DbFace is an efficient database driven applications development environment that helps you to create chart reports & dashboards applications via web. With the straightforward interface,you do not need to write PHP, HTML, CSS or other frontend/backend code to generate full-featured query applications, operation applications, and extensive report dashboard applications.
Who is DbFace for?
DbFace is right for you if:
Pull data from existing databases(SQL or NoSQL) and render them as tabular or charts
Clear and Instant way to make your databases accessiable
Build BI platform instantly
Convert SQL query to chart report (Visualize SQL query)
Much many more your database use-case
…
Mission Statement
Gives every user full control of their data instantly.
Or in short:
Liberate Data Application Platform
You already prepared your data for analysis? Your data might be stored in MySQL, SQL Server, PostgreSQL, Firebird/Interbase, Cubrid or even MongoDb. DbFace will pull your data from these data sources and show you chart reports (Pie, Line, Bar, Treemap and many other forms), dashboards, story reports or other types of applications.
DbFace is a cloud or on-premises solution, you do not need to download any software. Create an account on our website for free, and choose a subscription plan, then you will get all worked.
DbFace plugs directly into your databases and lets you build chart reports, dashboards, storyboards and many other database driven applications without programming.
DbFace is coinages from “Database” and “Face” composed, it can be used as a pretty face for your SQL/NoSQL databases or working as a database CMS solution.
Resources
Please follow us on Facebook or Twitter to get informed about the latest updates of DbFace.
If you have issues or inquiries, you can also post a new discussion at our forum.
1 - Getting Started
What does your user need to know to try your project?
The account is the only user credential to enter DbFace system. The DbFace account is comprised of username, password and e-mail address. You can sign in DbFace through username or e-mail address.
Sign Up
Use the browser to open DbFace website, Tap “Sign Up” link to enter the account registration page.
In this page enter your email address , username, password and click on the “Sign me up” button to create your DbFace account. Please make sure your email address is correct.
After the account created, DbFace will send you a welcome email, click the link in that email to activate your DbFace account.
You can also use Google or Facebook account to login directly (no need to register and activate).
Accessing DbFace
After the account was created, you can login DbFace system using your account. On DbFace website click on the “login” link to enter the login page. (If you choose the “Remember Password”
button, the system will record the encrypted account information in your current machine Cookie, in the next 30 days, opening the landing page will automatically enter the system).
If you want to use Google or Facebook account to log in, tap the corresponding social login button without entering account information.
Subscription Plans
DbFace provides 4 types of subscriptions and up to 14-days trial period. You can upgrade or downgrade your account at anytime.
Basic
Basic package includes 5 sub-account, create up to 2 database connections, and up to 100 applications.
Premium
Premium version does not apply the limitation to the number of sub-accounts, database connections and applications.
Enterprise
Enterprise version allows you run updated DbFace on a managed VPS host, we will keep your DbFace always updated. Cloud code, PHP reports and other advanced features are only available on Enterprise plan.
On-Premise
You can also host DbFace in your own environment with On-premise plan. On-premise license is lifetime, it means DbFace will never expired in your environment, but you still need to pay the upgrade fee (the license fee) to get the update after 1 year.
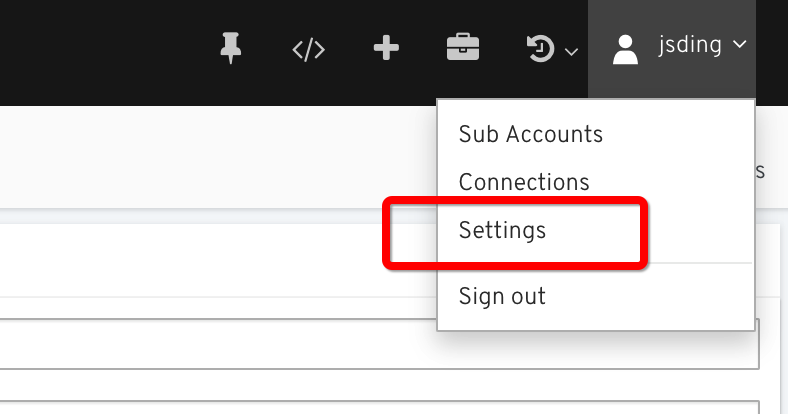
Click on “Settings” button in the current window, select the “subscription” tab to enter the subscription page. On this page, you can view your current subscription/trial
status and expiration date, you can also renew or modify your subscription.
Note: This page might be different depending on your region.
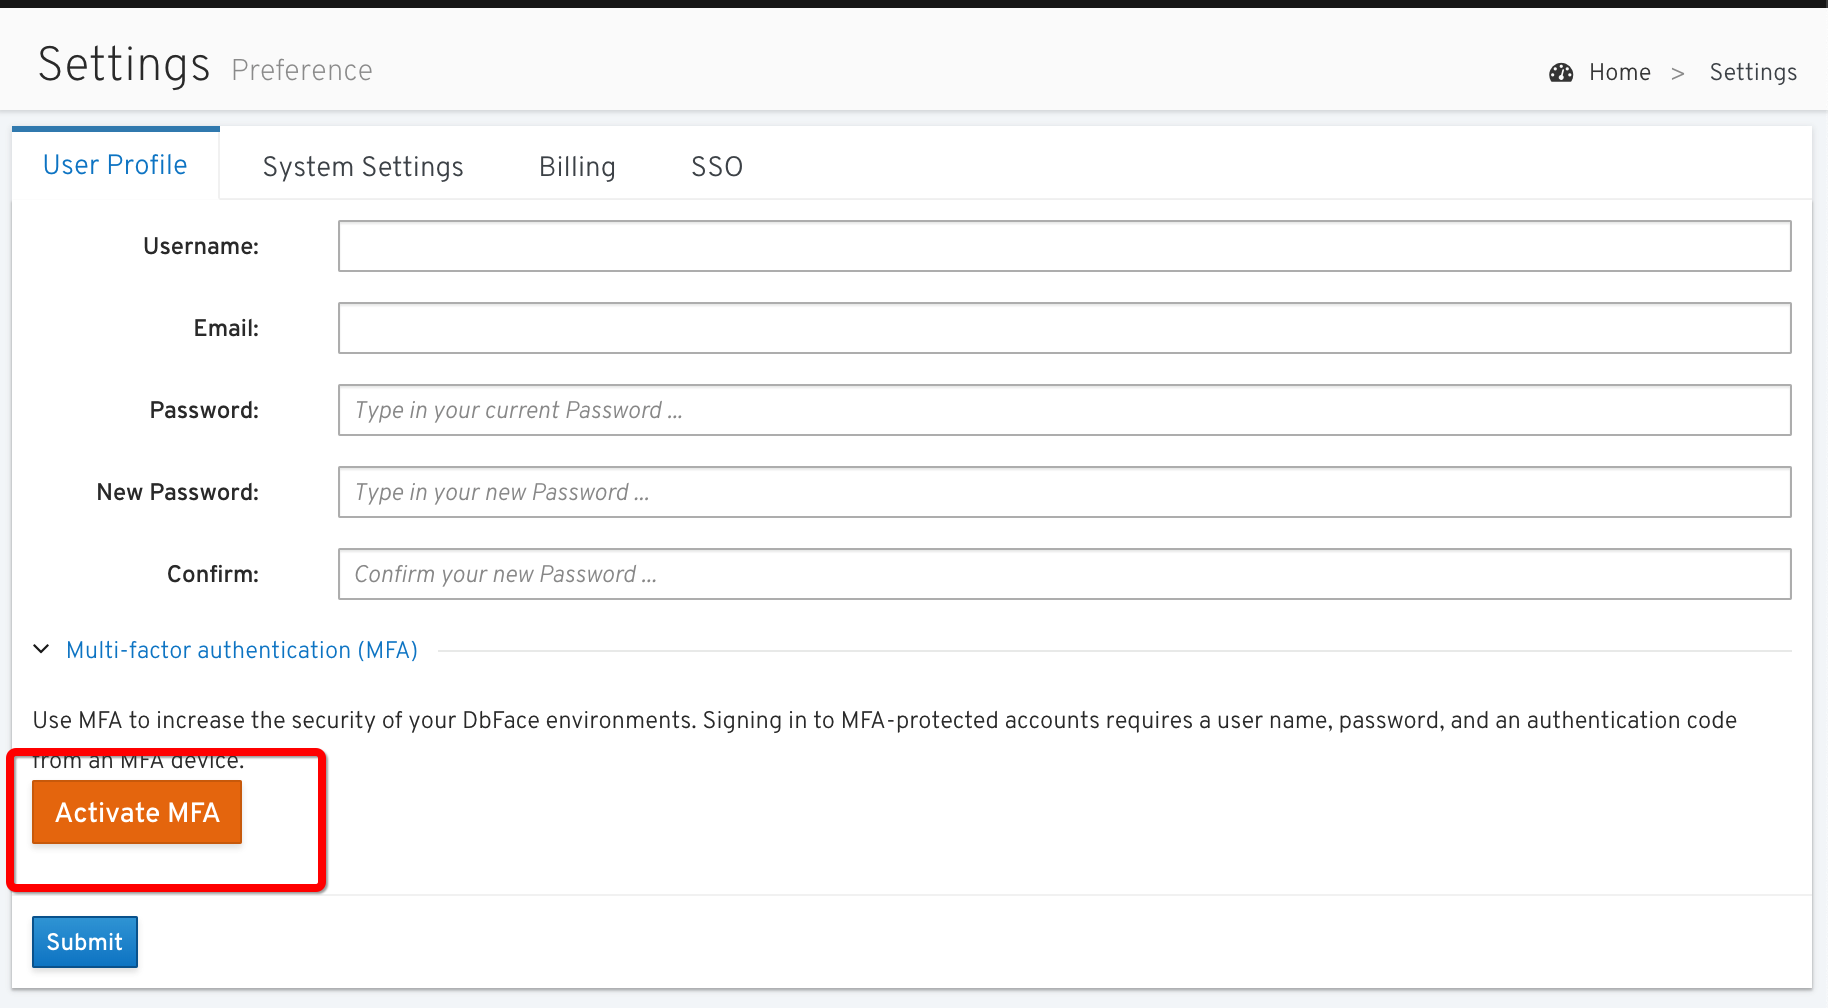
Edit Profile
Click on “Settings” and select “User Profile” to edit your user profile. You can change your password, your profile avatar, email, username on this page.
Cancel Account
If you do not want to use DbFace service anymore, you can cancel your account at anytime. The account information stored in DbFace server will be fully
deleted and unrecoverable, Please use caution.
When you cancel your account, we invite you to give us feedback so that we can improve our products. Your feedback will really help us make a better product for you and others like you.
Here is a video show you how to install DbFace On-premise on Docker:
If you already have prepared PHP5.3+(PHP5.3, PHP5.4, PHP5.5, PHP5.6, PHP7) webserver, you can also download DbFace zip file from the following URL, and install manually.
All DbFace applications data(sub-accounts, applications, settings, etc.) are stored in the user/ directory. You can backup the full user directory.
If you want to update to the latest version, you can copy the backup user directory to the new installation, all your DbFace data will be recovered safely.
1.1 - Install DbFace On-premises
Install DbFace On-premises.
Installation of DbFace is a trivial process. In fact, there is no real installation.
DbFace is a web product written by PHP. To install DbFace on your own environment, please make sure the following requirements:
To support all the features, DbFace requires PHP7.2.5+. However, you can still use most of the features on PHP 7.1+.
PHP7.2.5+ enabled webserver, such as Apache, Nginx, IIS, etc.
PHP extension: SQLite3.
PHP extension: IonCube Loader.
Database PHP extensions:
php_mysqli: Required for working with MySQL
php_pdo_pgsql: Required for working with PostgreSQL
php_pdo_firebird: Required for working with Firebird/Interbase
php_pdo_sqlsrv_72_ts: Required for working with SQL Server
php_oci8_11g: Required for working with Oracle
php_cubrid: Required for working with Cubid
php_mongodb: Required for Mongodb Support
Docker?
If you already known docker, we recommend you try our official docker version which already packed all components. Get DbFace Docker
Need help?
We provide free support on installing DbFace on your own environment. If you need help or have any questions, please drop us a mail: support@dbface.com.
Please follow the following instructure to install:
Step1: Uploading Files
Upload the corresponding product zip file (e.g. dbface_php7.2.zip) to your web folder.
Step 2. Uncompressing downloaded file
Unzip dbface product archive. If you do not want to use the default folder name, you can create your own and move all the files to your new folder.
Step 3. Setting Directory Permissions.
Make sure the following directories writable:
user
DbFace will store all files (logs, cache, temp etc.) in user/ directory, so please make sure user directory writable, 0755 should work well.
Step 4. Start the installation process.
open the browser and access the DbFace to start the installation process.
Example: http://server/dbface
If SQLite3 extension installed, DbFace will try it’s best to do the typical installation, otherwise, DbFace will ask you where to save it’s configuration.
The default Administrator username and password are admin/admin. You need to modify the account information to activate on-premise installation at the user profile page.
If you have issues or inquiries, you can also post a new discussion at our forum.
2 - Data Sources
DbFace supports MySQL, PostgreSQL, Clickhouse, Google BigQuery and most of SQL or NoSQL databases.
DbFace needs to get data from your database to display and manipulate. So DbFace needs to know how to connect to your database servers.
DbFace supports MySQL, PostgreSQL, Clickhouse, SQL Server, Oracle, Firebird/Interbase, CUBRID, MongoDB and other SQL/NOSQL database servers. You can also upload CSV files as data sources. For other data sources ( in-house data), you can create your own API connector or Data Source Plugin to make it work with DbFace.
Need Help?
We are always working on DbFace to support more database types, please let us know your databases, if you any issues with connecting to your data source, please drop us a mail.
Steps to Take Before Connecting
Ensure that the database is publicly addressable and currently up & running.
Verify that the database is not hosted on a local machine. DbFace cannot connect to databases hosted on local machines (e.g. laptops, PCs, etc.).
Ensure that DbFace supports the database type attempting to be connected. A list of supported integrations is available here.
Connect to database
To create a connection to your database, please login DbFace with the Administrator account, find the “Connections” section in the dashboard, there will list all the database connections you have created.
Click “Add new connection” button to enter “create a database connection” page:
Connect to database via DSN
We are always working on to support more database types.
Some database drivers (such as IBM DB2, 4D) might require a full DSN string to be provided. If that is the case, you should use the ‘dsn’ configuration setting, as if you’re using the driver’s underlying native PHP extension, like this:
Log in as Administrator, find the “Connections” section in the dashboard, click on “Edit” button, then enter the database connection editing page.
!!! warning
If your database schema changed, all applications will be affected.
Remove database connection
Log in as Administrator, find the “Connections” in dashboard page, click “Delete” button, After confirmation, the database connection will be removed.
!!! warning “Be careful”
Deleting a database connection will delete all applications using this database connection!
Sync data source
For API Connector, DbFace provides a quick way to sync the remote data to DbFace server on the fly.
After tapped the “Sync” button, DbFace will get the updated data from your server via the API Connector.
Default connection
Click the “Select” button to change the default database connection. DbFace will only show applications that using default connection in the left menu.
If you want to show all applications, you can change the option at System Settings page.
Tap Settings, and tap “Preference” menu
Select “System Settings” page
Find “Only show applications in default database connection.” and uncheck it
Click “Save Changes” to save your settings.
Manage database structure
For MySQL, CSV Files, API Connector data sources, DbFace provide database structure management tool.
MySQL is one of the most popular open-source databases in the world, used by some of the top companies everywhere.
To create a database connection to MySQL or MariaDB,
Log in DbFace with the Administrator account.
Find the “Connections” section, and tap “Add new connection” button
Select “MySQL or MariaDb” in the Database Type dropdown list.
Database Type:
The database driver that use to connect your database, here we choose “MySQL or MariaDB”. DbFace will use “mysqli” driver to connect to MySQL or MariaDB databases.
Name:
The name to identify this connection, used only in DbFace.
Host:
Your database host domain/IP. If you are not using the default port, should input host:port in the “Host” field.
Username:
The database username.
Password:
The database password.
Database Name:
The database that you want to connect. Tap the “Pick” button to populate all database names that have permissions.
Ensure that all information is correct, click “Submit” button, DbFace will use the provided information to try to connect the database and create the connection if successfully.
Congratulations! You have successfully built your first database connection.
Tips
We recommend you create a sperated username/password for dbface to connect to your database, for MySQL:
If you just want to create query applications which only access the databases in DbFace, please create readonly database user for the databases.
Hosted Amazon EC2 or RDS
When the server is hosted on Amazon AWS, but not on a VPC, the first step is to log into the AWS console as an admin. Afterwards, the database instance needs to be set as publicly accessible. A Security Group on your EC2 or RDS client will need to be configured to accept connections from DbFace’s IPs. The IP requirement is a CIDR/IP, and thus the IPs that need to be added are 52.221.20.99/32. After configuring this Security Group, it must be applied to the instance of the database that you are connecting.
2.2 - PostgreSQL
Connect to PostgreSQL in DbFace
Choose the database type from the “Database Type” drop down.
Database Type:
The database driver that use to connect your datatabase, choose PostgreSQL here.
Name:
The name to identify this connection, used only in DbFace
Host:
Your database host domain/IP. If you are not using the default port, should use host:port as your hostname
Username:
The database username.
Password:
The database password.
Database Name:
The database that you want to connect. The “Pick” button is not available for PostgreSQL connection.
For on-premise installation, you need to enable pdo_pgsql extension to enable postgreSQL database connection, check php.ini
extension=php_pdo_pgsql.dll
Ensure that all information is correct, tap “Submit” button, DbFace will use the provided information to try to connect to the database, and create the connection if successfully.
We recommend you create a sperated username/password for dbface to connect to your database, for MySQL:
create user 'thenewusername'@'52.221.20.99' identified by 'thenewuserpassword';
grant all privileges on thedatabase.* to 'thenewusername'@'52.221.20.99'
!!! tip “Recommend”
If you just creating query applications which only access the databases, please create readonly database users for the databases.
!!! note “Be careful”
Please update your server’s firewall to allow DbFace to connect to your database server. If you’ve got any issues, please contact us to get free support.
2.3 - Clickhouse
Connect to Clickhouse in DbFace
ClickHouse is a fast open-source OLAP database management system. DbFace the Http port (default 8123) to connect to clickhouse.
2.4 - Microsoft SQL Server
Connect to Microsoft SQL Server in DbFace
Choose the database type from the “Database Type” drop down.
Database Type: The database driver that use to connect your datatabase
Name: The name to identify this connection, used only in DbFace
Host: Your database host domain/IP. If you are not using the default port, should use host:port as your hostname
Username: The database username.
Password: The database password.
Database Name: The database that you want to connect
For SQL Server, make sure the PHP PDO SQLSRV extension loaded, check php.ini
extension=php_pdo_sqlsrv_54_ts.dll
please enter the SQL Server address in the host field, it should be like:
JSDING-WIN8\MSSQLSERVER2014
Ensure that all information is correct, click “Submit” button, DbFace will use the provided information to try to connect the database, and create the connection if successfully.
Congratulations! You have successfully built your first database connection.
!!! Tip “Recommend”
If you just creating query applications which only access the databases, please create readonly database users for the databases.
!!! note “Be careful”
Please update your server’s firewall to allow DbFace to connect to your database server. If you’ve got any issues, please contact us to get free support.
2.5 - Oracle
Connect to Oracle in DbFace
Choose the database type from the “Database Type” drop down.
Database Type:
The database driver that use to connect your datatabase
Name:
The name to identify this connection, used only in DbFace
Host:
Your database host domain/IP. If you are not using the default port, should use host:port as your hostname
Username:
The database username.
Password:
The database password.
Database Name:
The database that you want to connect.
For oracle, make sure the PHP oci8 extension loaded, check php.ini
extension=php_oci8_11g.dll ; Use with Oracle 11gR2 Instant Client
please enter the oracle SID in the host field, it should be like:
Ensure that all information is correct, click “Submit” button, DbFace will use the provided information to try to connect the database, and create the connection if successfully.
Congratulations! You have successfully built your first database connection.
!!! Tip
If you just creating query applications which only access the databases, please create readonly database users for the databases.
!!! note “Be careful”
Please update your server’s firewall to allow DbFace to connect to your database server. If you’ve got any issues, please contact us to get free support.
2.6 - IBM DB2
Connect to IBM in DbFace
IBM DB2
We are working hard on this section. It is coming soon!
2.7 - MongoDB
Connect to MongoDB in DbFace
Connect to MongoDB
Sign in DbFace with Administrator account, and tap “Add New Connection” in the dashboard.
After fillout all the required fields, click “Submit” button, DbFace will try to connect to
MongoDb with your input information. You will be redirect to the “Database Structure” page.
You can always click the “Views” button to enter this page.
Create Views
After connected to MongoDB, you need to create views using JSON query language.
Click the “Create View” button in the “Database Structure” page.
Click the “Save View” to open the “Save View” dialog.
Sync data to DbFace from MongoDB
Click the “Sync” button to update the MongoDb data.
You can make as many views as you want.
Build Applications for MongoDB
Now you can create application reports in DbFace like MySQL or any other databases.
2.8 - SQLite3
Connect to SQLite3 in DbFace
Since SQLite3 is a file based database, we do not provide SQLite3 support on the cloud version, but you can still connect to SQLite3 on the premise installation.
To create SQLite3 connection
STEP 1: Find the “Connections” section in the dashboard
STEP 2: Tap “Add New Connection” button
STEP 3: Select “SQLite3” in the Database Type drop down.
STEP 4: Enter the SQLite3 absolute path in the “Database Name” field. If your SQLite3 is password protected, please enter the username and password in the corresponding form fields.
STEP 5: Tap “Submit” button to save the connection
2.9 - Presto Db
Connect to Presto Db in DbFace
Presto Db
Presto is an open source distributed SQL query engine for running interactive analytic queries against data sources of all sizes ranging from gigabytes to petabytes.
With Presto, you can build visulization applications to Apache kafka and many other Presto supported connectors.
2.10 - Google BigQuery
Connect to Google BigQuery in DbFace
Google Big Query
We are working hard on this section. It is coming soon!
2.11 - Firebird
Connect to Firebird in DbFace
DbFace use PHP interbase driver to connect FireBird/Interbase database. You need to enable php-interbase extension. Open php.ini, and find
extension=php_interbase.dll
Click the Settings -> Connections and go to “Connections” section, click “Add New Connection” button, enter your firebird database information:
Your firebird database are powered by DbFace now.
2.12 - Cubrid
Connect to Cubrid in DbFace
DbFace use PHP CUBRID driver to connect CUBRID database. You need to enable php_cubrid extension. Open php.ini, and find
extension=php_cubrid.dll
Click the Settings -> Connections and go to “Connections” section, click “Add New Connection” button, enter your CUBRID database information:
Your firebird database are powered by DbFace now.
2.13 - Apache HBase
Connect to Apache HBase in DbFace
Apache HBase
We are working hard on this section. It is coming soon!
2.14 - Apache Cassandra
Connect to Apache Cassandra in DbFace
Apache Cassandra
Install DataStax PHP Driver
We use DataStax PHP Driver to connect to apache cassandra database. Please refer this linke to get how to install this driver:
https://github.com/datastax/php-driver
Install DataStax PHP Driver
git clone https://github.com/datastax/cpp-driver.git
cd cpp-driver
mkdir build
cd build
cmake ..
make
make install
pecl install cassandra
2.15 - Amazon DynamoDB
Connect to Amazon DynamoDB in DbFace
Amazon DynamoDB
We are working hard on this section. It is coming soon!
2.16 - CSV Files
Connect to CSV Files in DbFace
DbFace also supports uploading CSV files as datasource.
After uploading the CSV files, DbFace will show you a preview of your CSV File: fields, data types. you can edit the fields names and data types and click the “Submit” button to create the database connection.
DbFace will make a copy of your CSV files at DbFace server.
2.17 - API Connector
Connect to API Connector in DbFace
DbFace only supports relational data sources, but you can also refine your No-SQL or any other data sources and make them work with DbFace.
DbFace provides a flexible user defined data source API that allows the extraction of data that is not stored in a database or when there is no standard connector available.
You can create your own API connector to make any data sources work with DbFace.
DbFace will curl your data via the API connector and make a copy of the response.
You can always click the “Sync” button to let DbFace get the fresh data from your data source.
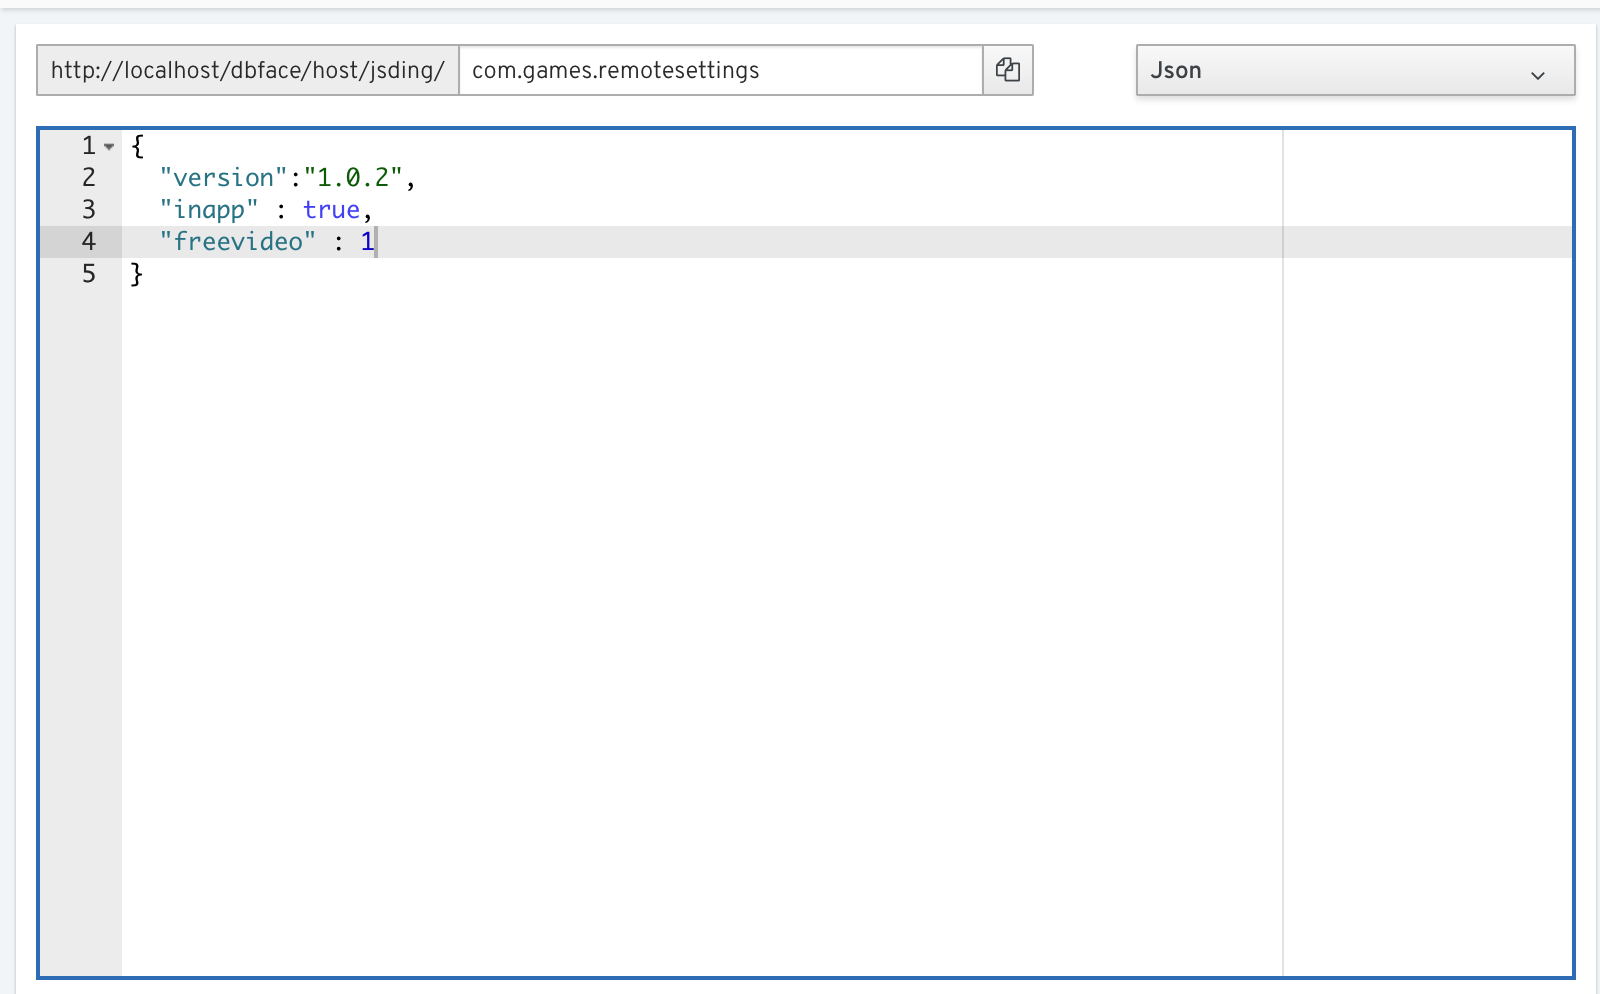
The API connector must fit the JSON schema for working with DbFace:
If you need help to make your own API connector, please contact us.
2.18 - Plugin Application Data
Plugin Application Data in DbFace
!!! Tip
Data Source Plugin only works on On-premises installation or Enterprise Plan.
If your data does not store in databases or even there is no data store. DbFace also works for your case with Data Source Plugin.
Write Data Source Plugin
Each data source plugin requires 2 entry files: plugin.setup.php and API.php
You can get the Sample Data Source plugin from:
https://github.com/jsding/dbface-plugins
plugin.setup.php
<?phpreturnarray('id'=>'sample_plugin','author'=>'DbFace','author_url'=>'https://www.dbface.com/','name'=>'Sample Data Source Plugin','description'=>'Sample data source plugin that help you build DbFace plugin that make your application work with DbFace. <a href="https://github.com/jsding/dbface-plugins">https://github.com/jsding/dbface-plugins</a>','version'=>'0.9.0','namespace'=>'Plugin\Datasource\Sample');
Name
Required
Description
id
Yes
Plugin ID (unique)
author
No
Plugin author
author_url
No
Plugin author website
name
Yes
The plugin name
description
Yes
The plugin description
version
Yes
The plugin version
namespace
Yes
The plugin php calss namespace
API.php
!!! warning “Please Note”
The API class namespace must be the namespace value in plugin.setup.php.
<?php// Must match the namespace value in plugin.setup.php
namespacePlugin\Datasource\Sample;/**
* Apache Log Analytics Plugin for DbFace - by DbFace
*
* @package plugins/datasources/apache-log
* @author DbFace
* @copyright Copyright (c) 2017 DbFace, Inc.
* @link https://www.dbface.com
* @since Version 1.0
*/classAPI{private$database;/**
* accept data source configuration
*
*
* @return array schemas array
*/publicfunctionsetup($config=array()){$this->database=$config['database'];}/**
* get schemas of this data source
*
*
* @return array schemas array
*/publicfunctionget_schemas(){// TODO: do your business and get the schemas finally
returnarray('sample_view1'=>array('fields'=>array('id'=>array('type'=>'integer','pk'=>1),'comment'=>array('type'=>'string'))));}/**
* get datas of this specific schema
*
* @return array datas of the schema
*/publicfunctionget_datas($schema){// TODO: do your business and finally get the resultset for $schema
$result=array(array('id'=>0,'comment'=>'this is string1'),array('id'=>1,'comment'=>'this is string2'),array('id'=>2,'comment'=>'this is string3'),array('id'=>3,'comment'=>'this is string4'));return$result;}}
Method Name
Parameter
Description
setup
$config
Pass the database configuration
get_schemas
void
Return all the views
get_datas
$shema
Return all json data of the specific schema
Use Data Source Plugin
Once you finished your data source plugin, place all the files in plugins/datasources folder, DbFace will scan all the subfolders and list all the available plugins in the Plugin category.
Now, we can make a new connection that use the plugin.
Field
Description
Database Type
The data source plugin name
Name
The name that identify the connection
Database Name
Internal name that will pass to plugin
Click “Submit” button, DbFace will create a new connection that use your data source plugin.
Click the “Sync” button to run the plugin.
!!! warning “Please Note”
Do not forget to click “Sync” button to let DbFace know the data source changes.
Now, you can use the data source to create report applications just like MySQL or any other database connections in DbFace.
2.19 - Microsoft Access
Connect to Microsoft Access in DbFace
Microsoft Access
Tip
Microsoft Access support was outdated and removed since V8.0. Please contact us for bringing it back.
Microsoft Access is only supported at on-premise installation on Windows. DbFace use PHP ODBC driver to connect to Access.
To connect to Access, you need to create ODBC data source first
On the User DSN tab or the System DSN tab, click Add to add a user data source or a system data source.
Now, you can use the DSN in DbFace on the Access connection page:
2.20 - Warehouse
DbFace internal warehouse
Warehouse
DbFace warehouse feature provides a way to do cross database reporting applications, even your database located at different hosts.
Warehouse Database Settings
DbFace stores all warehouse data in local SQLite3 database (the file will be created in dbface user directory). You can also configure it to existing remote MySQL database to gain better performance.
Click the gear icon button at the top right corner of Warehouse page,
At the popup dialog, change the hosting to Remote MySQL
Warehouse API
3 - Data Module
Access database tables.
After connected to a database, DbFace will create data module for the database connection. Data module lets you manage data as easy as possible.
Data module provides the functions such as CRUD (creating, updating, deleting), filtering, paging the original database table, etc.
DbFace built-in data module is powerful:
Navigation & Sort
DbFace provides a super easy way to navigate and sort table data page by page. Open the selected table:
Delete Row
To delete a row, click the “Delete” icon at the left, will remove the row.
The database table require a primary key to make delete function work.
Tip
The database table requires a primary key to support this feature.
Update Row
Double click the row data, will open the row updating dialog, at this dialog, change the row data, and click “Save Change” button to apply the row changes.
Tip
The database table require a primary key to make update function work.
Insert Row
At the table editor page, click the “New Record” link to open the row data editor, you can select a single row of data, DbFace will copy the seclected row data to the editor automatically.
After edited the row data, click “Save Change” button to apply this new row data.
Filter
Click the “Filter” button to open the filter condition editor.
Save filter conditions
You can save your frequently-used filter conditions.
Link tables
You might want to navigate to other tables by value, this feature helps you to do this easily.
Click the “Field Settings” link at the column, at the “Field Settings” page, select the table column your want to link, click “Save” button to apply this change.
After this change, the value will convert to link, click value to navigate to other table with the selected data value.
Field Formatter and Validatter
You can code your own formatter functions for fields in DbFace.
Click “Settings” and open the “Customization” page, select the “Functions(javascript)” tab, here you can code global javascript functions, DbFace will load these codes while page loaded.
We define a function that convert timestamp to readable date string.
Now you apply the “timestamp_to_date” function to an unix timestamp field.
Export Data
To export the current data, choose format, and click the corresponding button, you can export data to CSV, PDF and email.
Data Toolbar
Tap the data, DbFace will popup a smart toolbar that you can
Display data detail
Open Edit form
Copy the value to clipboard
Filter the table by this value
Column Background and Text Format
This section will learn how to define Background & Text Colors for a Column.
To format a column data, click the Dropdown icon and click Format menu.
You can set default column background color, text format or define background colors that apply under specified conditions.
The screenshot below is showing the Conditional Background Colors applied on Records in the Grid.
3.1 - MongoDB Data Module
View Mongodb connections in DbFace.
DbFace powerful data module also available on MongoDB. With Data Module for MongoDB, you can browser collections, edit collections data or filter on the fly.
4 -
How to build DbFace applications.
The Application builder workspace is where you build new applications and modify existing applications.
With the easiness Drag & Drop interface, you can build tabular report, summary reports, line chart, pie chart and many other application types in just some mouse clicks.
This section will show you how easy it is to build your own queries and charts using our intuitive drag & drop interface.
Basic Information
Connection:
The database connection that the application used. All applications require a valid database connection.
Name:
The application name, which is displayed in the main menu.
New:
Click the “New” button, redirect to “Setup new database connection” page.
Publish
Save Draft:
Save this application as a draft, draft application will not be shown in the left menu and can not be used in dashboard applications.
Preview:
Preview the current application.
Publish:
After you fixed all application issues, click the “Publish” button to set the application to published status. Published applications will be shown in the main menu.
Revision
DbFace will save all your application changes as revision, if you made a wrong change, and want to revert to the latest changes, click “Revision” button to open the change logs, find the right revision, and click the “Apply” button.
Form Builder
DbFace Form builder helps you generate user interface that produce query parameters. You can attach one form to any DbFace applications, including dashboard and storyboard applications.
To learn how to make a DbFace form, please follow the Form Builder section.
Visualization
DbFace provides many application types and counting. DbFace provides HTML report and PHP application, that you can define your own application templates.
Visualization Type:
Tap the corresponding application type button, the builder will be changed to corresponding application builder interface.
SQL Mode Checkbox:
SQL mode allows you to write custom SQL against your database. SQL Mode can be useful for complex queries that aren’t feasible in Drag & Drop Mode due to complex joins, subqueries, etc.
If you want to switch to SQL mode, click to check the “SQL Mode” checkbox, then you can write your SQL query in the SQL script editor.
Data Source
Select a table from the list, you can also join multiple tables to make a more complex data source.
Data source section only available in Drag & Drop mode, if you switch to Script mode, this section will be hidden.
Drag-drop Report Builder
Application Script
If you want to build application from scripts, Check the “Scripts” checkbox at the top corner of “Visualization”.
Additional Parameters
Additional Parameters option allow us to provide additional variables to current application script by an ini file.
Click the Additional Parameters button, DbFace will open an ini file editor, we input
; Additional variables for this application scriptevent_token=iap_purchasedpackage_name=com.flamingo.games
Now we can use event_token and package_name in the application script
Title:
The title will be displayed as application title. This is optional, if not defined, the application name will be used.
Description:
The application description, describe the application more detail. This is optional.
Custom Css:
You can add a CSS style to the application, You can define css class should be defined in Customization section.
Script:
Script allow you to add your own code to DbFace application. The javascript will run when application opened.
!!! Tip
Do not use the script tag in the Script text area; just enter your JavaScript.
** Chart Options:**
For chart report, you can define the chart height, the default value is 300px.
** Drilled In:**
For chart report and number report, you can define the application drilled in application. Only sub application can be drilled in.
Confirm Message:
Confirm Message only available for SQL Edit Application. It will be shown before the actural queries executed.
Category
The DbFace applications are organized by categories. If no category set, the Default category will be used.
** Sub Application** category is a special category. Sub-applications can not be opened directly, but you can embed them in container applications(dashboard, story, gallery).
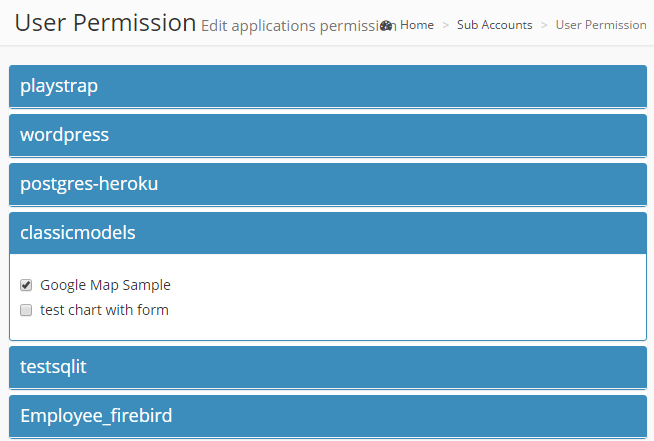
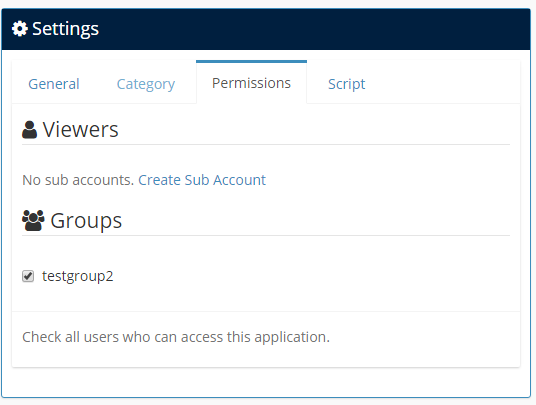
Permissions
Application user permissions section displays all sub-accounts under your account (developer accounts have permissions to all applications).
HTML Report Builder
HTML Report Builder provides a flexible way to make HTML report template as a DbFace application. You can embed Global parameters or Form variables in the HTML report template.
PHP Application Builder
PHP Application only available on Enterprise or On-premise installation.
If the default report types not work for you. You can define your own reports by PHP coding.
DbFace provides a raw PHP online editor, you can write your own PHP code there.
Dashboard Builder
Dashboard application allows you to have a instant view on your selected data. You can also make dashboard application using the Gallery Builder.
Story Builder
Story report allow you navigate DbFace applications page by page.
Gallery Builder
Gallery builder provides a flexible way to build gallery pages and dashboard applications.
Free Form Application Builder
Freeform display application is an advanced dashboard application type, Freeform display allows you combine applications, widgets(Text, Web page, Image) into one page, and combine pages in tabs.
Application comments
Comments are notes you attach to dbface applications that can be viewed by anyone who has access to the application.
Comments you’ve written in the past can be edited or deleted at any time.
4.1 - Application Script
DbFace application script.
DbFace script is purpose-built query language based on SQL, powered by smarty template engine (with YAML front-matter supported).
DbFace will simply split the queries by ;, and run theses queries one by one, and combine (join) all the result set into one result set.
If the big SQL query contains ;, and you want to force DbFace run the query by one batch, please add
{config-one-query} tag, or use one_query front matter.
Auto join multiple scripts query result, and combine them as one result
Using smarty template engine to extend SQL script achieves the function that user form variables can be dynamically inserted in SQL scripts and the scripts can be dynamically rewritten according to the input.
Before all the scripts submitted to the database, all the variables will be replaced with the value of the current form.
Form variable value can be applied to the script.
For example, a tabular report query application script:
The final statement may vary depending on the the choice of different data sources.
Tip
Script can also be used in drag & drop mode.Regarding about the filter condition value, you can also use the variable like
{$status}
For example:
About advanced usage of the script, please refer to Smarty template.
Form script
Form variables used in the script
Depending on the control, form controls may output two types of data: Single value and a value list.
Single value
Single Line, Multi Line, Drop down, and Radio Group submit only one value.
If it’s single value, please insert it into the scripts in the form** {$Field Name}** .
Considering a Single Line named Status, you can insert it into the filter condition or the scripts in the form {$status}. Such as:
selectorderDate,statuswherestatus='{$status}'
Please note: when this variable is included in the script, you need to add quotes. When parsing script, Dbface will not automatically determine the type of the field.
Multiple value
Checkbox and Multi Select will submit multiple value.
Multi-value control used in the filter condition is the same with Single value control, meaning that: a match to meet the conditons.
Multi-value control used in script mode is different from Single value control, such as the search condition.
...Wherestatus='{$status}'
Dbface will not retrieve the data, because {$status} is an array so that it will be forced to be converted to a string ‘Array’. The correct usage should be:
...Wherestatusin({$status|join})
{$status | join} Syntax will automatically expand and split this value.
Data Source script
Considering some form controls having limited value, such as DropDown, Multi Select, Checkbox, RadioGroup, you can use data source scripts to specify their limited value.
When executing, DbFace will dynamically execute data source script to get the value of form controls.
Data source script can output one or two fields, the remaining fields will be ignored.
If there are two fields: the contents of the first field as submitted value (data is applied in the script), the second field as the displayed value (data is only for display).
As
selectvaluefromtablewhere...
Or
selectkey,valuefromtablewhere...
To use the data source scripts, click the “Edit” button in Forms controls having limited value. Click the “Script” button in the edit box of pop-up window field, the input textbox “Data source script” will be displayed, where you can enter the data source script and save it.
** Do not forget to use the data source script generator, click on the generator icon behind the “script” button, all tables of current links and their fields will pop up. Check the required fields to generate queries.**
Form field onchange script
After editing the form field, you can set a query script. When the input is completed and the focus is lost, the script will automatically execute and fetch data form the final database. The data obtained will be mapped by name to the current form control one by one.
To change the script, click on the “Edit” button, the field property edit box pops up, click on the “Onchange Scripts” button, enter the script in the expanded textbox, then save it.
You can use the current form variable to change form field script.
## Form loading script
Users can specify a loading script (query) for user form to initialize the form data value.
After the application opened, DbFace will detect whether the current form has the loading script, if so, Dbface will automatically execute this loading script and map the query result to the current form one by one. If the query returns multiple data, Dbface will provide the “Browse” button, then you can select the required data for the form control value.
To create a form loading script, click the Form Editor “Properties” button, then the property editbox pops up, where you can enter the loading script and save it.
Tips
Script Plugins
DbFace provides many script plugins that help you to build complex application source.
config
You can use config function to assign variables to current application script.
{configkey1=value1key2=value2}
Now, you can use {$key1}, {$key2} in the application script.
For loading multiple fixed variables, you can also create ini file
DbFace will try to load the ini file and assigned all variables in the ini file.
To create ini file, please open Settings menu and click Cloud Code link, then click “Start Development Workspace”, then click “New File” in system folder.
create_variable
As you already known, you can create Global Variables in Parameters section. All available variables will be assigned in every appliction script.
You can also create local variable that only available in current application script.
value, sql, func and url should be (and only one) assigned.
value: assigned fixed value to {$local-variable-name}
sql: DbFace wil try to use the sql to query application database, and assigne the result set to {$local-variable-name}
func: DbFace will execute the function and assign the function result to {$local-variable-name}
url: DbFace will try to call the URL and assign the http response body to {$local-variable-name}
snippet
snippet plugin helps you refer tagged application script into current application script.
{snippetname='your-tagged-sql-query'}
purge_cache
Purge DbFace cache data.
{purge_cache}
Front-matter
Front matter allows you to keep metadata attached to an application. i.e., embedded inside a variable.
DbFace application script can contains a YAML front matter block.
We can attach a total widget at DbFace chart reports. If we do not specify Total Widget Script, DbFace will collect all series data and caculate the summary value for this widget. If the total widget script specified, DbFace will use the script to query series summary value.
Chart Detail Table
At Chart Options settings, check “Display Detail Table”, DbFace will display the original chart data source using tabular.
Table Calculated Fields
We can append new fields for table report using Caculated Fields in application script.
The result table will display fields using the sort_fields in front matter.
4.2 - Tabular Report
DbFace application script.
Tabular Report (Table View Report) displays the data in rows and columns, which is the easiest way to show the data. We offer many different options to customize how they appear.
Use a tabular report when you want to see the data in rows and columns.
You can also attach a Form to the tabular report.
Table format accepted
The tabular report accepts an unlimited number of measures and dimensions.No formatting restrictions.
Column 1
Column 2
Column 3
...
Row 1
Row 1
Row 1
...
Row 2
Row 2
Row 2
...
Row 3
Row 3
Row 3
...
...
...
...
...
## Interactive Mode
STEP 1: choose “Tabular Report” in “Visualization” section
STEP 2: Select or Join tables to make data sources
Select a table or join tables to make tabular data source.
STEP 3: Drag Select Columns from Field List
Select Columns:
The tabular report header titles
Order Columns:
The default order conditions, this field is optional.
Label Column:
You can click the field to label the column.
Make Custom Column
Click the dropdown of a column, and select “Custom” to make custom column.
STEP 4: Apply filter conditions
You can also use form variables or global parameters in filter condition, e.g. if the tabular has a form that contains a input field that named status, you can use {$status} value in the filter condition.
STEP 5: Preview the tabular report
Click “Preview” button to preview the tabular report, if there are errors, you need to correct them, and preview again.
STEP 6: Save the tabular report
Click “Publish” button to publish the tabular report. Click “Draft” button to save the current tabular report and you can edit later.
S Mode
Script mode provides you more flexible way to build tabular report.
Check the “Script Mode” checkbox to switch to Code mode to build tabular report. DbFace will try to generate correct SQL query(or JSON query for Mongodb) from the Report builder, but you still need to check the SQL query.
!!! tip “Tips & Tricks”
You can find more tips and tricks for tabular report at our knowledge base.
Tabular Options
DbFace provides several options to help you customize the table report appearance.
Table Header
Optional Scripts
Series Options
Drilled In Applications
Table Row Action
4.3 - Summary Report
DbFace application script.
Summary reports are similar to tabular reports, but also allow users to group rows of data,
Summary Report adds up the corresponding cell data of multiple reports which have the same structure and different data.
How to build Summary Report?
Like the tabular report, you can also build a summary report in Drag & Drop mode or Script mode.
Drag & Drop mode
STEP 1: Select “Summary Report” visualization type
STEP 2: Deside the Group and Summarized fields
You can summarized multiple fields.
STEP 3: Label fields and apply filter conditions
Choose appropriate label for fields, these label names will show as summary report header title.
STEP 4: Preview, correct issues and publish Summary Report
Click the “Preview” button to see what the summary report looks.
Script mode
Script mode provides a more flexible and advanced way to build summary report.
Check the “Script” checkbox to switch to Script mode, DbFace will try to generate SQL query that you already build, but you still need to correct it if contains issues.
Many results are presented in tables that can be pivoted interactively. That is, you can rearrange the rows, columns, and layers.
Pivot reports(Crosstab reports) provide another perspective on the same data you see in the list report.
Columns
Rows
Data
4.5 - Number Report
Build KPI Number Report Widget in DbFace.
DbFace provides “Number Report” to highlight a single data value, like total payment of all the orders, total customers in a quarter.
Use a Number Report visualization when you want to see the total for a measure or the count for a categorical column.
Table format accepted
Number report supports One column with one row, other rows and columns of the result set will be ignored.
Column 1
Single Value
Number report also supports Two columns with one row, it allows you to compare your Single Value against another value. It adds an up or down arrow next to the single value and shows the percent change, based on the comparison value.
Column 1
Column 2
Single Value
Single Value 2
How to build Number Report?
Interactive Mode
STEP 1: select “Number Report” visualization type
STEP 2: Choose field you want to highlight
Drag filed that you want to highlight to the “Select Columns” field. Only the first column will be used to summarized, other columns you dropped will be ignored.
Click the caret button, you can apply “Count”, “Sum”, “Avg” function to the column.
Click the selected column to change the label name of the field.
STEP 3: Preview to test and save.
After you finished your application, you can click the “Preview” button to see what the number report looks, correct any issues, and publish the number report.
SQL Mode
You can also build number report from SQL Query directly.
Click the “Script” checkbox at the top-right corner of “Visualization” section to switch to Script mode. DbFace will try to generate SQL query that you already built. But you might also need to correct issues.
Option: Script
For Number Report, you can define
function__format_label(label){varnewlabel=label;// TODO: apply format to the label
returnnewlabel;}
and
function__format_value(value){varnewvalue=value;// TODO: apply format to the value
returnnewvalue;}
function in the Script code area to format label and value of the number report.
Here is an example that bold the label and makes the value color to blue:
A pie chart (or a circle chart) is a circular statistical graphic, which is divided into sectors to illustrate numerical proportion. Displays tooltips when hovering over slices
Data format
Pie chart accepts two or more columns. The second through the last column must be numeric.
Dimension (X Axis)
Measure Y-Axis
...
Label 1
Row 1
...
Label 2
Row 2
...
Label 3
Row 3
...
...
...
...
4.7 - Column Chart
DbFace application script.
A column chart is a graphic representation of data. Column charts display vertical bars going across the chart horizontally, with the values axis being displayed on the left side of the chart.
Data format
Bar chart accepts two or more columns. The second through the last column must be numeric.
Dimension (X Axis)
Measure Y-Axis
...
Label 1
Row 1
...
Label 2
Row 2
...
Label 3
Row 3
...
...
...
...
4.8 - Application
DbFace application script.
The DbFace application is an available execution unit, could be a database query / operation, a form report, a summary report, a line chart,or a pie chart,etc.
DbFace applications include a user input form (optional), one or more execution scripts.
When users enter data, click the “submit” button, DbFace submits them to the target database to perform, then outputs corresponding data (such as data tables, summary tables, pie charts, line graph, etc.).
Dashboard and Story are special types of application. They can display more than one applications in one page.
DbFace supports the following application types:
Login as administrator or developer , the browser will display the application list, where you can edit or delete applications.
Edit application
In the application list, select the application you want to edit, click the “Edit” button to enter the edit page. When editing the application, you aren’t allowed to modify the data source.
How to edit application, please refer to “Application Builder” above.
Clone application
Click the “Clone” button to make a copy of the selected application.
Delete application
In the application list, select the application you want to delete, click the “delete” button, after confirmation the application will be deleted.
Share application
In the dashboard, tap the “Embed” button, DbFace will open the “Widgetize the application in your websites in an IFRAME” dialog, in this dialog, you can get the public URL of this application, please check the “Embed” button, copy the Direct Link or Embed Iframe code and click the “Confirm” button the save the settings.
Do not forget check the “Embed” checkbox, otherwise the Direct Link will not become active.
4.9 - Application Form
DbFace application script.
DbFace support to specify a form for the application to accept user’s input.
You can build DbFace form from Design Mode or Code Mode.
Drag & Drop Builder
DbFace has two major types of form controls: layout control and form control.
All form controls must be placed in layout controls.
Form fields
Single Line
Single Line allows the user to enter a single line of string data, the user can specify the data type in the property editor.
If you specify a data type, before form submission, Dbface will check the input items whether the input items are the specified type, if not, the form will not be submitted.
Date Range
You can input 2020-05-01 ~ 2020-06-30 to initialize the date range control. As default, Date Range control will use the last 30 days.
Multi Line
Multi Line allows the user to enter multiple lines of text.
Drop Down
Drop Down allows the user to select a data in a value list. Drop-down box needs to be specified the data source.
Radio Group
Radio Group displays a list of all the values, and allows the user to select one value as the form data to submit.
Checkbox
Checkbox displays a list of all the values, and allows the user to check multiple data to submit.
Multi Select
Multi Select displays a list of all the values, and allows the user to select multiple values to ??submit.
Static Label
Static label displays static data that can not be edited.
Text
The text control can be used as the form description. DbFace integrates CKEditor as rich text editor.
Form field Properties
To edit the form field properties, click on the “Edit” button, and open the property editor.
Label
Labels ar text items in front of form field, which can be used for user to identify this form field.
Name
Form field script name can be used as variables in application scripts by Smarty manner. Such as: {$status}
Required
This form field must be required. Before submitting, Dbface will check whether the value of this field is empty, if it is, the form will not be allowed to submit.
Disable
This item can not be edited. Users can not edit this item.
Data Sources
Only limited value form fields (such as Drop Down, Multi Select, Checkbox, etc.) have datasource options.
DbFace supports two kinds of ways to use the datasource: Enter value directly and mapping script. (“Unrestricted” is generally used to preview the script, in fact, generally do not use this.)
Enter value directly:
the user input datasource directly, one value per line.
The value supports “key: value” division format. If this format is detected, Dbface will automatically take the previous value as the form value,the succeeding value as data displayed in the form.
Value as a form before submitting value, the latter value data as displayed in the form inside.
!!! Tip
Do not forget to use the data picker to help choose the data from the database.
Mapping Script:
Users can use a query to set the data source.
Onchange Script
Onchange script is general SQL query script.
When the user completes the input and focus are lost, the scripts will be executed and the result will be mapped to the current form control.
Build Form from Code
If you need to build a form where Checkbox C is revealed If Checkbox B is Checked “No” or any combination of javascript actions and behaviors normally used in form building to make the Form “Smart”.
Diving into source code, you can build logic embedded into options & choices for Forms.
4.10 - Bar Chart
Create Bar chart in DbFace.
A bar chart or bar graph is a chart that presents grouped data with rectangular bars with lengths proportional to the values that they represent.
Like all DbFace charts, bar charts display tooltips when the user hovers over the data.
Data format
Bar chart accepts two or more columns. The second through the last column must be numeric.
Dimension (X Axis)
Measure Y-Axis
...
Label 1
Row 1
...
Label 2
Row 2
...
Label 3
Row 3
...
...
...
...
4.11 - Category
application category.
DbFace organizes all the applications by categories. The default category name is “Default”. All the applications that do not have a category are automatically attributed to the default category.
Create category
Log in as Administrator, find “Category” in the Dashboard. You will find all categories in “Category” section.
On this page, enter a category name, cofirm “Create a new directory” button to create a category. Category names are not allowed to be duplicate.
For convenience, when creating or editing an application, you can also make a new category name for it.
Edit category
In the category list, click the category name, a small window will pop up, where you can modify the category name.
Enter a new category name, then confirm.
You can also specify or update the icon of the cateogry.
Delete category
To delete a category, click the “Delete” button in the category list. Don’t worry, delete the category does not lead to delete the applications in the category.
All applications in the deleted category will be automatically moved to the default category(Application).
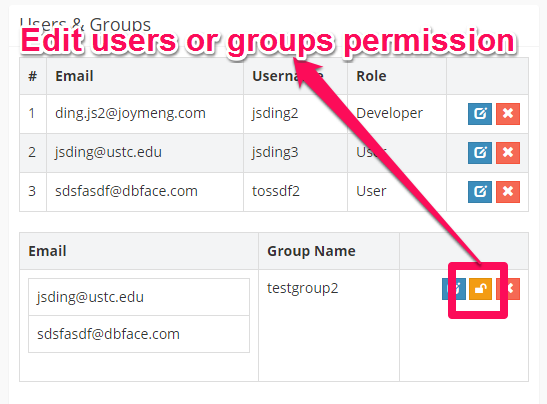
Edit category permission
DbFace categories are virtual folders that organize applications. Edit category permission does mean bulk edit application permissions that in the category.
Tap the “Edit user permissions” button to open a dialog that list all user accounts under your account.
4.12 - Form Library
DbFace application script.
Form library tool helps you fetch other application forms into the current application, so you do not need to build a form again and again.
Open Form Library
Click the “Form Library” button to open Form Library dialog. Form Library dialog will display all forms you have created (draft or published).
Preview Form
Click the Eye button to preview the form
Choose Form
Click the Correct button to fetch the form into current application
The Form library only displays forms that in the same database connection.
4.13 - Navigation Features
DbFace application script.
4.14 - Parameters
DbFace application script.
Parameters are used to store values that can be obtained in applications.
Parameters (Variables) are reusable pieces of information that can be created once and used in multiple places, such as filter conditions, SQL queries, and HTML applications. DbFace store includes a large number of predefined attributes, and also gives you the ability to create your own custom variables.
You can define fixed or dynamic variable(by SQL query or Code) in this section, all variables can be used in all applications.
If you bind a connection to the parameters, these parameters will be only available in applications that using the connection.
Define Global parameters
Tap the “Parameters” menu to open the “Global Parameters” page.
Create new parameter
Tap “Create new parameter” button to open the “Create new parameter” dialog. DbFace supports fixed and dynamic parameters.
Fixed Value
Dynamic Value
Please notice that DbFace only supports single value. DbFace will execute the SQL query, and make the dynamic value equal the first row and first field value.
If SQL query only return 1 field and 1 row, the column data will treated as the value, other then, the resultset associate array will be the dynamic value.
TTL
You can specified a TTL (time to live) value for dynamic value, DbFace will refresh the value when the time expired automatically.
If you want to force build the dynamic value, you can click the “Refresh” button at the parameters list page.
Public global parameter
You can access “Public Global Parameter” in external webpages without having to log in DbFace. Each public paramater has a public URL. i.e.
Tap the “Edit” button to open the “Update Parameter” dialog. In the dialog, you can edit the parameter settings.
Remove Global Parameter
Tap the “Delete” button to remove the global parameters.
Refresh Dynamic Parameter Value
You can tap the “Refresh” button to force DbFace to refresh dynamic parameter value. Since fixed value never changes, this function is not available for “Fixed Parameter”.
Use Global parameters
You use “Global Parameter” in DbFace applications just like the form field.
Use dynamic array value
Predefined Variables
DbFace also store several predefined variables that you can use directly.
Variable
Value
_now_
Current timestamp
_date_
Current date (2016-12-08)
_account_name_
The current login username
_account_email
The current login user email
_today_
date('Y-m-d')
_today_minus_7_
date('Y-m-d', strtotime('-7 days'))
_today_minus_30_
date('Y-m-d', strtotime('-30 days'))
_today_plus_7_
date('Y-m-d', strtotime('+7 days'))
_today_plus_30_
date('Y-m-d', strtotime('+30 days'))
_first_day_of_month_
date('Y-m-01')
You can also predefined variables on on-premises version, open config/config.inc.php and edit predefined_variables entry
You might also want to define dynamic predefined variables in hooks.php, find api_get_predefined_variables function in config/hooks.php
数据字典
4.15 - Table Editor
DbFace application script.
!!! note “Depreciate”
We generated Table Editor Applications for every tables automatically when the database connected. So you do not need create table editor application anymore.
Table editor provides the functions such as CRUD (creating, updating, deleting), filtering, paging the original database table, etc.
DbFace built-in table editor is powerful:
Navigate data by page
Sort by field(multi-field)
Delete the line
Open line editor
Insert line: the user selects a single row of data, then open the line editor, Dbface will copy the seclected row data to the editor automatically. Very convenient.
Filter data by field. Click the “Filter” button to open the filter condition editor.
To build complex dbface applications, you might need to do not only one query to the target databases, some of them to fetch values, and use this values in the result application script.
A line chart or line graph is a type of chart which displays information as a series of data points called ‘markers’ connected by straight line segments.
Here is a video that showing you how to build a chart report:
Data format
Line chart accepts two or more columns. The second through the last column must be numeric.
Dimension (X Axis)
Measure Y-Axis
...
Label 1
Row 1
...
Label 2
Row 2
...
Label 3
Row 3
...
...
...
...
4.18 - Scatter Plot
DbFace application script.
A scatter plot, scatterplot, or scattergraph is a type of mathematical diagram using cartesian coordinates to display values for two variables for a set of data.
Data format
Scatter plot chart accepts two or more columns. The second through the last column must be numeric.
Dimension (X Axis)
Measure Y-Axis
Measure Y-Axis 2
...
Label 1
Value 1
Value 2
...
Label 2
Value 1
Value 2
...
Label 3
Value 1
Value 2
...
...
...
...
...
4.19 - Area Chart
DbFace application script.
An area chart or area graph displays graphically quantitive data. It is based on the line chart. The area between axis and line are commonly emphasized with colors, textures and hatchings.
Data format
Area chart accepts two or more columns. The second through the last column must be numeric.
Dimension (X Axis)
Measure Y-Axis
Measure Y-Axis 2
...
Label 1
Value 1
Value 2
...
Label 2
Value 1
Value 2
...
Label 3
Value 1
Value 2
...
...
...
...
...
4.20 - Bar Line Chart
Create bar line chart in DbFace
Bar Line Charts use a bar and a line to visualize a data set with both a continuous and a categorical metric.
Data format
Bar line accepts three or more columns. The second through the last column must be numeric. The last column will be considered as line chart.
Dimension (X Axis)
Measure Y-Axis
Column 3
...
Label 1
Row 1
Row 1
...
Label 2
Row 2
Row 2
...
Label 3
Row 3
Row 2
...
...
...
...
...
4.21 - Word Cloud
DbFace application script.
Use a word cloud visualization when you want to see a text-based visualization of a given column. The text height represents the scale. The name itself is the different members of the column.
Data format
Word Cloud accepts two columns with multiple rows. The second column must be numeric.
Column 1
Column 2
Label 1
Row 1
Label 2
Row 2
Label 3
Row 3
...
...
4.22 - Funnel widget
DbFace application script.
Funnel charts are a type of chart, often used to represent stages in a sales process and show the amount of potential revenue for each stage. This type of chart can also be useful in identifying potential problem areas in an organization’s sales processes. A funnel chart is similar to a stacked percent bar chart.
Data format
Funnel widget accepts two columns. The second column must be numeric.
Dimension (X Axis)
What to measure (Y Axis)
Label 1
Row 1
Label 2
Row 2
Label 3
Row 3
...
...
4.23 - Treemap chart
DbFace application script.
Use a treemap visualization to identify patterns and exceptions in a large, complex data asset.
Data format
Treemap chart accepts two columns with multiple rows. The second column must be numeric.
Column 1
Column 2
Label 1
Row 1
Label 2
Row 2
Label 3
Row 3
...
...
4.24 - Radar Chart
DbFace application script.
As known as: Spider Chart, Web Chart, Polar Chart, Star Plots.
Radar Charts are a way of comparing multiple quantitative variables. This makes them useful for seeing which variables have similar values or if there are any outliers amongst each variable. Radar Charts are also useful for seeing which variables are scoring high or low within a dataset, making them ideal for displaying performance.
Each variable is provided an axis that starts from the center. All axes are arranged radially, with equal distances between each other, while maintaining the same scale between all axes. Grid lines that connect from axis-to-axis are often used as a guide. Each variable value is plotted along its individual axis and all the variables in a dataset and connected together to form a polygon.
4.25 - Gauge widget
DbFace application script.
A Gauge widget is a simple status indicator that displays a needle that moves within a range of numbers displayed around its edge.
Data format
Gauge widget supports One column with one row, other rows and columns of the result set will be ignored.
Label
Gauge Value
4.26 - Google Map
DbFace application script.
Google Map report allows you to create markers on google map report.
Data format
Google Map report accepts two or more columns.
Address
Marker Description1
Marker Description2
...
USA
Description1
Description1
...
UK
Description1
Description1
...
...
...
...
...
DbFace uses Google Maps Geocoding API service to decode the address field to real GEO locations. If the query result contains “lat” and “lng” fields, DbFace will use these two fields as geo location for each data.
lat
lng
Marker Description1
Marker Description2
...
80
-80
Description1
Description1
...
50
-50
Description1
Description1
...
...
...
...
...
...
You can also use JSON string in address field:
Lng & Lat
Marker Description1
Marker Description2
...
[80, -80]
Description1
Description1
...
[80, -80]
Description1
Description1
...
...
...
...
...
or
Lng & Lat
Marker Description1
Marker Description2
...
{lat: 80, lng: -80}
Description1
Description1
...
{lat: 80, lng: -80}
Description1
Description1
...
...
...
...
...
How to build a Google Map Report?
Follow the steps below to create a Google Map report.
Click the “Create New Application in Admin Console
Login in DbFace with Administrator or Developer accounts. and click the “Create New Report” button in the application list section.
Select “Google Map Report”
In the report builder page, find the “Visualization” section, and click the “Google Map” icon to start building Google Map report.
Select Google Map Report Type
Drag “Address” Fields
Drag the map address fields to “Address” fields, you can drag 1 or more fields to create detail map address
Drag “Markers” Fields
Address and Markers fields for Google Map Report in DbFacePHP
The settings will create the following Google Map Report:
You can also build Google Map Report in SQL Query Mode.
The first column will treat as the “Address” field and other columns treat as markers fields.
Google Map Options
__get_map_options
DbFace uses this function to override the default Google Map Options.
Please refer Google Map Options to get information about Google Map Options.
Here is an example that configure the initial Map zoom level to 16.
Query Snapshot Application helps you save current query resultset snapshot. You can view all snapshots of query result sets by date time.
You can monitor your Query result sets time by time using Query Snapshot Application.
Flat List View
Calendar View
!!! warning
The snapshot size is limited to 1KB, please double check your requirement. If you want to use larger snapshot size, please contact us.
How to build a Query Snapshot Application?
This section will show you how to build a Query Snapshot Application to monitor your query result sets.
Step 1: Choose the “Query Snapshot Application”
Step 2: Build SQL Query
Build SQL Query using the Drag&Drop wizard
Write SQL Query directly
You can also build your SQL Query directly in Application Script Editor.
Step 3: Publish
Input the “Application Name”, and click “Publish” button to publish the application. Now, the new created Query Snapshop Application should be available on the dashboard page.
Using Query Snapshot Application
Capture a Snapshot
Tap the “Capture Snapshot” button to capture the result sets of the query.
Remove a Snapshot
Tap the “Delete” button to remove the snapshot.
Flat List View and Calendar View
You can view snapshots in flat list view and calendar view mode.
4.28 - Calendar application
DbFace application script.
Calendar application displays query data in a full calendar.
How to build Calendar Application?
You can create calendar application in Drag & Drop mode and Script mode.
STEP 1: select “Calendar Application” in Visualization section
Please click the “Calendar Application” button to open the Calendar Application Builder.
STEP 2: Choose a base date field.
Drag the date field from the left field list top the Date field. If your fields do not contain “Date” field, you can also format string field to “YYYY-mm-dd HH:ii:ss” to get correct result.
You can only drag one date column to the Date field.
STEP 3: Choose the data fields
Drag the data fields from the left field list.
Script mode
You can also build calendar applications in Script mode.
Tap the “Script” checkbox to switch to Script mode, DbFace will try to generate correct query you already built.
Your SQL query’s first column should be Date field or date formatted field.
SQL Edit Application allows you execute one or more SQL queries one by one. These SQL queries usually used to update table data.
Typical SQL Edit Application are composed of
User input form (optional)
Confirm message
SQL queries
When opened an SQL Edit application, DbFace displays the user input form. The user fills the form, click on “Submit” button, the confirmation message (input data can be contained) will be displayed.
Click on the “Confirm” button, DbFace will execute the scripts line by line, and show the final execution result.
DbFace tries to execute all scripts in a transaction. Only all the scripts are executed, all the queries will be committed, otherwise the queries will all be rolled back. (The database should support transaction feature.)
How to build an SQL Edit Application?
This section will show you how to build an SQL Edit Application in DbFace.
Step1. Choose the “SQL Edit Application”
At the “Visualization” section, choose the “SQL Edit Application” type
Step2. Build a form
Build a Form, which allows application users input required information. Here, we build a form that contains a textbox named “licensecode”.
Step3. Write SQL Edit queries
Now, you can edit the SQL Edit Application queries, you can use the form fields by Smarty template manner.
Step4. Input Confirm Message
Enter a confirm message for the SQL Edit application, you can also use form fields’ variables by Smarty template manner.
Now, you have built an SQL Edit Application in DbFace.
4.30 - HTML Report
DbFace application script.
An HTML Report lets you create a custom report using HTML, inline CSS, and one or more series of data.
DbFace provides a full-featured HTML editor, users can edit the content on the fly. HTML also supports dynamic contents by Smarty template engine.
You can define variables in the “Parameters” section, and use these variables in HTML reports to build dynamic pages.
4.31 - PHP Application
DbFace application script.
If the other report types not work for you. You can define your own reports by PHP coding.
Notice
PHP Application only available on On-premises installation or Enterprise plan.
Tips
If you want to disable this application type, you can open config/config.inc.php and set disable_phpreport entry to FALSE.
DbFace’s PHP development environment is based on CodeIgniter Framework, so you can benefit from all CodeIgniter features especially the Database Active Record.
Sign in DbFace with Administrator or Developer account. Click the “PHP Application” button in the “Visualization” section. DbFace workspace will show you PHP code editor.
Input your PHP code, and press CTRL + Enter or click Preview button to preview the PHP application.
Controller-View Application
DbFace already integrates Smarty template engine.
Create smarty template
Tap Settings -> Cloud Code to enter cloud code page, click the “Create Template” button to create new smarty template:
Here, we build a simple sample Smarty template, we use [{}] as the variable delimiter:
DbFace is a general platform to visualize any data from any data source, including application data. Chain application allows you create json response in your existing application system (which might writen JAVA, Python, PHP, etc.) and visulize them in DbFace.
Chain Application Settings
At the Application Builder page, click the “Chain Application”, DbFace will display Chain Application Settings section:
Application URL
DbFace will post (or get) application data from the Application URL. You can use http:// or https:// schema to get your remote application. You can also use file:// schema to get static files in DbFace public directory.
You can use variables in this area. You can define applicationURL variable in the Global Parameters, and input {$applicationURL}.
Form Query
Additional form data.DbFace will post the form data to the Application URL. Global parameters are also accepted in this input field.
Callback
If leave this setting empty, DbFace will try to show the application type depends the response data.
How to make chain application?
4.33 - Story report
DbFace application script.
Story report helps you navigate sub reports page by page smoothly via carousel component.
4.34 - Column based Dashboard Application
DbFace application script.
Dashboard application allows you to have an instant view on your selected data. Dashboards are a simple way to organize together and manage multiple charts that share the same underlying data.
Dashboard application can seamlessly integrate the above-mentioned three types of applications into a single page.
DbFace provides full-featured layout editor that allows users to drag and drop existing applications to the layout.
DbFace uses a simple clean way to arrange the applications in a dashboard. It provides 9 kinds of layouts(and counting), you just need to choose one layout for your dashboard, and drag & drop reports in the dashboard to build new dashboard.
!!! Tip
Gallery Builder also provides a flexible way to build dashboard applications.
To build a dashboard application:
check “Dashboard Application” in the Visualization section
Change dashboard layout
Tap the “Change dashboard layout” button to choose a appropriate layout template for your dashboard.
Place reports into the dashboard
Tap the “Add a widget” button to explore all existing applications
Here is a sample dashboard:
4.35 - Gallery application
DbFace application script.
Gallery builder provides a flexible way to build gallery pages and dashboard applications.
Gallery application provides a fluid container that you can place applications, menu items in sections.
Gallery Application: Application Menu Links
Gallery Application: Dashboard
Gallery Builder
1. App/Link
Displaying applications directly or displaying application menu link.
2. Change background Color
Change the menu link background color, this option does not affected if displaying application directly
3. Choose application icon
Change the application icon, only available displaying menu link.
4. Expand the size
Expand the section size
5. Reduce the size
Reduce the section width
6. Remove the application
Remove the application from the container
7. Add new application
Add new existing application into the container. The new placed application will append into the container.
8. Open the application in new page or dialog
Click to swith the application opened style.
4.36 - Predefined Script Application
DbFace application script.
Build DbFace application by TOML scripts.
4.37 - Query Application
Build DbFace applications for SQL Guru.
Query Application
Query Application is the most simple workflow to build application by SQL in DbFace. We type SQL and choose an application type, then all set down.
5 - Coding
DbFace allows you creating your own API by PHP for public access. DbFace use CodeIgniter Framework to provide a flexible PHP development environment.
Create or edit Cloud code
Sign in DbFace with Administrator or Developer account
Tap “Settings” -> “Cloud Code”
You will see all available cloud code you already created in the selected database connection.
Tap the “Create API Code” button to create a new API code.
API Name: this will be the Public URL for accessing the cloud
Disabled: if you want disable the public URL temporarily, you can check the “Disable” checkbox
Open: open the cloud code in debug mode
Save Changes: after editing the cloud code, do not forget click “Save Changes” button to save the cloud code
Access Cloud Code
You will find the cloud code public URL in the list page.
Cloud Code Alerts
Cloud Code Alerts can be configured to run either on an interval or at a scheduled time.
To run a Cloud Code Alert on an interval, select the interval option and choose from every 10 minutes, 30 minutes, 1 hours, 4 hours, 12 hours, or 24 hours.
By selecting the ‘Schedule’ option, cloud code alerts can be set to run at a specific time in specific timezone.
You can change the timezone at config/config.inc.php file
Cloud Code Alerts can be disabled by turning off the “Enable Alerts” switch under the Cloud Code footer.
!!! tip “Please Notice”
Cloud Code only be available on On-premises installation or Enterprise plan.
Templates
You can also create your own Smarty templates that can be used in Cloud Code or PHP Report.
!!! tip “Please Notice”
Use {$ and } in templates. We already put predefined variables, parameters and other global variables into the smarty instance.
Use templates in Cloud Codes
We already create $smarty variable and put all available variables into the smarty instance.
You can also use $db variable that point to your current database connection.
$smarty->display('my-template.tpl');
Use templates in PHP reports
$smarty->display('my-template.tpl');
Scheduled Jobs
As default, All scheduled jobs are executed by 10 minutes. You can drag the “Drag” icon to order the scheduled jobs.
Triggers
User Login
/**
 * Trigger function when user sign in DbFace successfully.
 *
 * @param $params
 *
 * @return bool
 */
function _trigger_login($params) {
  return TRUE;
}
Pre Application
/**
 * trigger function before user execute an application
 *
 * @param $params: appid, creatorid, userid
 */
function _trigger_pre_application($params) {
  return TRUE;
}
Post Application
/**
 * trigger function after user execute an application
 *
 * @param $params: appid, creatorid, userid
 */
function _trigger_post_application($params) {
  return FALSE;
}
Custom Menu for Viewers
You can define custom menu for viewers in DbFace by an editable YAML file.
DbFace Modules
DbFace modules are pure php applications that be able to installed in DbFace. You can install DbFace modules as DbFace menu items.
So we can access these php applications in DbFace navigation system.
5.1 - Auto Load Code
Auto Load Code.
DbFace will load all auto load code globally. So all functions defined in auto load code will available in all scripts.
We can define auto load code and use the php function in them in Parameters, then use them in DbFace application or create elastic dashboard widgets.
5.2 - Coding workspace
DbFace Coding Workspace
DbFace integrates full featured PHP project editor that you can define cloud code directly using web browser.
To open the IDE, click Settings, tap Cloud Code menu item, and find the “Start Development Workspace” button,
the IDE will open.
5.3 - FAQs
DbFace Coding FAQs.
DbFace Coding FAQs
DbFace provides many internal PHP and javascript functions to help you access the features, we list functions that you can use in your PHP or HTML report here:
PHP Functions
You can use PHP functions in PHP reports or Cloud Code.
import_var
PHP function to get global parameters value created in DbFace
<?php// get all global parameters created in DbFace
$vars=import_var();// get total lost user value
$var=import_var('total_lost_user');?>
import_db
PHP function to get database connection object to specific connection
Your installation URL should be https://apps.dbface.com/[your-payment-name]. To use your own domain for the DbFace installation, please open a new ticket at our ticket system.
5.7 - Query Builder
Query Builder.
Query builder helps you generate complex SQL query without direct coding work.
It takes just a few clicks to add conditions and build the query. No complex SQL constructs to deal with - just a visual interface that looks like a human language sentence.
You can open DbFace Query Builder in the following page:
Tap the “Query Builder” button in SQL Workshop
Tap the “Query Builder” button in the application builder page.
5.8 - Query Stats
Query Stats.
Query Stats
Query stats page shows you the latest queries and queries performance. Click Settings, tap Query Stats, DbFace will go to this page.
Start Time
The query start time
Query
The query statement, if the statement is too long, click the icon to display the whole statement
Elapse(s)
Seconds to get the query result. We can use check this field to get bottlelack of the application.
5.9 - Remote API Monitor
Remote API Monitor.
We are working hard on this section. It is coming soon!
5.10 - Script Library
As the same as the Form Library, you can also reuse the script queries of other applications using the same database connection.
** Open Script Library**
Tap the “Script Library” button at the top corner of Application Script Editor will open the Script Library.
** Preview Script**
At the opened Script Library dialog, Click the “Info” button will highlight the Script Query.
Copy Script into the current application
Double click the Script will paste the selected script query into the application editor.
5.11 - Snapshots
Snapshots.
Snapshots
Snapshots allow you backup and recover full work in DbFace.
To view snapshots files, click Settings and click “Snapshots” menu item.
You will see all existing snapshots.
Create Snapshot
DbFace will collect all current work in DbFace, and zip them in a zip file. You will find snapshot files in user/snapshots directory.
Upload Snapshot
Upload snapshot file into DbFace. You can use the feature to move snapshot file created in other installation into this installation.
Download Snapshot
Download the snapshot zip file. We recommend you download import snapshot files and backup in multiple places.
Recover Snapshot
Recover DbFace from the snapshot file, DbFace will create snapshot file from current state automatically.
Delete Snapshot
Removed the snapshot file.
5.12 - SQL Terminal
SQL Terminal.
SQL Terminal helps you to execute and test SQL query on the fly.
Click the “SQL Terminal” button to open SQL Terminal dialog:
5.13 - Story board
Story board.
We are working hard on this section. It is coming soon!
5.14 - Table Row Action Script
Table Row Action Script
Table Row Action Script
We can use table row action script to add additional buttons for each row of tabular report.
Create Table Row Action Button
Action button label
Application Type
Application script when clicking the table row button
When user click the action button, all columns of the row will pass to the application script.
5.15 - Notebook
A short lead description about this content page. It can be bold or italic and can be split over multiple paragraphs.
Notebook
We are working hard on this section. It is coming soon!
5.16 - Optional Script
All DbFace application contains one main script. You can attach more optional scripts in one DbFace application. DbFace will render other scripts in tab. When user click optional script tab, the option script will executed to render the application.
6 - Working with Application
Working with Application.
Login as Administrator or developer , the browser will display the application list, where you can edit or delete applications.
Edit application
In the application list, select the application you want to edit, click the “Edit” button to enter the edit page. When editing the application, you aren’t allowed to modify the data source.
How to edit application, please refer to “Application Builder” above.
Clone application
Click the “Clone” button to make a copy of the selected application.
Delete application
In the application list, select the application you want to delete, click the “delete” button, after confirmation the application will be deleted.
Share application
In the dashboard, tap the “Embed” button, DbFace will open the “Widgetize the application in your websites in an IFRAME” dialog, in this dialog, you can get the public URL of this application, please check the “Embed” button, copy the Direct Link or Embed Iframe code and click the “Confirm” button the save the settings.
Do not forget check the “Embed” checkbox, otherwise the Direct Link will not become active.
7 - Embedding
Integrate DbFace into your own environment.
7.1 - Bundle Product
The “product” feature allows you re-package applications created in DbFace as a standalone web product.
Web product works as a standalone application which has its own URL, brand, menu, and login system. You can even choose a prebuilt theme for the web product.
Product Builder
DbFace provides you a super easy way to pick existed applications and combine them into menu items.
Sign in DbFace with the administrator account. Tap the “All Product” icon at the right-top corner. You can see all the web products under your account.
Tap the “Create new product” button to enter Product builder interface, if you want to edit the existing web product, tap the “Edit” button.
Settings
Name
The web product internal name. If you do not provide Brand name, it will also be considered as the brand name.
URL
The web product URL suffix. DbFace will generate the web product URL based on the DbFace installation and the web product URL field.
Description
The web product description text.
Design Theme
DbFace provides several prebuilt color themes for your web products. You can even custom the final product theme based on the prebuilt theme by editing CSS code.
User Logins
Select the “Public” radio button, web product does not require user logins to access all the applications. If your DbFace installed on a public web server, that means anyone can access these applications in the web product.
Active this product
The web product can not be accessed until you check the “Active this product” checkbox.
Applications
In the “Applications” section, you pick applications under your account and combine them into menu items.
Misc Settings
Brand
The web product brand name.
** Brand URL**
People tap the brand will open the brand URL.
Menu Type
Use static and fixed top navbar.
Menu Position
Place the menu left or right.
Container
The application container responsive fixed width or full width of the viewport.
Styles
You can use CSS code and Javascript to customize the behavior of the web product.
Your CSS code will override the default styles.
The javascript code will be loaded and executed after the web product loaded.
Preview Area
!!! tip
Please notice that the preview area does not show you the REAL look of the web product. You need to click “Preview” button to see what the web product looks in actuality.
Preview & Save
Tap the Preview button, you can check what the web product real look. You need to input URL field in the settings section before you tapping the Preview button.
Tap the “Save” button to save the web product. You can find the web product URL in the list page.
7.2 - Single Sign On
Enable SSO in DbFace.
SSO allows you access DbFace without having to log in. Users can log-in DbFace with their username and password from an existing backend system
DbFace implements Single SignOn using JWT (JSON Web Token), JSON Web Tokens are an open, industry standard RFC 7519 method for representing claims securely between two parties.
You are required to develop and expose an HTTP endpoint (SSO login URL) which will pass login information to DbFace.
Request flow
This is SSO happens:
You embed DbFace IFrame Link into your web page.
DbFace IFrame Link will redirect to SSO login URL (HTTP endpoint implemented by you and hosted on your domain)
Your HTTP endpoint valid current login status, and make JWT object which includes the user’s email and name. You redirect to DbFace IFrame Link with token parameter, the token value is just the JWT object.
DbFace will unpack and valid the JWT object and full authenticated and final redirect into DbFace.
Enable SSO in DbFace
To enable SSO in DbFace, sign in DbFace with Administration account, click Settings -> Preference -> SSO.
Here is a sample SSO login URL implemented by PHP:
// The DbFace IFrame Link will be provided by the ssocallback parameter
$ssocallback = $_GET['ssocallback'];

// SSO Secret Token configured in DbFace
$key = 'SSO Secret Token';

// JWT PHP library: https://github.com/firebase/php-jwt
require(APPPATH."third_party/php-jwt/vendor/autoload.php");

// the email and name should already created in DbFace
// Your DbFace account or sub-account
// rand field make token unique everytime
$token = array(
  'email' => 'my-email@my-company.com',
  'name' => 'my-name',
  'rand' => time()
);
$jwt = JWT::encode($token, $key);

// OK, now we redirect to the DbFace IFrame Link with the token parameter
redirect($ssocallback.'?token='.urlencode($jwt));
Token Definition
Field Name
Description
email
Required: the email address of the signed in user
name
Required: The username of the signed in user
permission
Optional: permission of the signed user, user or developer, no affect to the existed user
group
Optional: user group, no affect to the existed user
password
Optional: password for the created user, no affect to the existed user
Create DbFace Account via SSO
You do not need to create SSO account in DbFace one by one. Only View and Developer account can be created.
$token = array(
  'email' => 'my-email@my-company.com',
  'name' => 'my-name',
  'permission' => 'user or developer',
  'group' => 'user group name: optional',
  'password' => 'specified password, if not set, will generated random',
  'rand' => time()
);
$jwt = JWT::encode($token, $key);
If DbFace does not find account by email and name, it will create this account with a random password automatically.
To disable this feature, please open config/config.inc.php and edit
// auto create user, please attach permission field: developer or user
$config['sso_autocreate_account'] = FALSE;
7.3 - REST API
REST API.
DBFace API Access
To configure DbFace API Access, please click Settings -> API Service.
Enable
Enable or disable API service.
Public
DbFace API will be public available if switch on. DbFace will NOT check the master key if set to public.
Master Key
If set to Public, the master key will not be used. To use the API key, you must put the following into the header for your query:
HTTP-X-DBFACE-AUTH:
IP Whitelist
Only ip in the ip whitelist able to access DbFace API.
7.4 - dbface-helper.js
If you want to embed applications, cloud codes, products, variables created in DbFace into your external webpages. DbFace provies you an effective way:
You can always access dbface-helper.js with the URL below:
<!-- if already include jquery, please remove this line --><scriptsrc="https://assets.dbface.com/jquery.js"></script><scriptsrc="https://assets.dbface.com/dbface-helper.js?v=7.7"></script>
If your pages already includes jquery, you can remove the jquery line.
Here is a sample page that embeding web product into app_container:
<html><head><!-- if already include jquery, please remove this line --><scriptsrc="https://assets.dbface.com/jquery.js"></script><scriptsrc="https://assets.dbface.com/dbface-helper.js"></script></head><body><divid="app_container"dbface-root="https://dashboard.dbface.com/"dbface-widget="product"dbface-pid="p_58469fc4f4218"></div></body></html>
DbFace helper will create an iframe and insert into the DOM. If the dom is and iframe tag, it will modify the src to the application embed URL.
Embed dbface application via dom attributes
<html><head><!-- if already include jquery, please remove this line --><scriptsrc="https://assets.dbface.com/jquery.js"></script><scriptsrc="https://assets.dbface.com/dbface-helper.js"></script></head><body><divid="app_container"dbface-root="https://dashboard.dbface.com/"dbface-widget="app"dbface-app="C6B478EE13E11927E0968CD405DEFF9E"></div></body></html>
<html><head><!-- if already include jquery, please remove this line --><scriptsrc="https://assets.dbface.com/jquery.js"></script><scriptsrc="https://assets.dbface.com/dbface-helper.js"></script></head><body><divid="app_container"dbface-root="https://dashboard.dbface.com/"dbface-widget="variable"dbface-team="admin"dbface-valuename="now"></div></body></html>
<html><head><!-- if already include jquery, please remove this line --><scriptsrc="https://assets.dbface.com/jquery.js"></script><scriptsrc="https://assets.dbface.com/dbface-helper.js"></script></head><body><divid="app_container"dbface-root="https://dashboard.dbface.com/"dbface-widget="code"dbface-team="admin"dbface-code="all_players"></div></body></html>
<html><head><!-- if already include jquery, please remove this line --><scriptsrc="https://assets.dbface.com/jquery.js"></script><scriptsrc="https://assets.dbface.com/dbface-helper.js"></script></head><body><divid="app_container"dbface-root="https://dashboard.dbface.com/"dbface-widget="product"dbface-pid="p5846a13c25da9"></div></body></html>
This section explains on how to customize the DbFace by changing the organization name, header logo, favorite icon, email logo, time zone, and date time display formats.
DbFace can be rebranded/white-labeled with the organization name, header logo, favorite icon, email logo, time zone, and date time format.
8 - Elastic Dashboards
Elastic Dashboards.
The DbFace application is an available execution unit, could be a database query / operation, a form report, a summary report, a line chart,or a pie chart,etc.
DbFace applications include a user input form (optional), one or more execution scripts.
When users enter data, click the “submit” button, DbFace submits them to the target database to perform, then outputs corresponding data (such as data tables, summary tables, pie charts, line graph, etc.).
Dashboard and Story are special types of application. They can display more than one applications in one page.
DbFace supports the following application types:
Login as administrator or developer , the browser will display the application list, where you can edit or delete applications.
8.1 -
DbFace Data Board
Data Board is a simple way to put html snippets, variables and other JSON format data into dashboard application.
9 - Administration
9.1 - Command Interface
Connect to MySQL or MariaDB in DbFace
DbFace Command Interface
9.2 - Configuration
DbFace provides many configuration items to make it work as you like.
DbFace provides many configuration items to make it work as you like.
Logo
You can change the logo at the left top area. The default is text: DbFace. Image (HTML code) is allowed here. for example:
<img src="//www.dbface.com/logo.png"/>
will place the logo image at the left top.
Language
We are working on supporting more languages now.
If you want DbFace supports your local language, you can download the language file and translate every entries into your language, and sent it to support@dbface.com. After confirmation, we will make this language file to your DbFace instance.
IP Whitelist
If your have a fixed IP or IP ranges, we recommend you set the IP whitelist. After setting the white list, the non-white list IP addresses access to your account or sub-account will be rejected.
To set or modify the whitelist, please log in as an administrator, the current user information click on the small window in the upper right corner of the “Settings” button to open the “System Settings” tab,
Fill IP whitelist, save the changes take effect.
192.168.0.1-192.168.0.24,211.157.2.99′
you may have known, only 192.168.0.1 ~ 192.168.0.24 and 211.157.2.99 allowed to access the service.
The ip whitelist supports different formats.
Network ranges can be specified as:
Wildcard format: 1.2.3.*
CIDR format: 1.2.3/24 OR 1.2.3.4/255.255.255.0
Start-End IP format: 1.2.3.0-1.2.3.255
!!! note
If you set your current IP to non-whitelist eventually, you will not be able to access DbFace. Please contact support@dbface.com to request to reset your whitelist information.
Skin
You can choose 12 color skins. Try them and choose the skin you like.
Menu position
The default menu position is left, you can also make the menu at top position.
Welcome page
Welcome page is used for Users sub accounts. You can also set an application report in the welcome page.
Embed Protection key
At some cases, you need protection for embedded charts. Ideally should be option so checks if authenticated. Only want logged in sessions on you site to see embedded. However don’t want to have users go to dbface but instead should be through our admin backend on site.
You need to add the following key into session to allow your website to embed dbface applications
$_SESSION['_EMBED_KEY'] = 'YOUR-PROTECTION-KEY';
This configuration only available on On-premise version.
Disable SQL Edit application
SQL Edit application allow you create application that modify database tables vis SQL Query, if you do not want this application feature, you can disable in server configuration file.
Open config/config.inc.php and edit:
$config['disable_sql_edit_application'] = TRUE;
Disable PHP application
PHP application allows you create applications that can do anything on your webserver. You might want to disable this feature for security reason.
Open config/config.inc.php and edit:
$config['disable_phpreport'] = TRUE;
Disable public access parameters
You can enable access global parameters defined in DbFace publicly. If you do not want this feature, you can disable in the server config file.
We also provides many options to allow you customization on the server side. You can open config/hooks.php file and write your own hook functions to customize the DbFace behavior.
_hook_fc_start_
This function allows you inject any initialize code into DbFace.
function _hook_fc_start_() {
  date_default_timezone_set('America/Los_Angeles');
  define('ENVIRONMENT', 'production');
}
config/functions.php
Define your functions in config/functions.php, all functions defined in this file can be accessed in cloud codes or PHP report applications.
<?php// define your custom functions here
// all functions can be used in the Cloud Code
9.3 - Context Selector
Connect to MySQL or MariaDB in DbFace
9.4 - Data Dictionary
Connect to MySQL or MariaDB in DbFace
9.5 - DbFace Plugins
Connect to MySQL or MariaDB in DbFace
Plugins
A plugin is a piece of software containing a group of functions that can be added to a DbFace application. They can extend functionality or add new features to your DbFace applications.
DbFace plugins are written in the PHP programming language and integrate seamlessly with DbFace.
Register Plugins
At the Settings Panel, switch to Script tab, and click Application Plugin to list all available plugins.
Create Plugin
How Plugins works?
Each DbFace application plugin contains a getSubscribedEvents function, DbFace will call this function to initialize the plugin, and call the event function when executing at that point in core. Here is an example.
When DbFace running at a specific point in the execution of Core, DbFace will fire an event to run plugins. Plugins can hook at this point, get all data in event parameter, modify data, and write back the modified data into the event return object.
onApplicationInitialized
onPluginInitialized
onAppTemplateInitialized
onAppQueryResult
Use this hook to modify the result set of application query result. The following plugin will modify all data to test. You can also append new field at this point.
Script Library - Reuse application scripts that created in other applications
9.7 - SQL workshop
Connect to MySQL or MariaDB in DbFace
Many DbFace users request to add a SQL workshop for database connections, so they can test SQL scripts on the fly. you can find SQL Workshop in the database connections section.
Here is a video that shows how the SQL workshop work.
Open SQL workshop
To open SQL workshop, click the “SQL Workshop” button in the connection list table.
You will enter the SQL workshop page.
SQL Terminal
Click this button to open the SQL Terminal tool, SQL Terminal provides a easy way to fire SQL query.
Query Builder
Quer builder helps you drag to generate SQL query, so you do not require handy work to create SQL query.
Publish
Publish the SQL Query to exchange marketplace, so you can pick it later in the application builder interface.
Tag SQL Query
You can name the SQL query in the SQL Editor. All named SQL Queries will be listed in the tagged group.
Double click the SQL query in the tagged group will copy the SQL Query into the SQL Editor.
You can pick out the Tagged SQL query in the application builder page in the Script Library dialog.
9.8 - config.inc.php
Raw configuration for webmaster.
The config.inc file
The config.inc file, found in your user/data directory contains special settings for to your own DbFace installation. This file is unique to your installation and it’s the only file in the script that you need to edit.
!!! tip “Enterprise Plan”
If you are using Enterprise Plan, please edit the config.inc.php file and send to support@dbface.com. We will be arranged to upload the config.inc.php file to your DbFace installation.
; ini file to config dbface installation// Auto detect the Base URL$config['dbface_app_url_base']=FALSE;// use the default timezone$config['default_timezone']=date_default_timezone_get();// the default schema cache is never expired (seconds) 0: disable cache$config['cache_schema']=3600;// report never auto expired (seconds), 3600 means 1 hour, 0: disable cache$config['cache_app']=3600;// the sql query cache ttl$config['cache_sql_query']=600;// the app process will be termiated 60s$config['ExecTimeLimit']=60;// Max memory 64M for each app execution$config['MemoryLimit']="64M";// the generate app access URL ttl, false: never expired, number: timeout to expired$config['ttl_access_url']=FALSE;// hide the online support widget$config['enable_onlinesupport']=TRUE;// if use the database to store session data$config['sess_use_database']=FALSE;if ($config['sess_use_database']) {$config['sess_save_path']='df_sessions';} else {// session save path, comment this, if you want use the default folder in php.ini$config['sess_save_path']=FCPATH.'user'.DIRECTORY_SEPARATOR. "cache";}// default category name$config['default_category_name']='Default';// default data category name$config['default_data_category_name']='Data';// menu style: normal or horizontal// you can also overwrite this settings in System Settings (dropped)$config['menu_style']='normal';// Use your Google Appkey to generate Google Map$config['google.appkey']='AIzaSyBImzyugJzPWt1cQC0bWbUznaVUIc805eU';// the max rows for picked sample data$config['max_sample_rows']=100;// Enable error_report, the error does not include any app data$config['enable_error_report']=TRUE;// define the default title of DbFace$config['df.title']='DbFace - Online Application Builder for Any Data Source.';// the assets URLif ($config['production']) {$config['df.static']="//d3krtd5frfbrx5.cloudfront.net/assets/v79";
// thirdparts assets URL, set this to gain better performance
$config['assets_base_url'] = '//d3krtd5frfbrx5.cloudfront.net/assets/v79';} else{$config['df.static']="./static";
// thirdparts assets URL, set this to gain better performance
$config['assets_base_url'] = './static';}$config['product_assets_url']='//d3krtd5frfbrx5.cloudfront.net/assets/v79';// DbFace will use third part cdn to improve js loading performance$config['use_assets_cdn']=TRUE;// product base URL, if FALSE, we will detect automatically based on the installation$config['product_base_url']=FALSE;// checkpoint max_size bytes$config['cp_max_size']=1024;// enable / disable gravatar$config['enable_gravatar']=TRUE;// disable PHP report$config['disable_phpreport']=FALSE;// hide edit application$config['disable_sql_edit_application']=FALSE;$config['disable_public_access_parameters']=FALSE;$config['Access-Control-Allow-Origin']=FALSE;// DbFace only access public schema, you can also switch to other schema for pgsql database only// Since V6.6, you can add schema option for pgsql database$config['pgsql_default_schema']=FALSE;// if password mismatch 3 times, the ip will blocked 24 hours, set FALSE disable this feature$config['daily_retry_login_times']=50;$config['daily_retry_login_time_duration']=86400;// the max num of last opened apps$config['history_app_num']=6;// max favorite num$config['favorite_app_num']=10;// enable ipwhitelist, set to FALSE to disable ip whitelist check$config['enable_ipwhitelist']=TRUE;// If you want to use DbFace to create database for you, enable this// let dbface create database in your hostdb$config['enable_createdatabase']=TRUE;// AUTO: for self host, dbface will use sqlite3, otherwise will use the hostdb conguration.$config['hostdb']='AUTO';// whether creating new database user for the newly created database$config['create_sperated_user_for_hostdb']=TRUE;// the created database user host, % for any location, or set ip address for security// $config['hostdb_user_host']='localhost';// predefined variables$config['predefined_variables']=FALSE;// Login logo settings// position: left | right | center | hidden, hidden will hide the navbar at login page// array(// 'url'=> '//www.dbface.com',// 'position'=> 'right',// 'img'=> $config['df.static'].'/website/dbface_logo.png'// );$config['login_logo_settings']=FALSE;// Additional css files (for remote customization theme)// you can get the css url from DbFace Support Team (Licensed User + Gold Support)// the css file will include to override the default style$config['customer_additonal_css']=FALSE;// default tooltip border width$config['chart_tooltip_border_width']=1;// allow forget password on the login page for all users$config['allow_reset_password_on_premise']=TRUE;// USE CAUTIOUS// force reset the username & password to this entry string// if you have forgot the admin password, please set this entry to reset password// and do not forget recover to false // sample// $config['force_reset_accounts']=array(// array('email'=> 'admin@dbface.com', 'passowrd'=> 'my new password')// );$config['force_reset_accounts']=FALSE;// MongoDb list collection parameters$config['mongo_options_listCollection']=array();// crontab schedule date timezone$config['crontab_schedule_timezone']=date_default_timezone_get();// crontab execution key$config['crontab_execution_key']='6193rW3iTjXo7N3S27t2I2GA6OJjo03S';// world map name map$config['worldmap_namemap']=array();// The email settings for sending reports or notification// The function mail() in Cloud Code also use this settings// we already binding a public smtp settings, if it not work for you, please use your own // mail server settings// uncomment the email_settings email_settings_from will override the default smtp server/*$config['email_settings']=array(
'useragent' => 'dbface',
'protocol'=> 'mail',
'mailpath' => '/usr/sbin/sendmail',
'smtp_host'=> '',
'smtp_user'=> '',
'smtp_pass'=> '',
'smtp_port' => '25',
'crlf' => '\r\n',
'newline' => "\r\n",
'mailtype' => 'html',
'smtp_crypto' => "ssl",
'validate' => false,
'charset' => 'utf-8',
'wordwrap' => true);*/$config['email_settings_from']=array(
'from'=> 'support@dbface.com',
'name'=> 'DbFace',
'reply' => 'support@dbface.com');// capture service URL// If you have Gold Support, you can use your own capture service$config['capture_service_url']="http://capture.dbface.com:8891/";// capture app access key$config['app_access_key']='dbface@accesskey!j';// default ttl (seconds) for URL parameter$config['default_parameter_ttl']=3600;// check update automatically$config['check_update']=TRUE;// internal db that store mongodb and plugin cached data// set to FALSE to use the default sqlite3 implementation// The user should be able to create new database/*$config['internal_cache_db']=array(
'dsn' => '',
'hostname'=> 'cache_db_host',
'username'=> 'root',
'password'=> '',
'database'=> 'mysql',
'dbdriver' => 'mysqli',
'dbprefix' => '',
'pconnect' => TRUE,
'db_debug' => TRUE,
'cache_on' => FALSE,
'cachedir' => '',
'char_set'=> 'utf8',
'dbcollat' => 'utf8_general_ci',
'swap_pre' => '',
'autoinit' => FALSE,
'stricton' => FALSE,
'failover' => array());$config['internal_cache_db_by_connid']=array();*/$config['internal_cache_db']=FALSE;// enable Tsv format, use excel to open the csv file, use UTF-16LE encoding, if set to FALSE, use UTF-8$config['csv_excel_compatible']=TRUE;if ($config['csv_excel_compatible']) {$config['export_csv_settings']=array(
'delimiter' => "\t",
'newline' => "\n",
'enclosure' => '"'
);} else {$config['export_csv_settings']=array(
'delimiter' => ",",
'newline' => "\n",
'enclosure' => '"'
);}// enable or disable command api, default FALSE// command api allow user to create account or other jobs via /cmd/action URL$config['enable_command_api']=FALSE;// This field should not empty if enabled command api, appenc key=$command_security_key to let DbFace protect the command api$config['command_security_key']='';// check user access app permission$config['strict_check_user_permission']=TRUE;// Form date and datetime format$config['form_date_format']='YYYY-MM-DD';$config['form_datetime_format']='YYYY-MM-DD HH:mm:ss';// disable google analytics$config['disable_analytics']=TRUE;// invite colleage email subject$config['invite_colleages_subject']='Welcome to DbFace - It is amazing to have you on board!';// app max revision$config['max_app_revision']=50;// use this config to encrypt the connection password// set to FALSE, will use plain text to store the connection password$config['db_password_encrypt']=TRUE;// use for encrypt/decrypt the connection password, if FALSE or empty, people will find the database connection password without encrypt in sqlite3 file$config['connection_encrypt_key']='dbface.conn.2018';// enable/disable dbface api$config['feature_dbface_api']=TRUE;// enable context selector in the menu bar// administrator and developer can select connection id as context$config['enable_conn_context_selector']=TRUE;// cron job executor: pageview or crontab (default crontab)$config['cronjob_executor']='crontab';// cron job executor interval seconds$config['cronjob_executor_interval']=600;// enable mobile access$config['enable_mobile_viewer_access']=TRUE;// account access url ttl$config['account_access_url_ttl']=86400;//$config['chain_app_access_key']='6193rW3iTjXo7N3S27t2I2GA6OJjo03S';// email titles$config['email_title_forgotpassword']='DbFace password';// use estimate row count for mysql innodb large tables$config['estimate_table_rows_for_innodb']=FALSE;// directory for saving snapshots, FALSE: disable this feature$config['snapshot_dir']=USERPATH.'snapshots'.DIRECTORY_SEPARATOR;// proxy to connect remote database, used in connected: Google Big Query$config['https_proxy']='127.0.0.1:1080';// Table Row Action Header$config['row_actions_header']='Actions';// IP2LOCATION_DATABASEdefine('IP2LOCATION_DATABASE', USERPATH . 'data'.DIRECTORY_SEPARATOR.'IP2LOCATION-LITE-DB3.BIN');
9.9 - Customization
Page customization.
Header Template
You can define javascript code, javascript includes, style codes in Header template to customize and extend DbFace. DbFace will simply include the header template content in HEAD tag.
!!! Tip
Style codes in header template will overwrite the default settings.
To define your own Header template
STEP1: Expand the Settings menu
STEP2: Click “Customization” menu
STEP3: Edit the Header Template
STEP4: Click the “Save Changes” button to save your header template.
Functions(javascript)
Functions section allows you define your own javascript codes for DbFace. These functions are loaded globally, it means you can use them in every applications.
To define your own Javascript Functions
STEP1: Expand the Settings menu
STEP2: Click “Customization” menu
STEP3: Select the “Functions(Javascript Tab)” and enter your code there
STEP4: Click the “Save Changes” button to save your Functions.
We do not offer CSS/Javascript support or training directly, but there are a TON of great resources on the web to get you started into learning more about HTML, CSS and Javascript. There is a learning curve, but they are very valuable and reusable skill.
!!! tip “Tips & Tricks”
You can find more tips and tricks for customization at our knowledge base.
9.10 - Backup & Restore
DbFace backup and restore.
All your works in DbFace are saved in user directory. For on-premises installation, you can simply backup and restore user directory to continue all the work in DbFace.
Backup DbFace
For On-premises installation and Enterprise plan, you can backup all your work in DbFace and restore it later.
To get started, click the Preference menu in the left, select the “System Settings” tab, scroll to the
“Backup & Restore” section.
Click “Download Backup” button, DbFace will generate a zip file that contains all your work in DbFace, save the zip file locally.
Restore DbFace
At the “Backup & Restore” pane, click the “Select files” button and choose a backup file of DbFace. DbFace
will restore to the backup state.
Please notice, all your work in DbFace after the backup date will be lost.
9.11 - Database Structure
Database Structure.
10 - Accounts
DbFace Accounts
DbFace provides 3 account roles. Administrator account was created while installing. You can create Developer or Viewer sub accounts with the Administrator account.
Administrator
Administrator can access the management settings. Administrator can create and manage users and connections, change system settings, define SSO, and more. Each On-premise installation has one Administrator.
Each On-premise installation has 1 Administrator account, you can not create new Administrator account.
DbFace will create admin/admin account while installing, you need to edit the account name and email to activate on-premise installation.
Tip
If your organization has many teams, each team has their own data sources, you need to subscribe for each team to get an administrator account.
Developer (Manage Applications)
Developer role has all permissions on all connections. Developers can create, edit applications.
Manage all applications on all the connections
Manager all tables on all connections
Viewer (Access Applications)
Viewers can only access applications that have access permission.
Viewer Group
If you have many viewers in your team, you can create User Group to manage them effectively.
Edit Users or User Groups permission
Tap the Permission button to edit users or user groups application permission.
Check the checkbox to allow the viewer to access the application.
You can also choose permission at the application builder page:
10.1 - MFA
Active multi-factor authentication in DbFace.
Multi-factor authentication (MFA)
Use MFA to increase the security of your DbFace environments. Signing in to MFA-protected accounts requires a user name, password, and an authentication code from an MFA device.
Activate MFA
To enable multi-factor authentication, please click the Settings menu item at the top-right corner of DbFace.
At the User profile page, expand the Multi-factor authentication (MFA) panel.
Click the Activate MFA button to open MFA settings
Follow the steps to setup the MFA options for your DbFace account.
Please note the sign in MFA option,
Always use password and MFA code
You will require MFA code and password to sign in
Only MFA
Only MFA code required to sign in DbFace.
Deactive MFA
Click the “Deactivate MFA” button to disable MFA settings, after deactivated, the old MFA devices are disabled. You need to follow the activation steps again to reactivate MFA.
11 - Change Logs
DbFace changelogs
The release notes of DbFace.
We continue to update our changelogs here. Please also refer the detail changelogs
Version 9.8 (20210103)
Version 9.6 (20201004)
DbFace V9.6 released at 2020/10/04
Added Improve application accessiable, we added an history application quick access bar, so you can navigate to other applications more easier.
Introduce DbFace Application Plugin system. People will code plugin to extend DbFace or DbFace applications later. The feature is still improving, and might be changed
Added Custom PHP libraries import, in the user directory, you can use composer require command to import third-party php libraries. this libraries are imported automatically, and can be use in PHP Code directly.
Many styles and minor issues fixed
Version 9.4 (20200829)
DbFace V9.4 released at 2020/08/28
Many styles and minor issues fixed
Version 9.4
DbFace V9.4 released at 2020/07/24
Version 9.3
DbFace V9.3 released at 2020/06/26
[FEATURE] We can make comments on applications now
[FIX] Input SQL and generate Table or Chart in Notebook
[FIX] Improved filter features
[IMPROVE] Improve SQL Editor (You can edit multiple queries at the same time now)
[FEATURE] AMI first release, DbFace support AMI to support build full-featured applications now
[IMPROVE] Many styles fixes and improves
Version 9.2
DbFace V9.2 released at 2020/05/22
[NEW] Data dictionary, now we can build data dictionary to customize the data diplay for code
[FIX] Several styles and bug fixes
Version 9.1
DbFace V9.1 released at 2020/04/06
[FIX] Several styles and bug fixes.
Version 9.0
DbFace V9.0 released at 2020/02/06
[NEW] Clickhouse initialize supported
[NEW] XTerm: introduced to make changes by hand
[NEW] Module: use React or custome program dbface page
[NEW] Story product
[IMPROVE] Many styles fixes and improves.
Version 8.7
DbFace V8.7 released at 2019/09/10
[NEW] Presto initialize supported
Version 8.0
DbFace V8.0 released at 2018/12/30
[NEW] Google Big Query initialize support
[NEW] Data Board allows put variables in a dashboard
[NEW] Scheduled Jobs
[NEW] Snapshots: backup whole DbFace in local file system.
[Bug] The public url will be lost after edited parameters.
[Improve] Changed the default font to more clear Open Sans
[Improve] Use space as tab, and set tab size to 2 for all editor.
Version 6.3
DbFace V6.3 released at 2016/11/07
[Feature] Free form display application (advanced dashboard application introduced)
[Improve] Appearance settings for DbFace applications
[Feature] Public access URL for global parameters defined in DbFace
Version 6.2
DbFace V6.2 released at 2016/10/18.
[Feature] Query Snapshot Application Supported
[Improve] Calendar Application Supported
[Improve] Removed foot toolbar in Gallery
[Improve] We changed to use source editor for HTML report.
[Improve] Global Parameters (Variables) now support Array
Version 6.1
DbFace V6.1 released at 2016/10/14.
[Feature] Cloud Code Support On-premise
[Improve] Javascript exception might crash the App builder, we handle them more reasonable
[Improve] Form OnChange script now can apply resultset to Drop down and Multi-select
Version 6.0
DbFace V6.0 released at 2016/10/03. Since V6.0, You can install DbFace on prepared PHP 5.3+ (PHP5.3, PHP5.4, PHP5.5, PHP5.6, PHP7) ready webserver(Apache, IIS, Nginx).
[Feature] New Application Type: Application gallery application
[Feature] New Application Type: Funnel Widget supported
[Feature] New Application Type: TreeMap Widget supported
[Feature] Single Sign-on now available
[Feature] SQL Terminal
[Feature] Application logs for debug
[Feature] Define global dynamic parameters
[Feature] Batch edit user permissions for applications in category.
[Feature] Firebird/Interbase Supported
[Feature] Define global variables (fixed or dynamic)
[Feature] Multiple CSV files supported
[BUG] Fixed connection issues on Microsoft SQL Server
[Improve] Many other minor improves.
Version 5.9
DbFace V5.9 released at 2016/09/19
[Feature] Enhanced SQL workshop that you allow test your SQL queries on the fly.
[Feature] Query Builder
[BUG] Oracle Support
Version 5.8
DbFace V5.8 released at 2016/09/08
[Feature] We have changed Custom Css to Header template.
[Feature] Pick linked field data in Data module
[Feature] Form support for HTML & PHP report
[BUG] Minor bug fixed
Version 5.7
DbFace V5.7 released at 2016/08/20
[BUG] Customization CSS can not apply to embed applications (20160831)
[BUG] Generate wrong SQL query switching to SQL query mode
[BUG] Can not apply form variables in Drag Drop mode
[Feature] Support raw html form builder, building Form using Javascript, HTML.
[Feature] Custom dashboard layout
[Feature] API Connector, connect DbFace to your No-SQL database
[Feature] Customization javascript code custom reports behaviour by javascript
Version 5.5
DbFace V5.5 released at 2016/05/18
[Improve] New application categories system.
[Improve] Support category icon
[Improve] Column links in Table Editor (navigate tables by column value)
Minor other bugs fixed
Version 5.3
DbFace V5.3 released at 2016/03/14
[FIX] Dashboard builder fixes.
[Improve] Show/Hide Data module
[Improve] Option for showing all applications of all database connections
Minor other bugs fixed
Version 5.2
DbFace V5.2 released at 2016/02/25
[Feature] Story report, navigate reports page by page.
[Improve] SQL Server supported
[Improve] PostgreSQL supported
[Improve] Oracle supported
Minor other bugs fixed
Version 5.0
DbFace V5.0 released at 2016/01/18
[Improve] Redesigned menu system
[Improve] Cloud Code (beta)
[Improve] Database structure manager (only available for MySQL)
DbFace is a report and dashboard builder tool for SQL databases like MySQL, PostgreSQL, SQLite3 (MS SQL Server etc.). DbFace provides you a creative way to build database driven application on the fly.
What is the system requirements for On-premise installation?
You need a PHP7.2+ (PHP7.2, PHP7.3, PHP7.4) webserver (apache, nginx, etc) with SQLite3 extension installed.
All modern brownsers(desktop or mobile device) are cool, Firefox, Chrome, Safari.
if you have desired product customizations or other inquires, please contact us.
How is the product licensed?
A single website require one license. A website is defined as a single domain including sub-domains that operate as a single entity. Additional software licenses must be purchased in order to install and use the software on additional websites.
Does On-premises license expire?
The on-premise license is lifetime. Therefore it won’t expire.
Can you help me to install it on my server freely?
Yes, we can help you to install DbFace on your server freely after the order received. Please make sure your webserver fits the system requirements.
Can I use the same license for more than one machine/server?
No, the licenses can only be installed once, for one machine/server.
How do I register the license code?
You can input your license key in Settings -> Preference -> Billing page.
How is the DbFace On-premise Delivered?
DbFace On-premise can be downloaded for free and it becomes a registered version once a license key/serial number is registered
Features
What are the supported databases (datasources)?
MySQL, Oracle, MS-SQL Server, DB2, Informix, ProstGreSQL, Access, Interbase, Firebird and others ODBC or OLEDB patterns. You can also upload CSV file as database source, for other data sources (Mongodb, No-SQL, Google Analytics etc.), you can write your own API connector.
I update the db an not refresh the changes in the reports, why?
DbFace caches all the report data by default. You can click the icon at bottom-right corner at a report widget to flush report. If you do not want the cache feature, open the config/config.php and change the app cache time value.
Pricing
Can I change plans anytime?
Absolutely. DbFace is a month-to-month, pay-as-you-go service. You can upgrade or downgrade plans anytime. If you’re unsatisfied for any reason, you can cancel your account within the first seven days and request a full refund, no questions asked. Please notice the return policy does NOT apply to DbFace Server.
What forms of payment do you accept?
We accept PayPal payment, please notice you can still checkout with your creditcard through PayPal without a PayPal Account. Please contact support@dbface.com if you require payment methods other than PayPal.
Do you offer a trial period?
Yes! If you’re unsatisfied for any reason, you can cancel your account within the first seven days and request a full refund, no questions asked.
What are differents between PREMIUM and ENTERPRISE?
Enterprise version provide a managed VPS sandbox that contains sperated environment. You can execute your PHP code. Click here to get more information.
Yes! If you’re unsatisfied for any reason, you can cancel your account within the first seven days and request a full refund, no questions asked.
Is the Technical Support included in the licensing price?
For technical issues such as bugs, connection to your datasource, installation, version migration/upgrade, our technical Support will be provided with no additional costs.
Technical
I got “No input file selected” error?
FastCGI + apache htaccess might cause this issue, The goocher was no RewriteBase, please edit .htaccess file (located in the root directory) to
DbFace stores all the own data in the user directory, especially, user/data/dbface.db (SQLite3 file). We recommend to move the MySQL for production use to gain more stable performance.
Create database dbface and execute SQL file config/schema.sql
Copy the following file (database.php) into user/data directory
Now, DbFace will use the MySQL to store application data.
How to use Form variables in applications?
DbFace use Smarty as internal template engine. You can use simply {$form_field_name} in application script, filter conditions to delegate the form field value.
Let’s see a simple example:
We build a form which contains 2 input textbox: fromDate, endDate.
You can use the form fields in application scripts
How to host static files in DbFace?
DbFace hosting feature helps you hosting editable json files, html files or any other static files for your applications. So you do not need to setup a web server for this simple job.
Expand the Settings menu, and click Hosting menu to open hosting page:
Click the plus icon or edit button to edit the static files in DbFace UI.
As default settings, all hosted files are public available. You can also set X-DBFACE-MASTER-KEY, or ip whitelist to protect the hosted files.
THIS SOFTWARE IS PROVIDED BY THE AUTHOR `AS IS’ AND ANY EXPRESS OR IMPLIED WARRANTIES, INCLUDING, BUT NOT LIMITED TO, THE IMPLIED WARRANTIES OF MERCHANTABILITY AND FITNESS FOR A PARTICULAR PURPOSE ARE DISCLAIMED. IN NO EVENT SHALL THE AUTHOR BE LIABLE FOR ANY DIRECT, INDIRECT, INCIDENTAL, SPECIAL, EXEMPLARY, OR CONSEQUENTIAL DAMAGES (INCLUDING, BUT NOT LIMITED TO, PROCUREMENT OF SUBSTITUTE GOODS OR SERVICES; LOSS OF USE, DATA, OR PROFITS; OR BUSINESS INTERRUPTION) HOWEVER CAUSED AND ON ANY THEORY OF LIABILITY, WHETHER IN CONTRACT, STRICT LIABILITY, OR TORT (INCLUDING NEGLIGENCE OR OTHERWISE) ARISING IN ANY WAY OUT OF THE USE OF THIS SOFTWARE, EVEN IF ADVISED OF THE POSSIBILITY OF SUCH DAMAGE.
13.1 -
Billings and Plans
DbFace support managed and on premises installation. For more pricing information, please visit https://www.dbface.com/pricing
Cloud Hosting
If you only need the data visualization features in DbFace, you can subscribe our cloud hosting.
Managed DbFace
We will help you to host DbFace in AWS. All managed hosting customers have their own CPU and memory resources.
On-premises installation
If your databases or applications only be accessable from your local intranet. You can use On-premises installation, please download the right PHP version DbFace from https://www.dbface.com/download-dbface and install it in your own web server.
13.2 -
Terms and Conditions
EFFECTIVE AS OF JULY 26, 2016
Leku Co, Ltd (“DbFace”) provides DbFace services for database application builder services (collectively “services”) to registered commercial users (hereinafter called “users”) via dbface.com.
This Agreement governs the use of the dbface web application and related client-end software (the “Software”), and any other services, software, data, and other materials made available through dbface’s services. The following Terms of Service are valid for every use of dbface’s services.
1. APPLICABILITY
1.1. These Terms of Service shall apply to all services provided by dbface. The agreement constitutes a legal binding agreement for all of dbface’s services received by its users.
1.2. The user’s general terms and conditions shall not apply, unless they are approved by dbface through a written agreement. By using this service in any manner; including, but not limited to, visiting the site or contributing content, information, or other materials to the site, you agree to be bound by this Agreement.
2. REGISTRATION AND CONDITIONS OF USE
2.1. The use of the services requires the registration as a user. The services are offered exclusively to commercial customers, therefore the registration of private persons is not permissible.
2.2. The user is obliged to provide true, accurate, current and complete registration data, and to maintain this by promptly updating the registration data, and other mandatory disclosures including payment information, when necessary. If you provide any information that is untrue, inaccurate, not current or incomplete; or if dbface has reasonable grounds to suspect that such information is untrue, inaccurate, not current, or incomplete; dbface has the right to suspend, or terminate your account and prevent your access to potentially all of the services and, or content (or other users’ access to your content), and refuse any future use of the service (or any portion thereof), or content.
2.3. If you are entering into this agreement on behalf of a company or other legal entity, you confirm that you have the authority to bind such entity to these terms and conditions, in which case the terms “you” or “your” shall refer to such entity. If you do not have such authority, or if you do not agree with these terms and conditions; you must not accept this agreement, nor use the service.
2.4. dbface’s services are online services; therefore all communications including notices, or other information will be delivered electronically, or as an announcement via the users account. The user is obliged to ensure that emails sent to the email address specified, can be received and agrees to check his email inbox at least once each working day. The user has to ensure that the settings of his email account are set accordingly, so that dbface’s emails will not be sorted out by the spam filter.
2.5. There exists no right to register with dbface. dbface reserves the right to reject any registration request without stating reasons.
3. DESCRIPTION AND MODIFICATIONS OF SERVICES
3.1. dbface provides software for database application builder as a web service via its websites (Software-as-a-Service). These services are offered exclusively online, via dbface’s interface. The user has no right to download or install the software on his systems, nor devices.
3.2. The functional range of dbface’s services complies with the current product description published on the website www.dbface.com. The use of the services is limited to the respectively ordered number of databases and user licenses. dbface may offer you additional packages for the use of further databases, or user licenses. The termination of the ordered service also applies to the additionally ordered packages.
3.3. The quality and reliability of the application results depend on the quality of the underlying data, and execution of the inner SQL query. The user is solely responsible for both the quality and the execution of the inner SQL query, as he provides the database and performs the SQL query. dbface does not review or assess the data.
3.4. If the user instructs dbface to copy the data or databases from the user’s servers to dbface’s own servers, then this is exclusively for the purpose of reducing the load of the user’s systems, and accelerating the performed analysis. dbface does not guarantee the availability and integrity of the copied data. As these data will be transferred exclusively for analysis purposes, dbface is entitled to edit or modify this data for own purposes (e.g. converting the data into another format, rounding up numbers, merging data), without providing a backup copy of the original data. The user is solely responsible for the availability and integrity of the original data.
3.5. dbface’s services consist of complex hardware and software components. All components interact with each other and are subject to permanent change due to enhancements; changing legal conditions and security updates. dbface will execute any adjustment to the hardware and software components in the best technical and professional manner as possible, but cannot guarantee any uninterrupted availability of services. dbface guarantees an average annual availability of 98% for the service platform, and an average annual availability of 95% for single services.
3.6. dbface’s services are partially based on software developed by third parties (e.g. analysis tools, scripting languages, query languages, database systems, etc.) and depend on such software regarding its functionalities. dbface has no influence on adjustments made to software from third parties. In certain cases it is possible that dbface will not be able to offer single functions of its own services anymore if the functionality of underlying third party software changed, or if certain functions and software can no longer be used due to security reasons. dbface reserves the right to adapt its services and to make any necessary changes in interest of the user in such cases.
3.7. If dbface will offer new services, or advanced functionalities of existing services within the duration of the agreement; then, the same terms of service shall apply to such new or extended services offered by dbface.
3.8. dbface is entitled to reasonably adjust the prices of its services due to changes in functionalities of these services at the beginning of the next term. dbface is obliged to announce such adjustments in pricing in written form stating the reasons for the price changes, at least 30 days prior to the next term.
4. THIRD PARTY SERVICES
dbface may offer its users analytical services of third parties. Such services will be declared as third party offers. Solely, the terms and conditions and privacy policies of these third parties apply to the use of their respective services.
THIRD PARTY SERVICES
dbface may offer its users analytical services of third parties. Such services will be declared as third party offers. Solely, the terms and conditions and privacy policies of these third parties apply to the use of their respective services.
5. TRIAL PERIOD
5.1. dbface may offer its users a cost-free and limited version of its services (“Free Trial”). This free trial is offered on a temporary basis and automatically ends after the free trial period has expired. If the user purchases a subscription to the service within the duration of the free trial period, the free trial ends with the order of the paid services.
5.2. A free trial will under no circumstances be automatically turned into a paid contract. Paid services have to be explicitly ordered by the user.
6. USER OBLIGATIONS
6.1. The user is obliged to maintain the confidentiality of his login, password and account details, and shall not disclose this information to third parties. The user is fully responsible for all activities that occur under his password or account. If the user becomes aware or believes that this personal information has been disclosed to an unauthorized third party, then he is obliged to immediately change this data.
6.2. The user is responsible; that he is authorized under the respective legislation and internal company guidelines, to provide dbface with the login details of the user’s company servers and systems that dbface requires, in order to make the requested analysis available. Same applies, if the user assigns dbface to copy the data stored in the systems of the user, for analytical purposes.
6.3. The user shall instruct dbface only with legitimate evaluations of data that he has lawfully collected, or otherwise obtained lawfully by the user, or by the user’s company. It is the user’s sole responsibility to ensure the compliance with the applicable data privacy laws.
7. RIGHTS OF USE
7.1. dbface grants the user, and the agreed number of additional users, for the duration of the contract, a non-exclusive and limited right of use, of the purchased services to the agreed extent via dbface’s website.
7.2. The parties agree to grant each other the use of their logo and company name as a reference on the other party’s website, or within company presentations. Each party might decline the use of their logo and company name at any time for a specific case, or generally with effect for the future. An objection requires the written form.
8. RIGHTS OF dbface IN CASE OF BREACH OF THE TERMS OF SERVICE
8.1. In case a third party can prove credibly that they have been violated in their rights, while dbface is providing its services on behalf of the user (e.g. due to access to a database, database mirroring or analysis of this database), dbface is authorized to terminate its services on its own behalf to avoid any liability until the legal situation is satisfactorily clarified.
8.2. dbface reserves the right to close the account of any user and terminate the contract, in case the user repeatedly breaches or seriously violates this terms of service.
8.3. The claim for fees of dbface persists in the case of a justified account cancellation, according to the provisions set out above.
##9. DURATION AND TERMINATION
9.1. The duration of the booked services is determined by the offer chosen. Normally the duration is two years, one year, or six months.
9.2. The booked services shall extend automatically by the original requested duration, unless otherwise agreed, or terminated by one of the parties in due time. In case the first contract term is more than a year, the renewal period will be one year.
9.3. The notice period for the termination of services is eight weeks prior to the end of the contract for a term of six months, twelve weeks for a term of one year and sixteen weeks for a term of two years.
9.4. Termination must be in writing; transmission via email must be sent to support@dbface.com. Alternatively, dbface may entitle its users to terminate their contract via their user account.
9.5. dbface has an exceptional right of termination if the user contradicts to a technical required change of service, according to 3.7.
10. TERMS OF PAYMENT
10.1. Payment must be made monthly, quarterly or yearly, in advance; unless otherwise mutually agreed upon in an order form, or within an individual written agreement between both parties.
10.2. dbface shall provide the user with an electronic invoice.
10.3. If the user cannot make the payment on the agreed date, dbface reserves the right to temporarily deny access to the user’s account, and to discontinue the services. dbface is entitled to demand reimbursement of all costs and expenses arising from the delayed payment of a user (e.g. fees for charge backs, collection expenses).
11. AVAILABILITY OF SERVICES
11.1. If the unavailability of services, or of a single service is based on intent or gross negligence on parts of dbface, or of one of dbface’s agents; dbface cannot refer to the compliance to availability commitments according to section 3.6.
11.2. dbface is not responsible for nonconformity with the availability commitments according to section 3.6, if the inaccessibility is based on; force majeure, technical problems on parts of third parties that are not agents of dbface, or due to an illegal attack on dbface, or one of dbface’s commissioned service providers.
12. LIABILITY
12.1. dbface shall be liable without limitation to pay compensation for violation of contractual and non-contractual obligations, only in case of intent or gross negligence.
12.2. dbface shall only be held liable for cases involving the intent and gross negligence of non-executive agents, if such agents have violated essential contractual obligations.
12.3. dbface shall not be liable for breaches of nonessential contractual obligations through simple negligence by its management bodies, executive officers, employees, or other agents.
12.4. Essential obligations are obligations, that are essential for the due, and proper implementation and fulfillment of the contract, and with those contract partners can reasonably and regularly rely on.
12.5. In case of infringements of important contractual obligations, the liability shall be limited to the foreseeable loss for such type of contract.
12.6. The above limitations of liability do not apply to dbface’s liability with regards to; intent or gross negligence, guaranteed quality features, injury to life, body or health, or product liability laws.
13. DATA PRIVACY
13.1. dbface’s data privacy policy applies to the use of dbface’s services.
13.2. dbface creates anonymized user statistics for user-oriented design of services, error detection, and marketing purposes. The user statistics do not contain any personal data of the user, or related data from the user’s databases. The user has the right to object the anonymized analysis of his user behavior in written form, with effect for the future. Such objection shall be sent to support@dbface.com.
13.3. dbface is obliged to automatically delete any personal data of the user at latest 30 days after expiration of the contract unless there are legal storage periods in individual cases.
14. GENERAL
14.1. dbface’s employees are not authorized to make any verbal agreements with the user, which are not conform to these Terms of Service Agreement.
14.2. If any provision of these Terms and Conditions be or become invalid, the validity of the remaining provisions shall remain unaffected. Instead of the ineffective regulation, an effective regulation whose economic purpose is as close as possible to the parties, shall apply.
14.3. To the extent that the user is a merchant, a legal entity under public law or a public special asset; China is the place of jurisdiction for all disputes arising from contractual relationships between the user and dbface.
13.3 -
On-premises License
DbFace End-User License Agreement
IMPORTANT – READ CAREFULLY: This End-User License Agreement (“EULA”) is a legal agreement between you and DbFace Corp to regulate your use of the DbFace software and its related components. If you do not agree to all of the terms of this EULA, you should not download, install or use the DbFace software and its related components. If you have already downloaded or installed the DbFace Software, you should remove it from your system and destroy all copies thereof.
1. Definitions in this EULA
“Licensor” means DbFace Corporation. “Licensee” means an individual or a legal entity exercising rights under, and complying with all of the terms and conditions of this EULA or future versions of this EULA. “Software” means the software program known as DbFace Enterprise edition in binary form, including its documentation, any third party software programs that are owned and licensed by parties other than Licensor and that are either integrated with or made part of Software (collectively, “Third Party Software”). “License Certificate” means evidence of a license provided by Licensor to Licensee in electronic or printed form, and defininig the optional rights related to the Software. “License Key” means a unique key-code file, provided by Licensor or its authorized representatives, that enables the Licensee to use the Software.
2. Ownership
The Software is the property of Licensor or its suppliers. The Software is licensed, not sold. Title and copyrights to the Software, in whole and in part, all copies thereof and all modifications, enhancements, derivatives and other alterations of the Software regardless of who made any modifications, if any, are, and will remain, the sole and exclusive property of Licensor.
3. Third Party libraries
The Software may contain third party libraries which may require notices and/or additional terms and conditions. You have to read and accept a driver EULA in the libraries settings dialog appearing before the first usage.
4. Grant of Rights
According to the License Certificate, Licensor grants Licensee a non-exclusive, non-transferable rights to use the Software, and sub-sequent versions thereof, under certain obligations and limited rights as set forth in this EULA. Licensee may:
Use each License Key on more than one computer system, as long as it is always used by the same user. Each new user of the Software requires an additional License Key.
Make copies of the Software and the License Key as reasonably necessary for the use authorized by this EULA, including backup and/or archival purposes. No other copies may be made. Each copy must reproduce all copyright and other proprietary rights notices on or in the Software Product.
Notwithstanding the non-transferability, Licensee may transfer a license to another user in the same organization, when, and only when, the designated Licensee (user) moves to non-database tasks or leaves the organization.
5. Evaluation License
A time limited version of the Software, Evaluation License, is provided for a period of fourteen (14) days (“Trial Period”) from the date of issuing a temporary evaluation License Key. The time limited version is subject to all terms set forth in this EULA with the exception that the Evaluation License is not for general commercial use. The Software contains a feature that will automatically disable the Software after the Evaluation Period has expired. Licensee may not disable, destroy, or remove this feature of the Software, and any attempt to do so will be in violation of this EULA and immediately terminate this agreement.
6. License Restrictions
Licensee may not:
Reverse engineer, decompile, disassemble, modify, translate, attempt to discover the source code of the Software in whole or in part.
Distribute, copy, publish, assign, sell, bargain, convey, transfer, pledge, lease or grant any further rights to use the Software.
Modify or create derivative work based Software in whole or in part
Tamper with, alter, disable or circumvent the Software’s built-in license verification and enforcement capabilities.
Remove of alter any trademark, copyright, logo or other proprietary notices in the Software.
Disclose the License Key in any way.
7. Disclaimer of Warranty
Unless specified in this EULA, all express or implied conditions, representations and warranties, including any implied warranty of fitness for a particular purpose are disclaimed, except to the extent that these disclaimers are held to be legally invalid.
8. Limitation of Liability
To the extent not prohibited by law, in no event will Licensor (or any third-party-developer) be liable for any lost revenue, profit or data, or for special, indirect, consequential, incidental or punitive damages, however caused regardless of the theory of liability, arising out of or related to the use of or inability to use Software, even if Licensor has been advised of the possibility of such damages. In no event will Licensor’s liability to Licensee, whether in contract, tort (including negligence), or otherwise, exceed the amount paid by Licensee for Software under this EULA. The foregoing limitations will apply even if the above stated warranty fails of its essential purpose. Some states do not allow the exclusion of incidental or consequential damages, so some of the terms above may not be applicable to Licensee.
9. Termination
This EULA is effective until terminated. Licensee may terminate this EULA at any time by destroying all copies of Software. This agreement may be terminated by either party if the other party commits a material breach. Either party will have thirty (30) calendar days following the receipt of written notice to remedy any material breaches. Immediately upon termination, any Accessible Code in possession, custody or control of Licensee must be destroyed and written confirmation of such destruction provided to Licensor. Licensee agrees that upon termination of this EULA for any reason, Licensor may take actions so that Software no longer operates.
10. Severability
If any provision of this EULA is held to be unenforceable, this EULA will remain in effect with the provision omitted, unless omission would frustrate the intent of the parties, in which case this EULA will immediately terminate.
11. Integration
This EULA is the entire agreement between Licensee and Licensor relating to its subject matter. It supersedes all prior or contemporaneous oral or written communications, proposals, representations and warranties and prevails over any conflicting or additional terms of any quote, order, acknowledgment, or other communication between the parties relating to its subject matter during the term of this EULA. No modification of this EULA will be binding, unless in writing and signed by an authorized representative of each party.
12. Reservation of rights
All rights not expressly granted in this EULA are reserved by Licensor. Licensor reserves the right at any time to cease the support of the Software and to alter prices, features, specifications, capabilities, functions, licensing terms, release dates, general availability or other characteristics of the Software.
13. Licensor Representations
Licensor represents, warrants, and covenants that it and each of its affiliates and their respective agents and subcontractors (i) use and will continue to use commercially reasonable efforts to ensure that there is no slavery, human trafficking, and/or child or forced labor in any part of their respective businesses or supply chain; (ii) have not, and their respective directors, officers, and employees have not, been convicted of any offense involving slavery, human trafficking, and/or child or forced labor; and (iii) are not currently and have not in the past been the subject of any investigation, inquiry, or enforcement proceedings in relation to an alleged offense in connection with slavery, human trafficking, and/or child or forced labor.

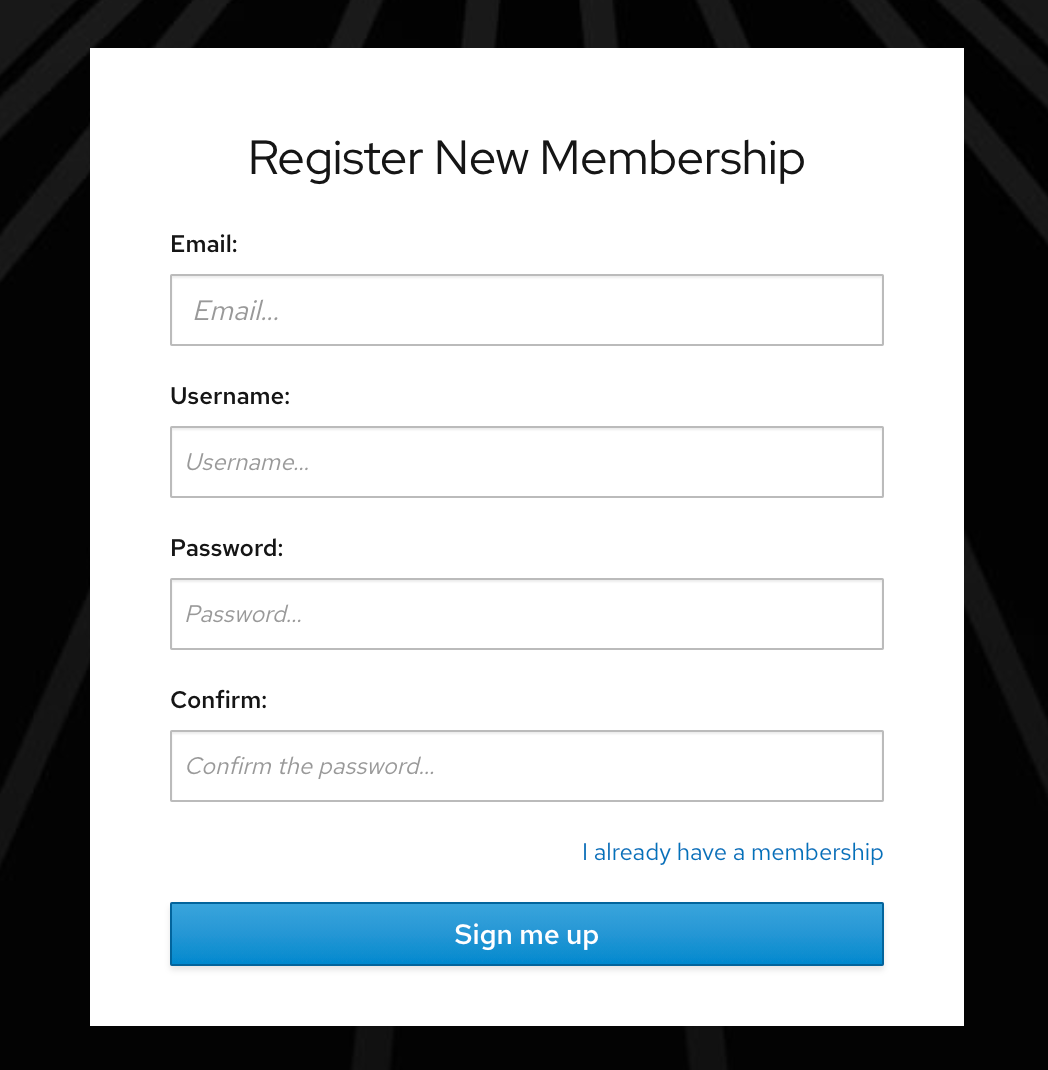


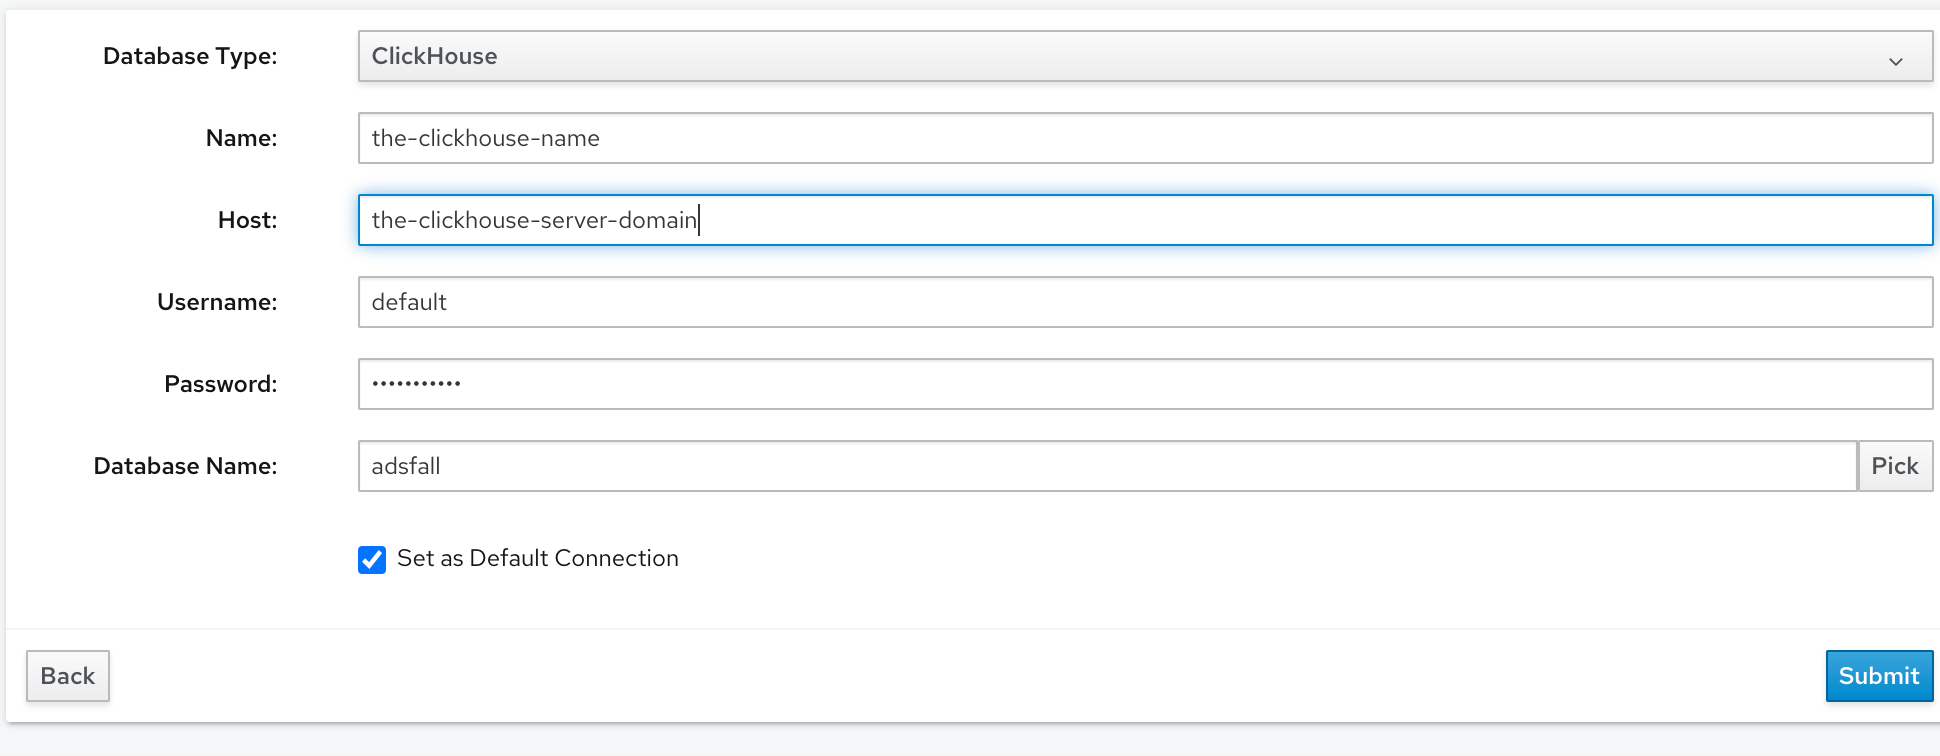
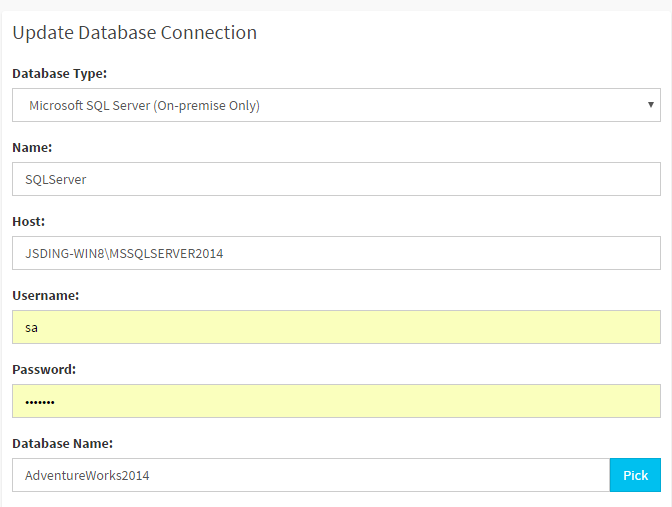
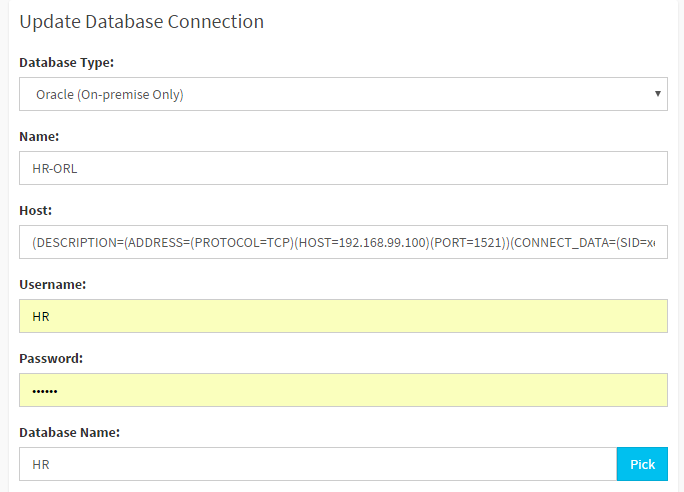
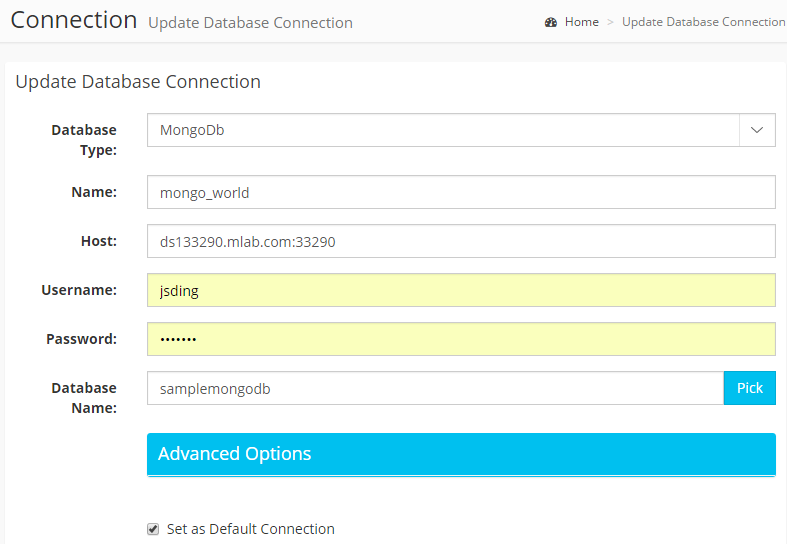
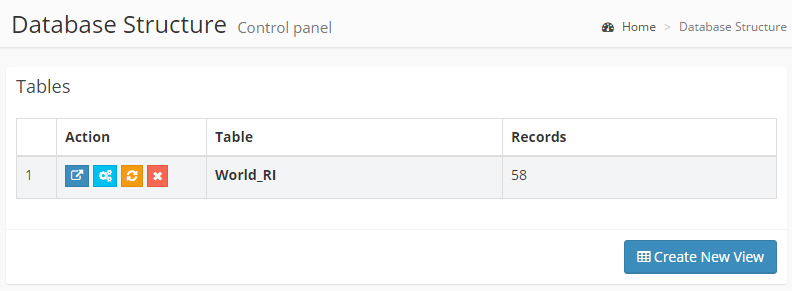

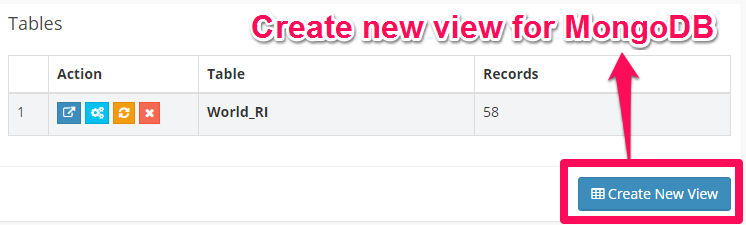 Click the “Create View” button in the “Database Structure” page.
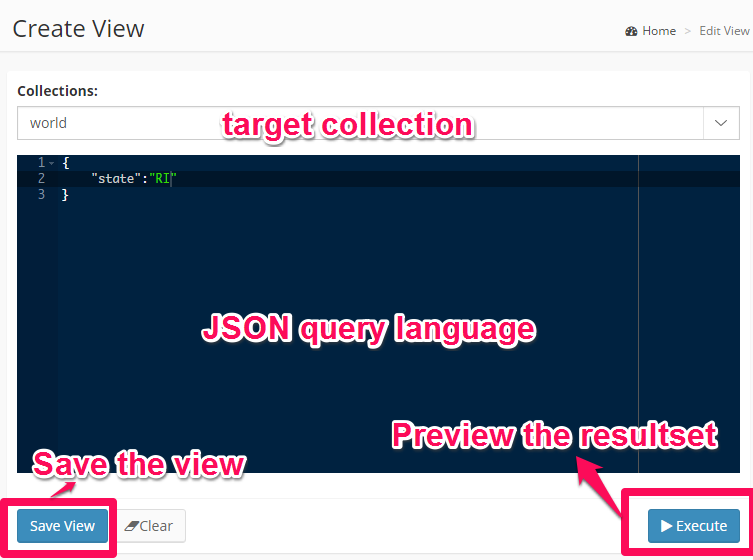
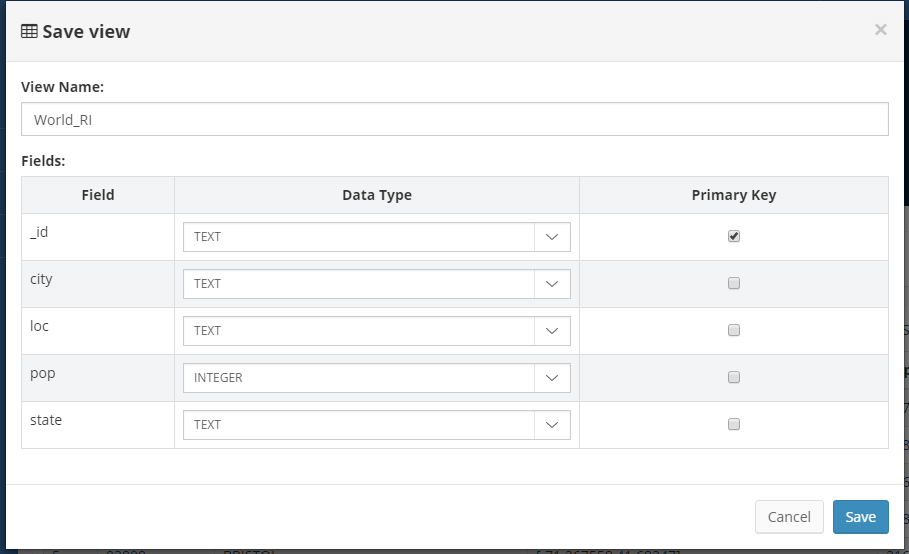
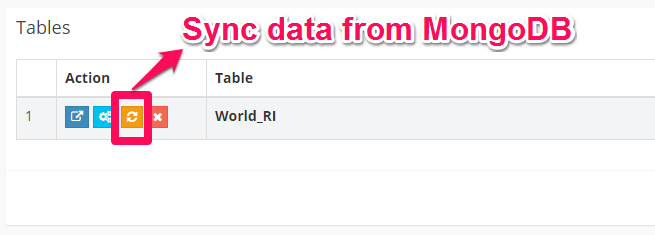


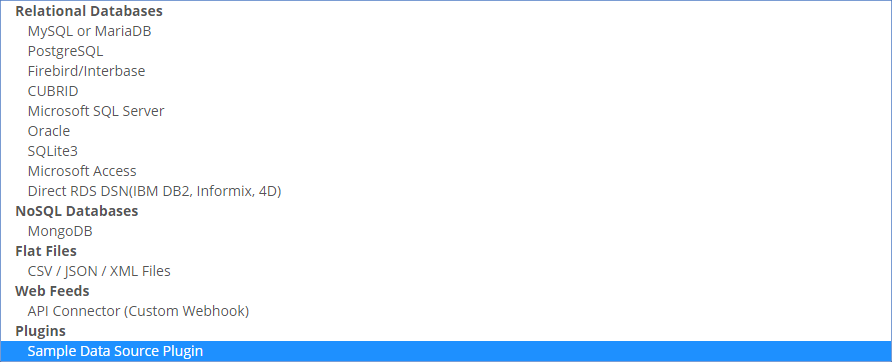
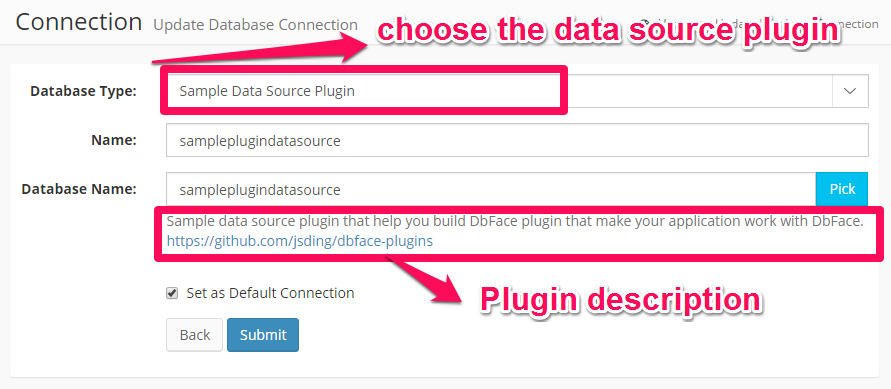


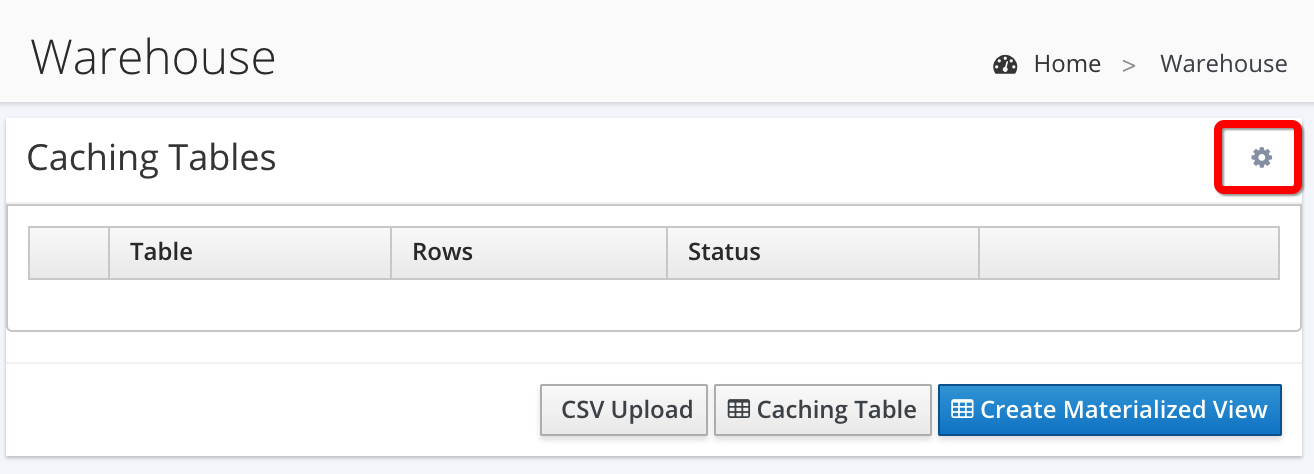
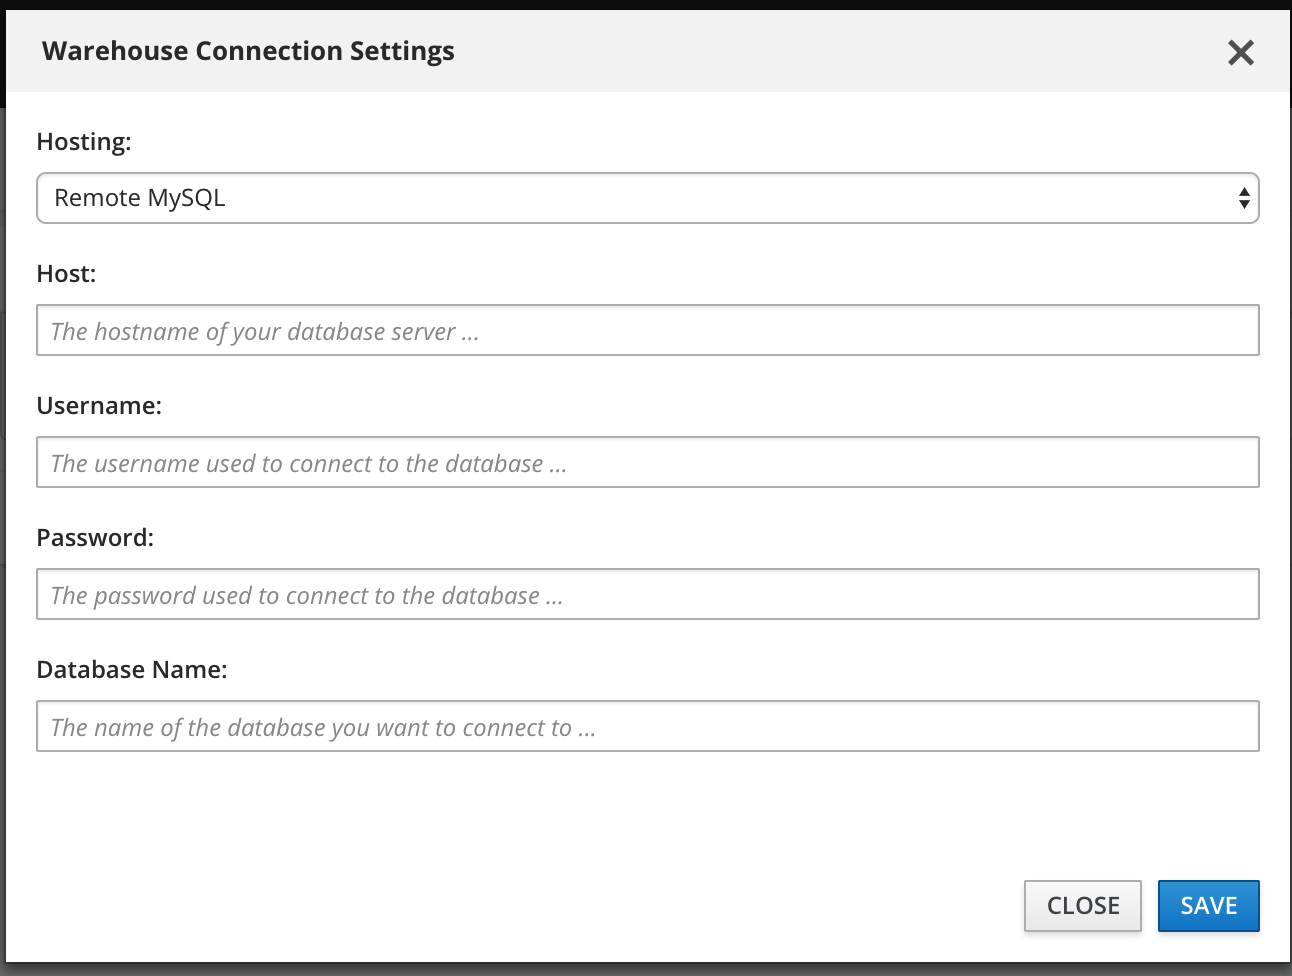


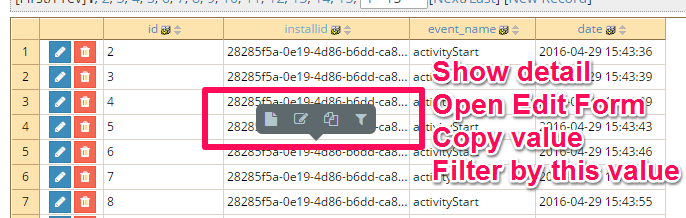
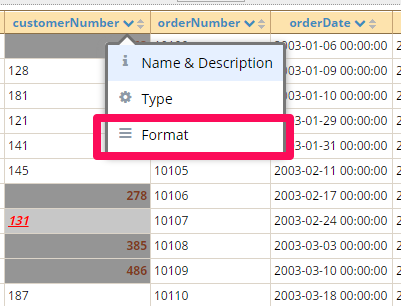
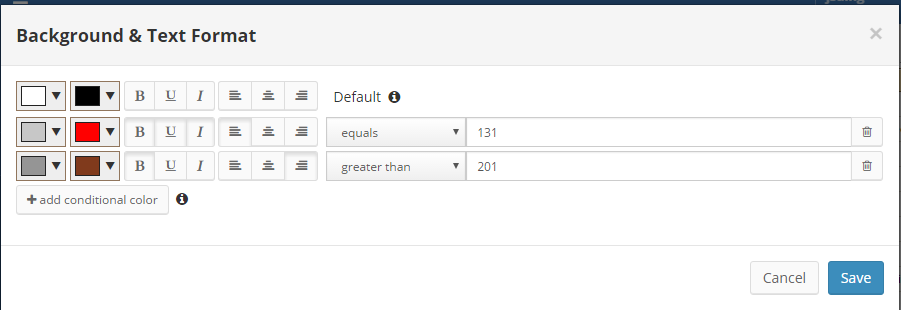 The screenshot below is showing the Conditional Background Colors applied on Records in the Grid.
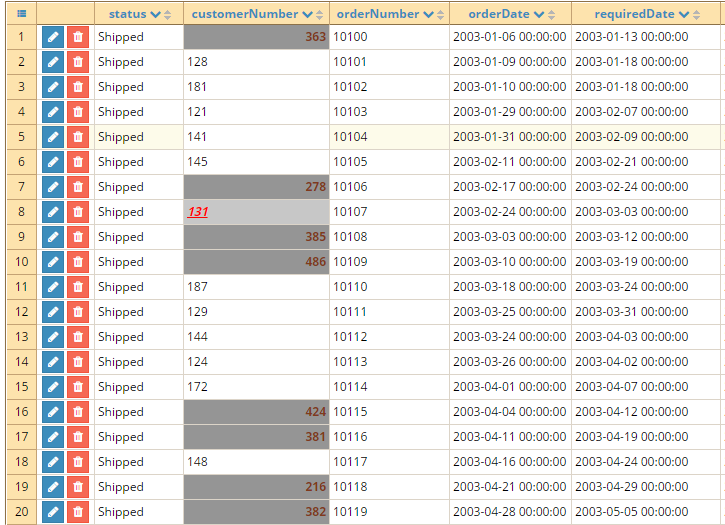
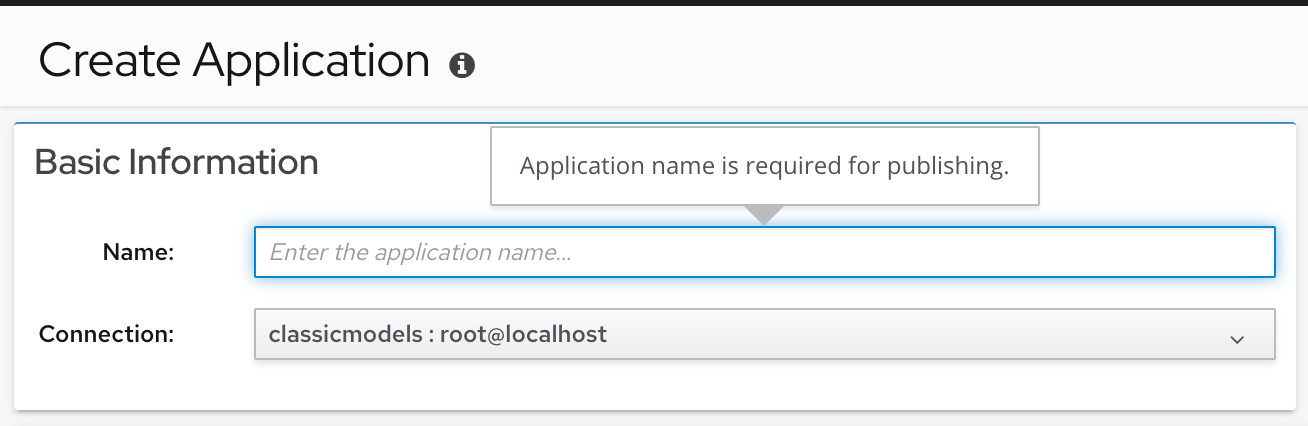
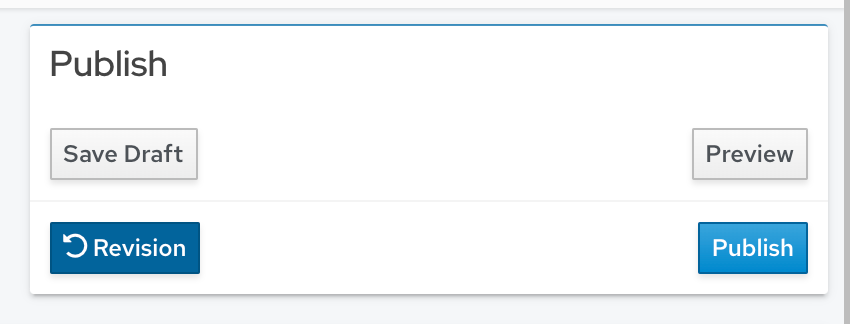
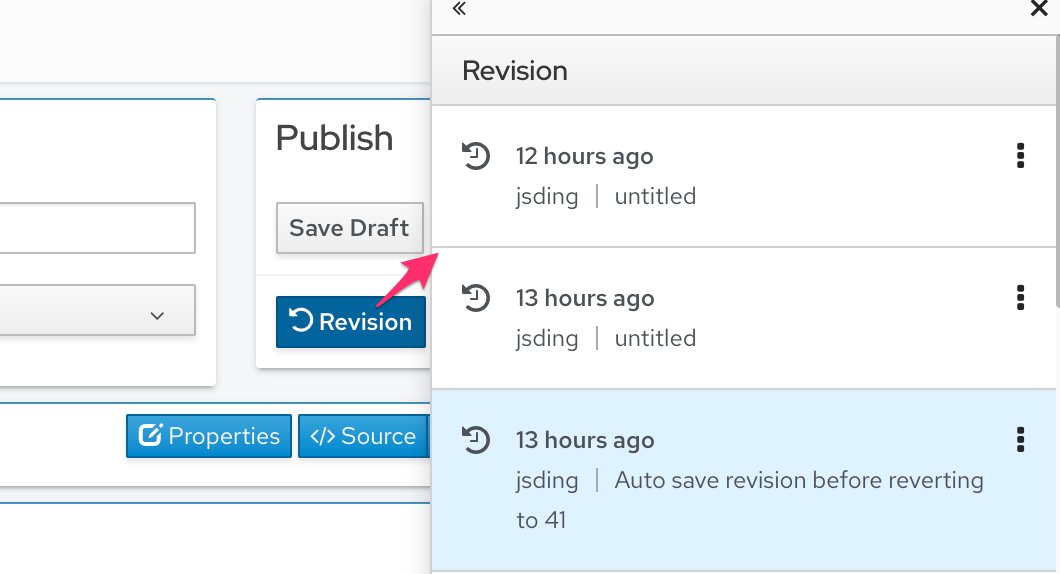

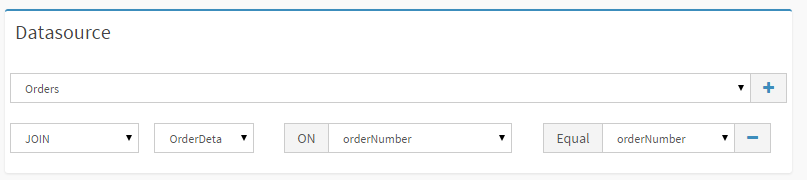


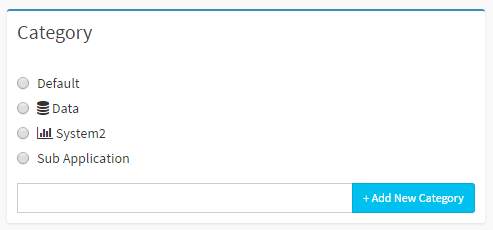

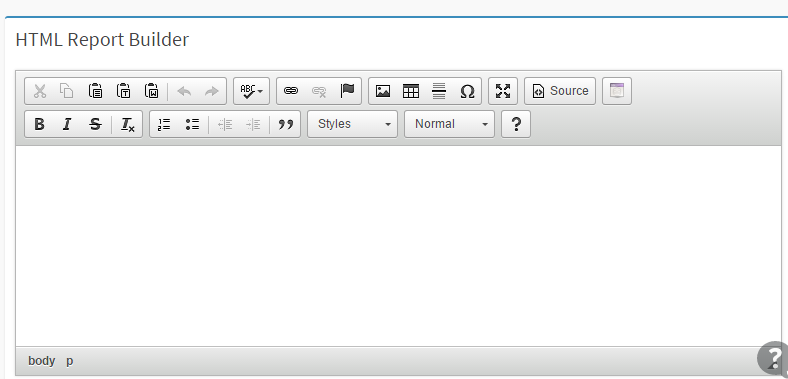


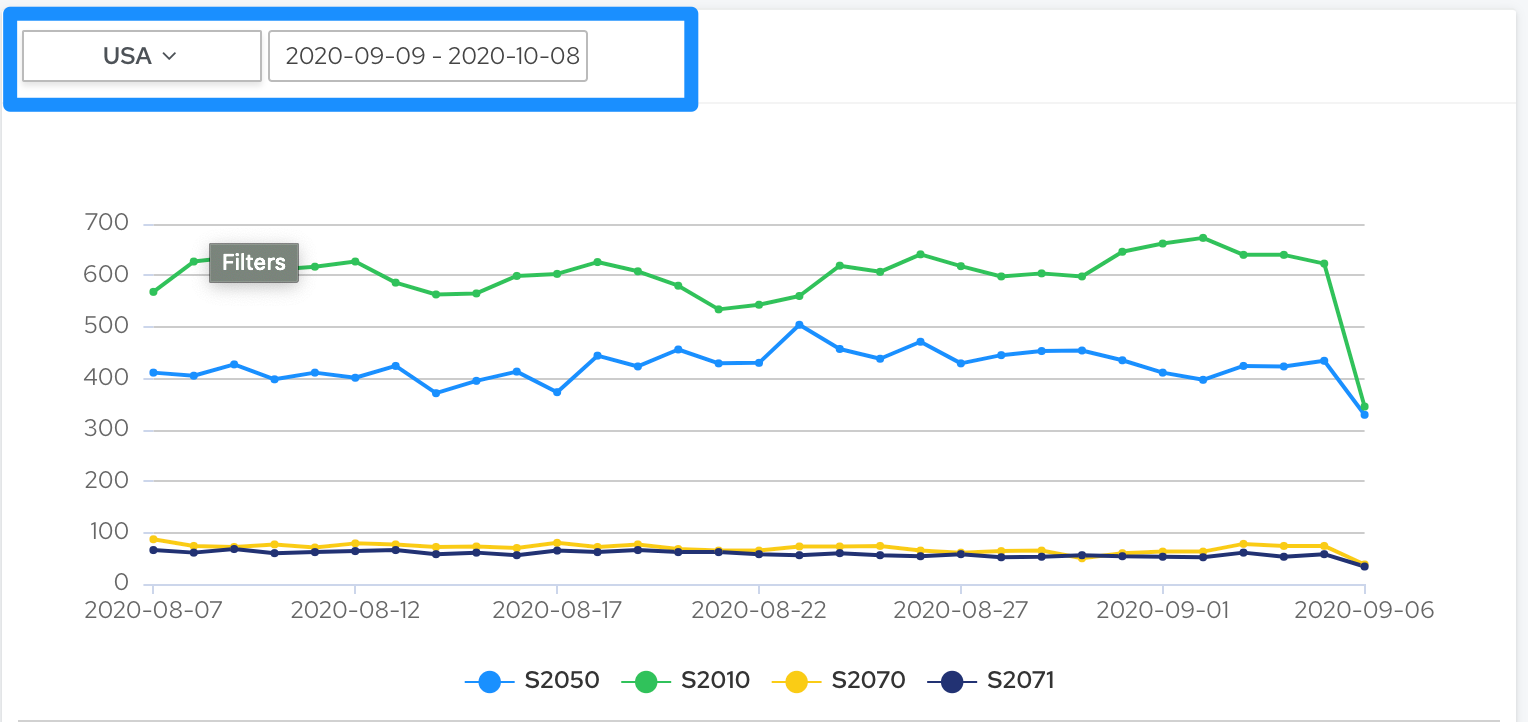
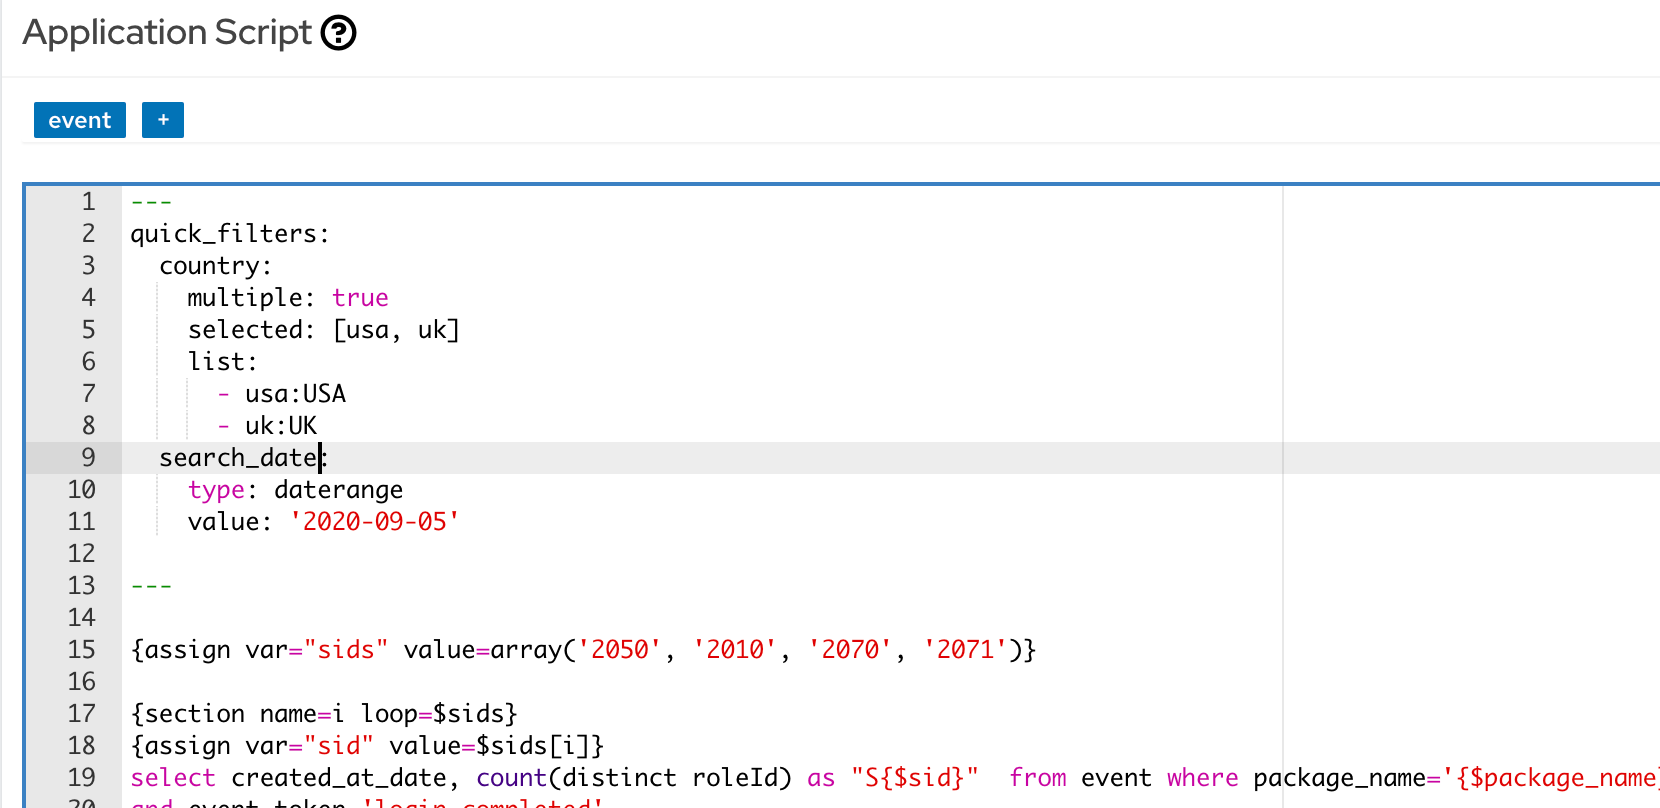
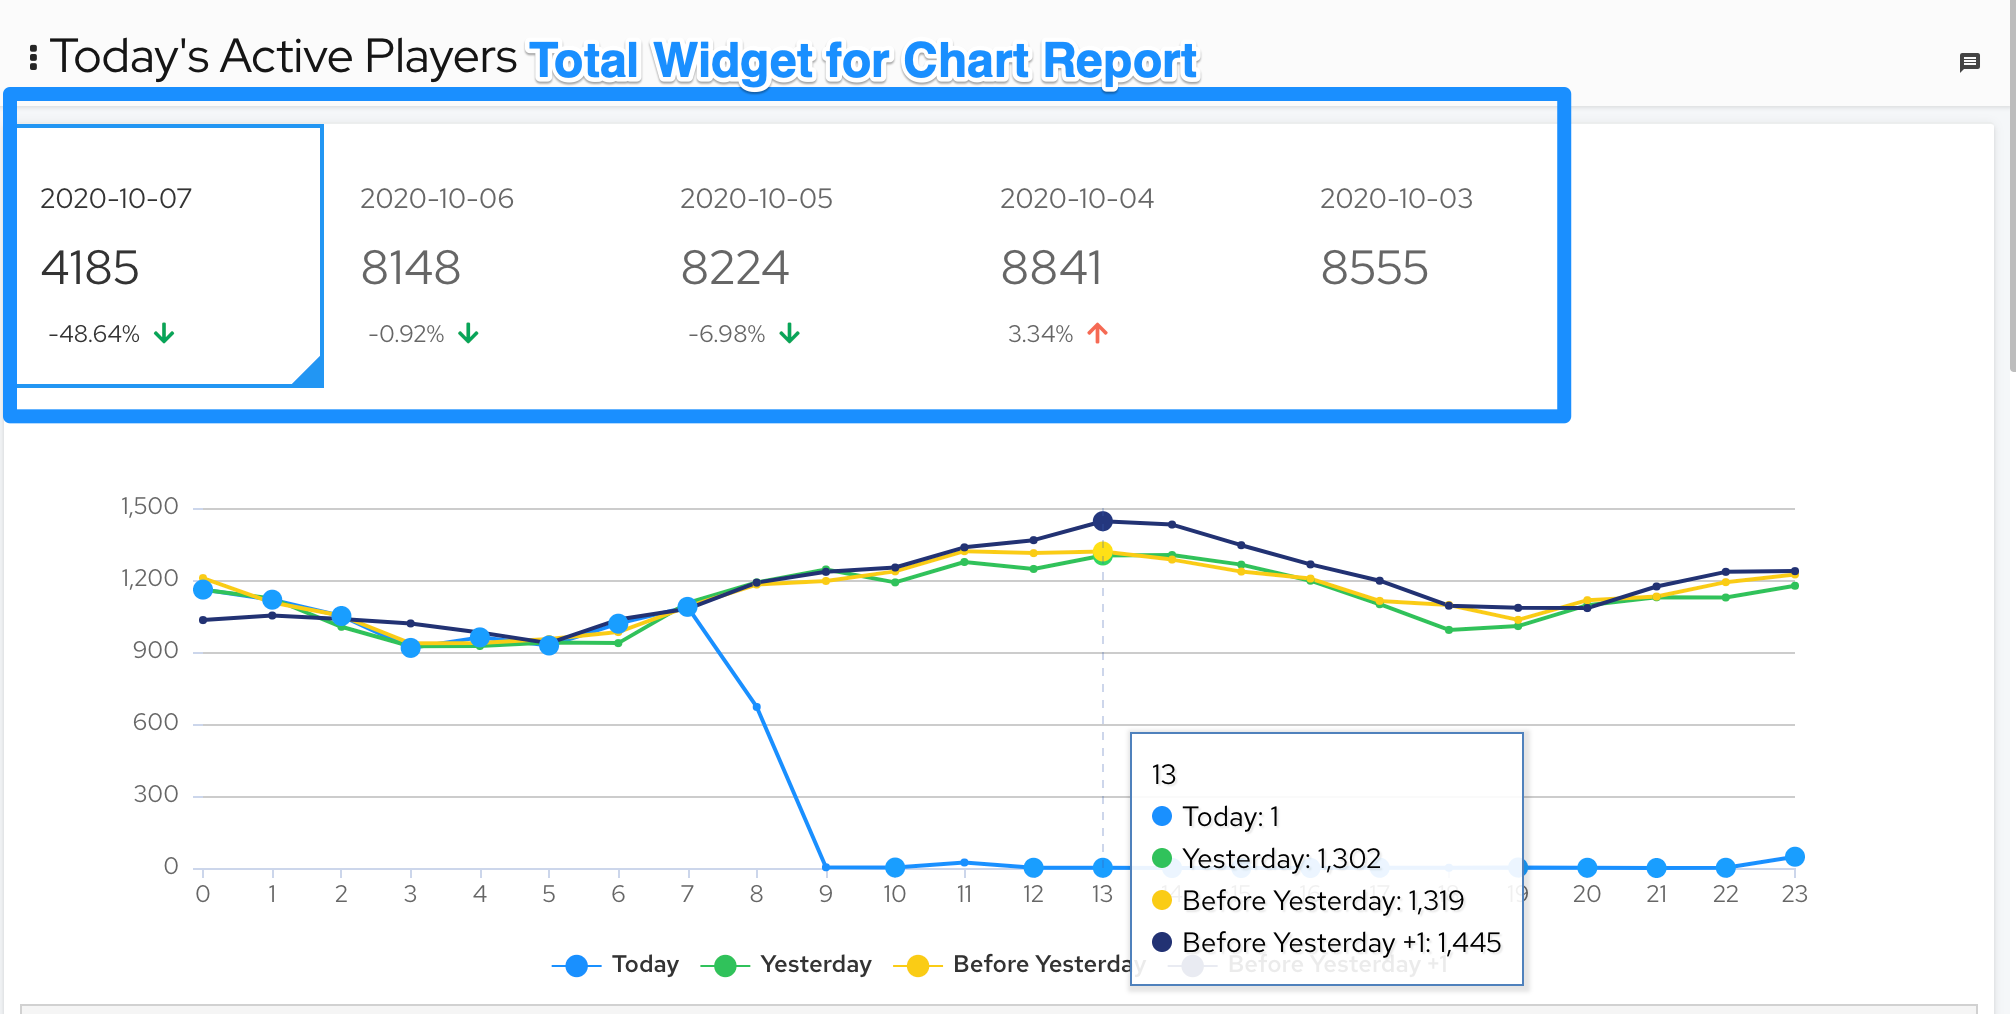
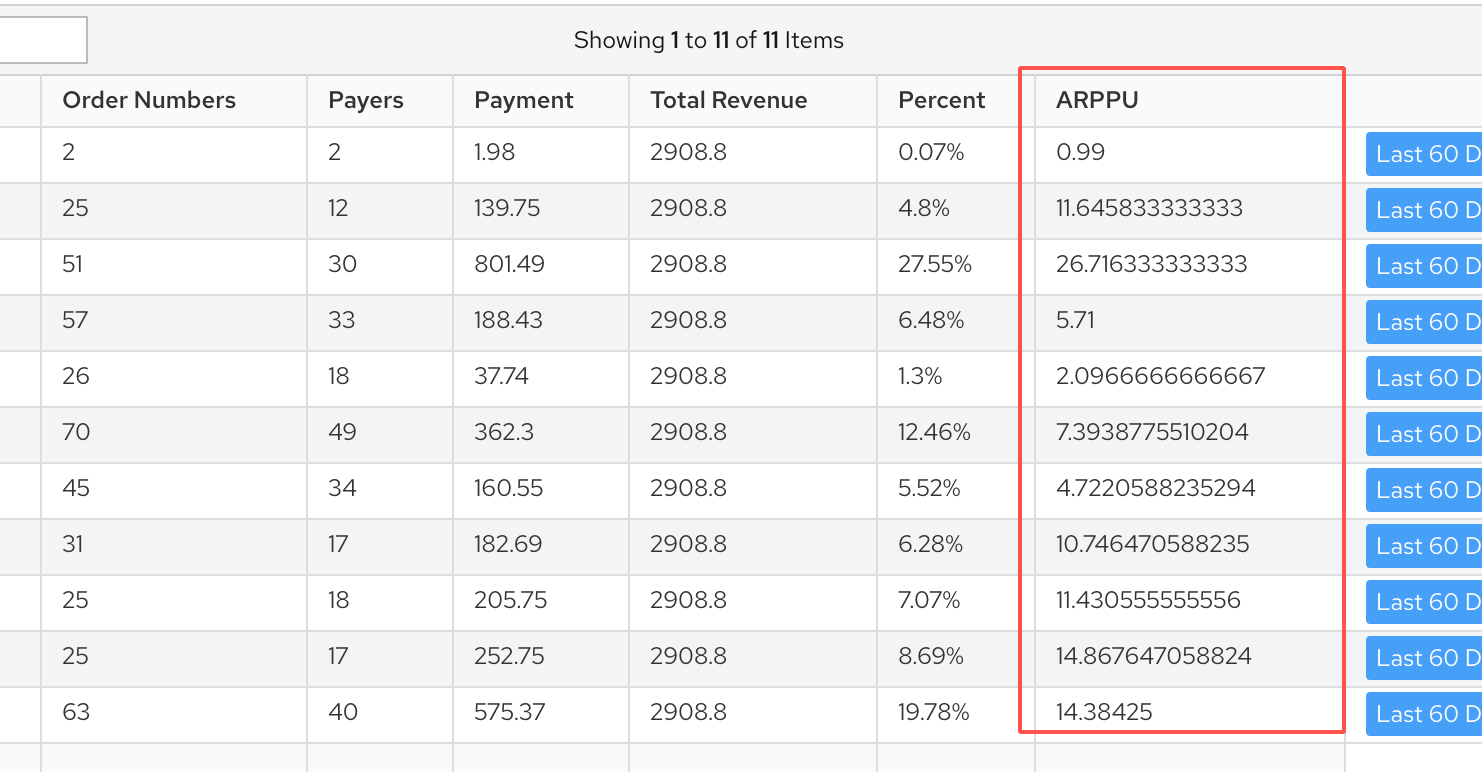 We can use row, data, and row_index in the expression


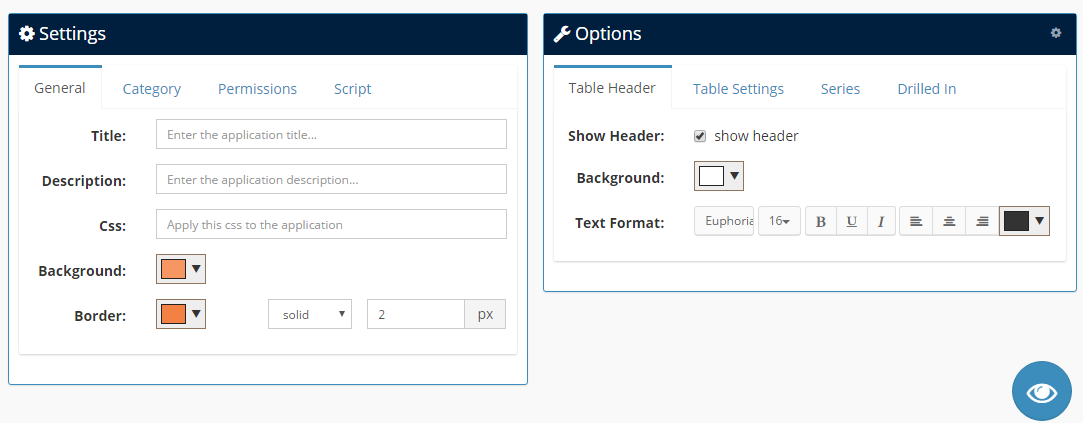


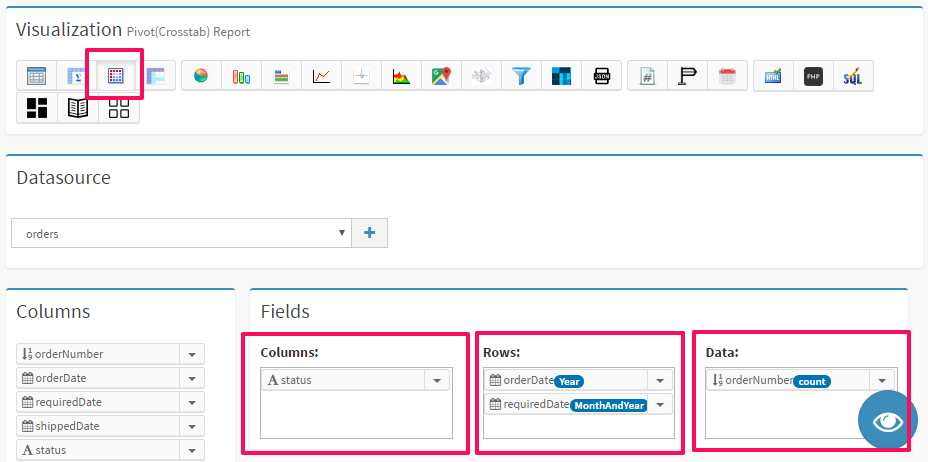
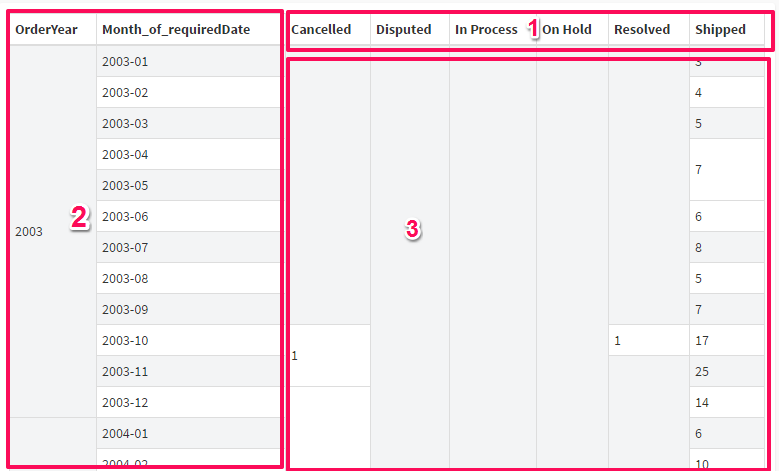


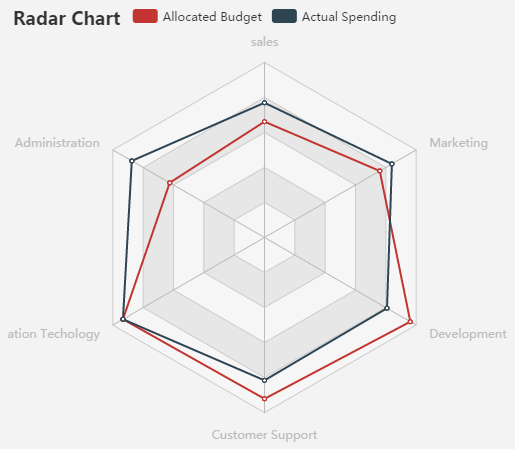


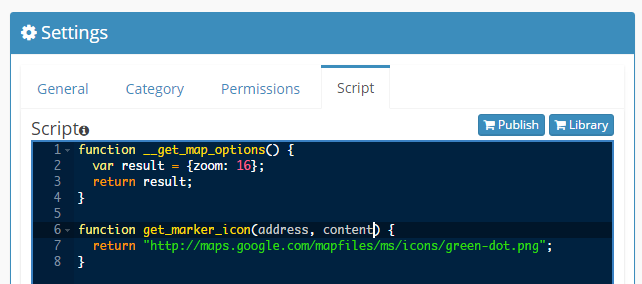

 in DbFace")


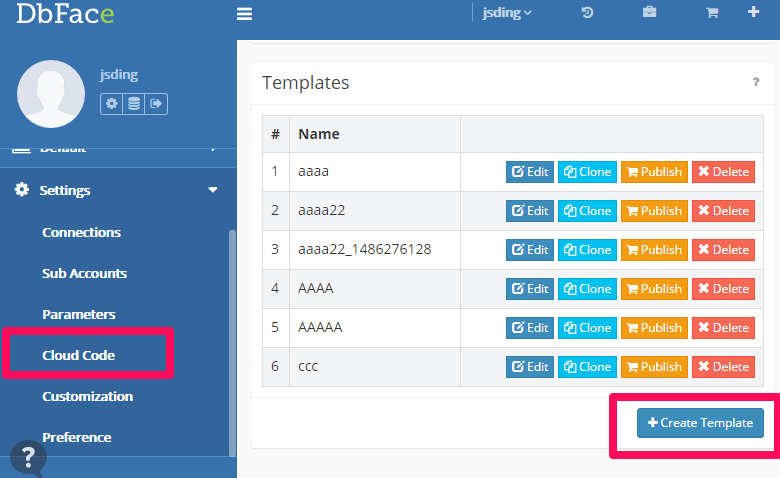
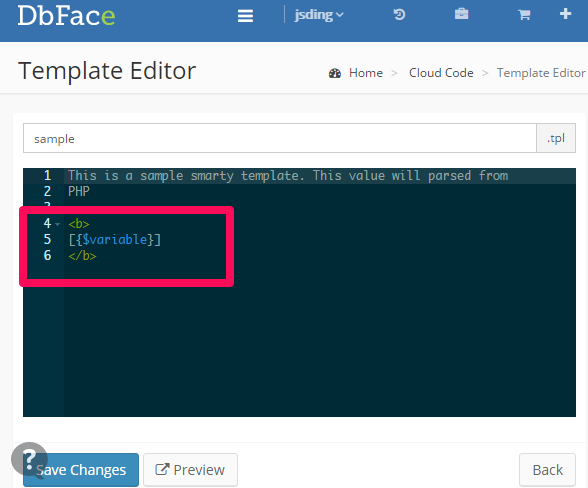
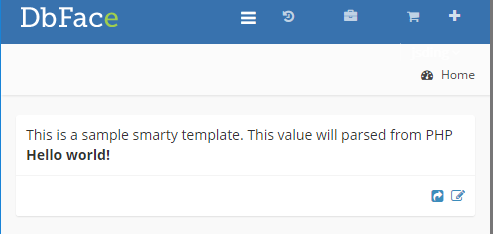
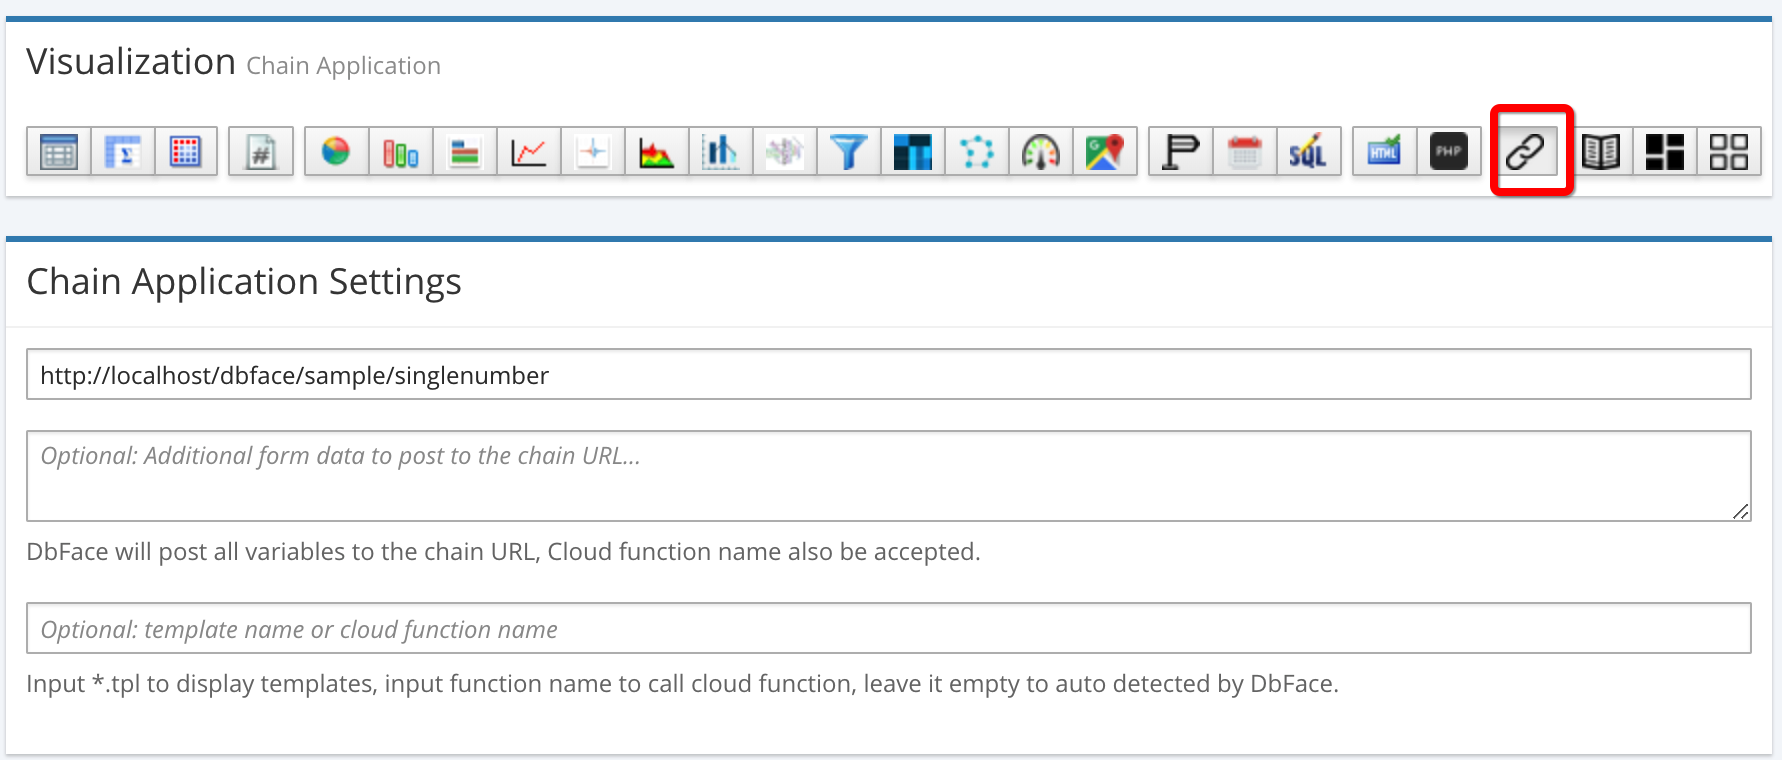
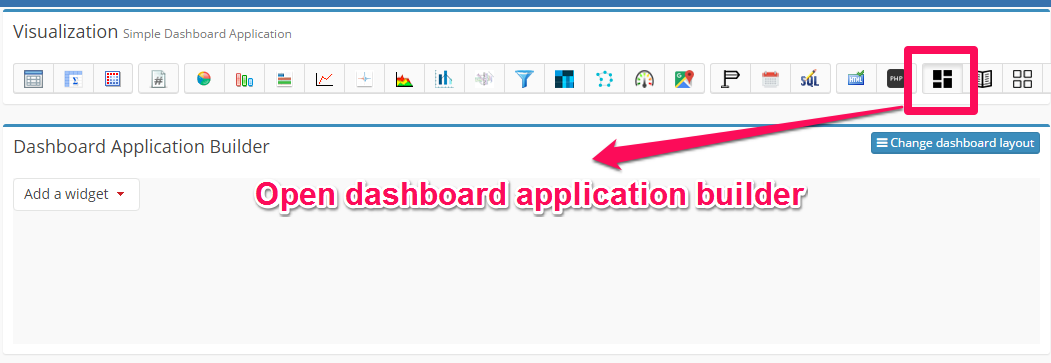
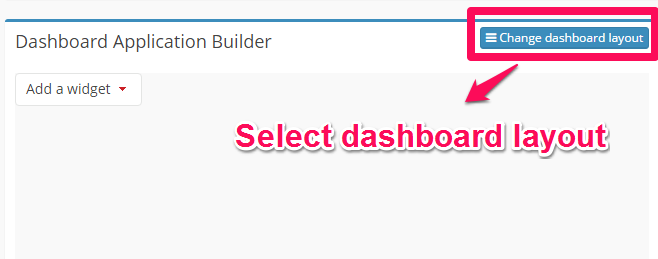
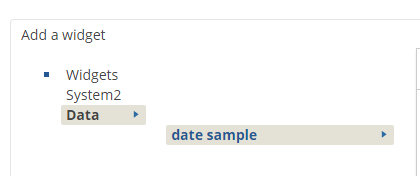
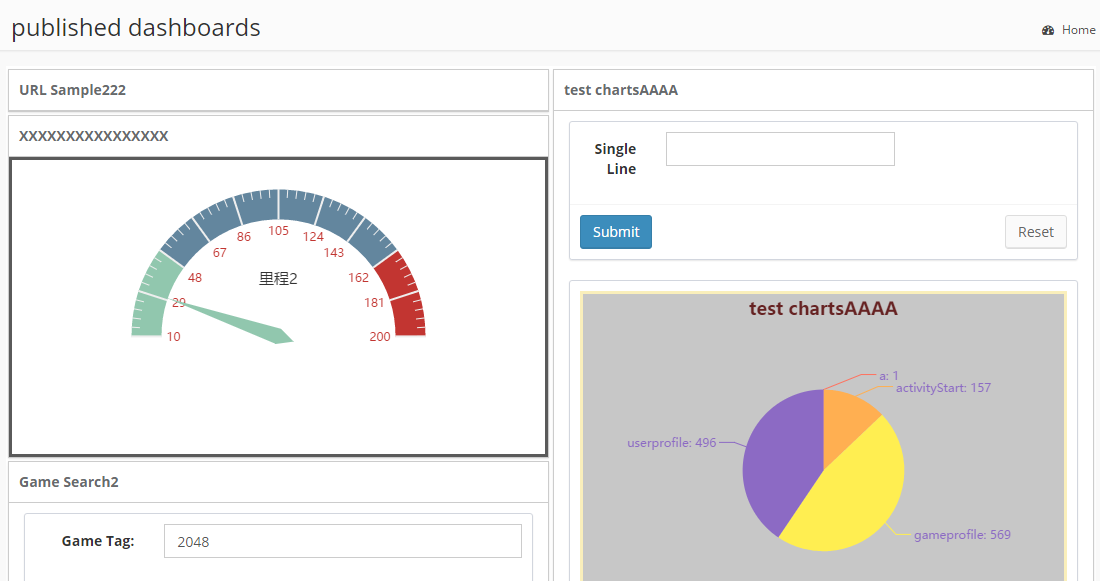


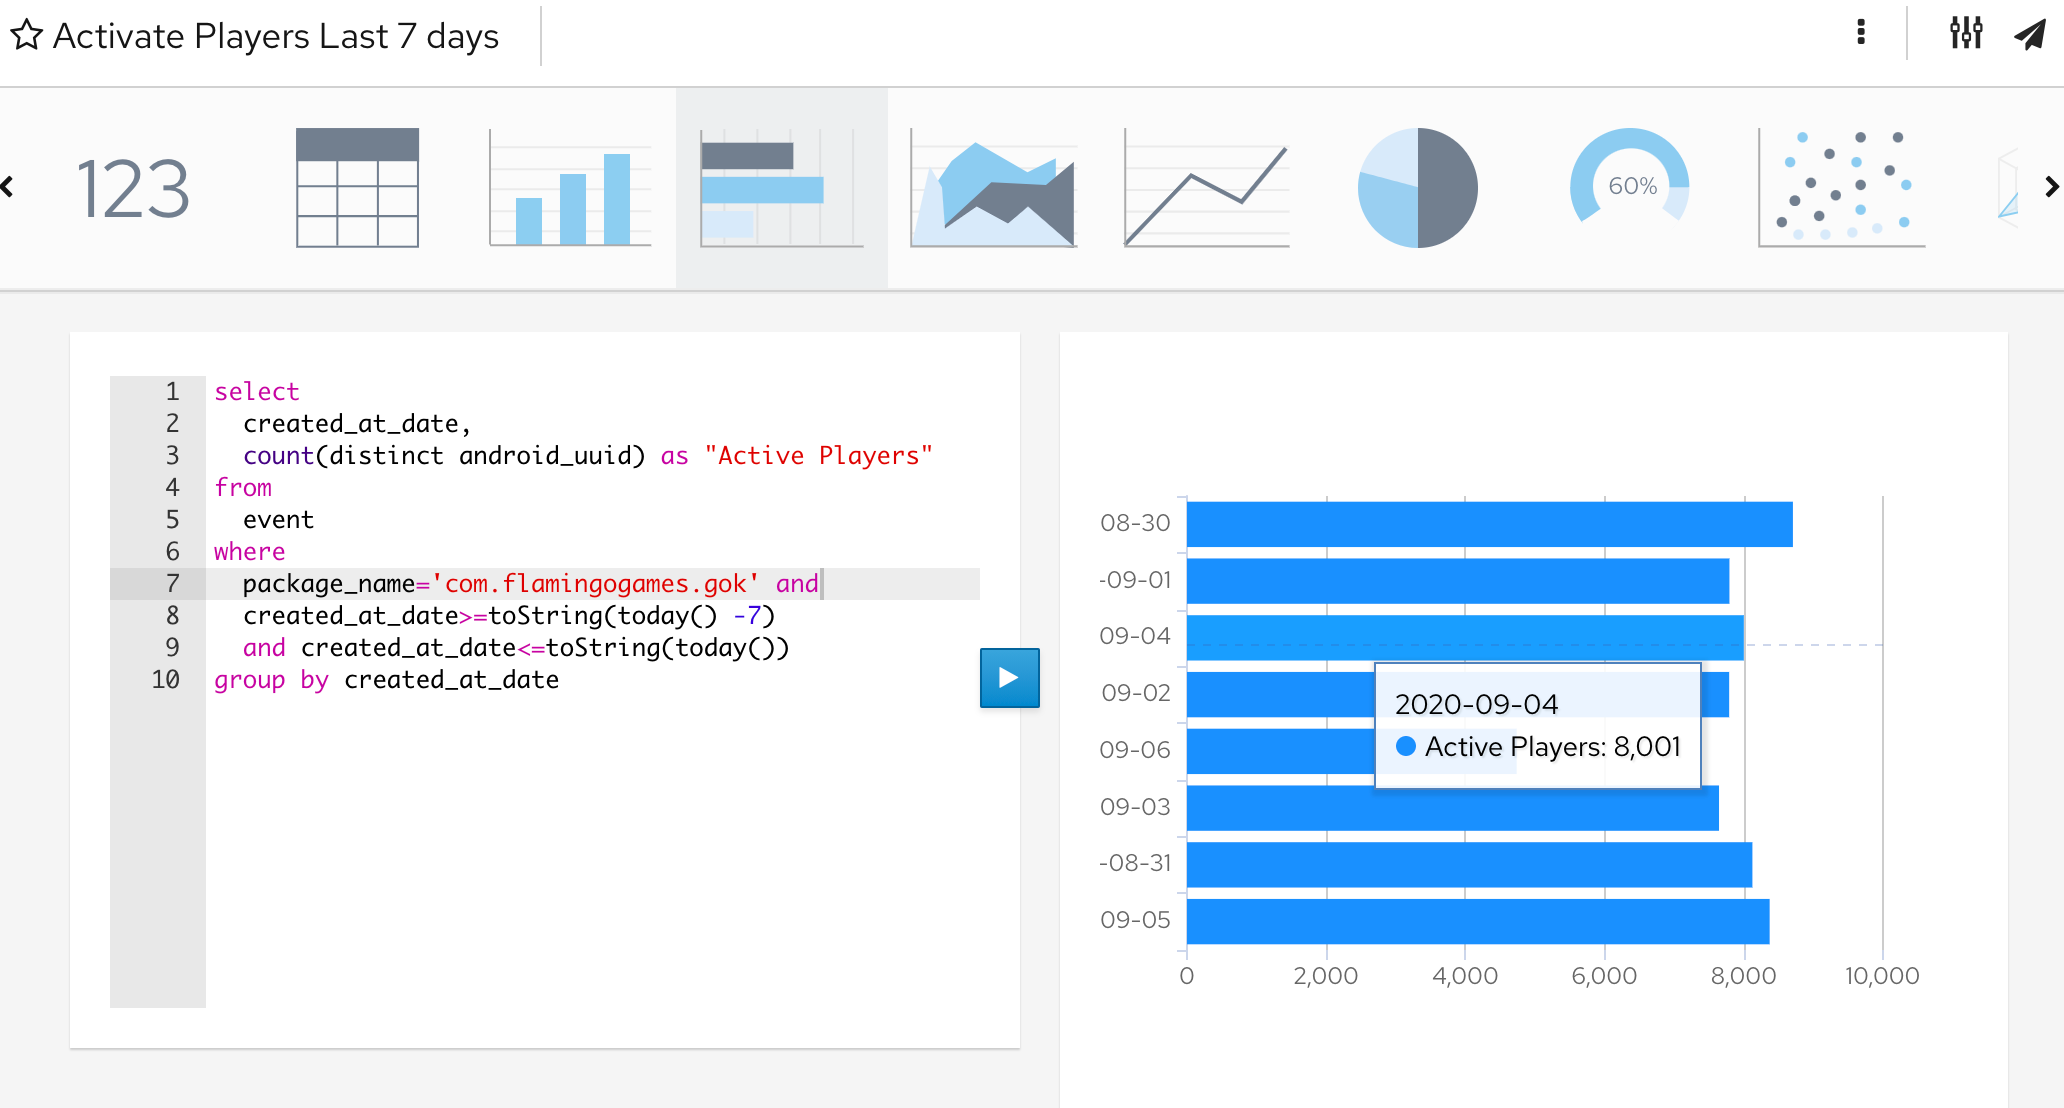
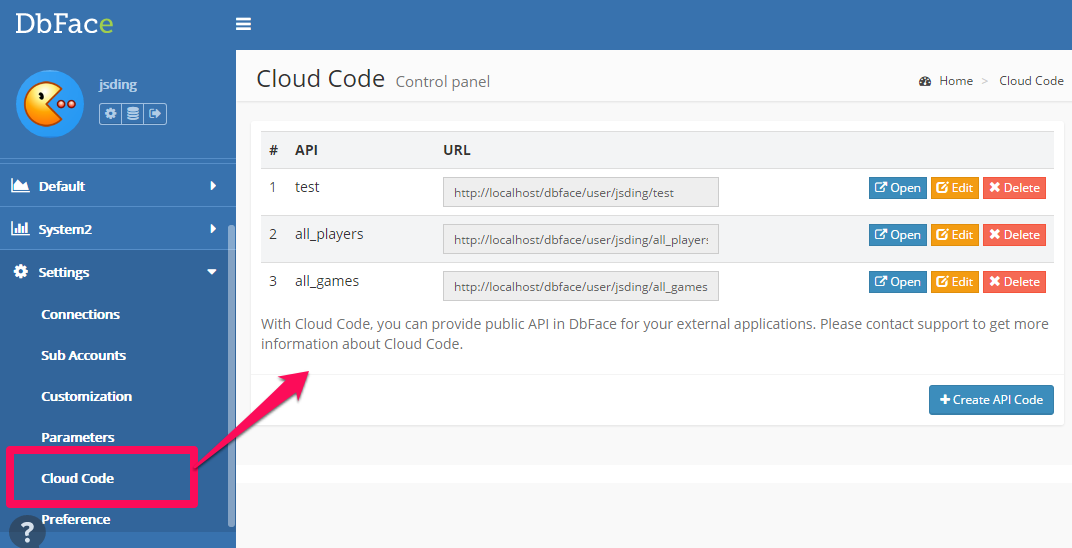
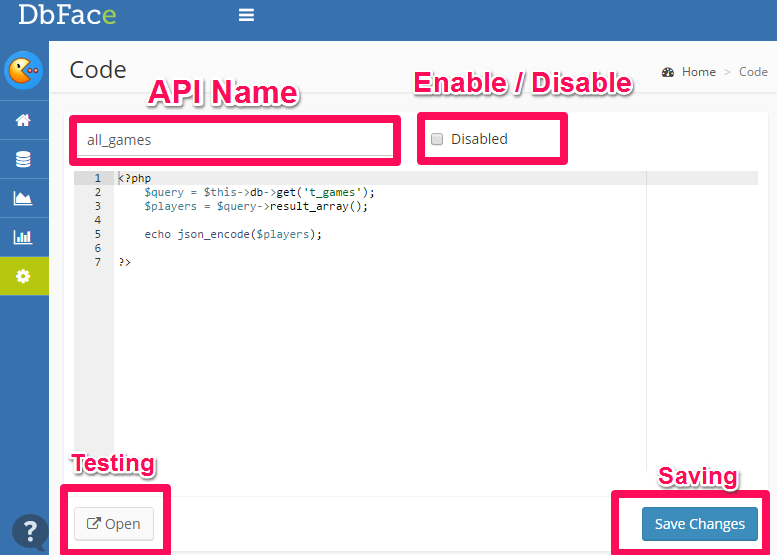

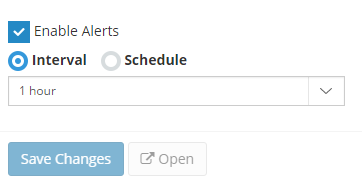
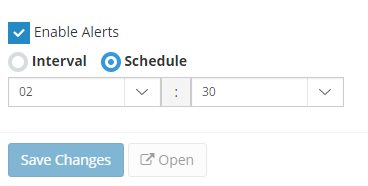 You can change the timezone at config/config.inc.php file
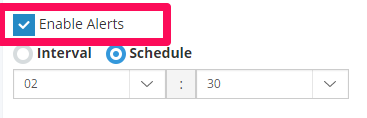
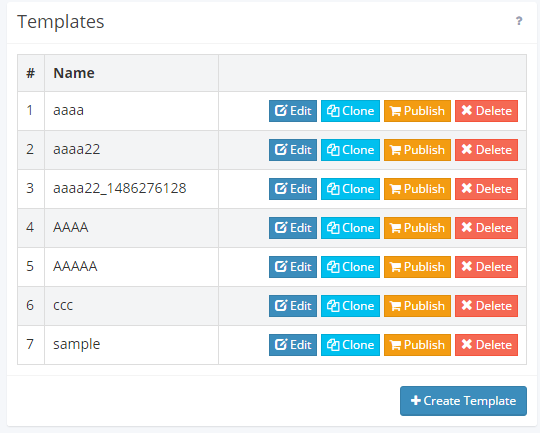
 As default, All scheduled jobs are executed by 10 minutes. You can drag the “Drag” icon to order the scheduled jobs.
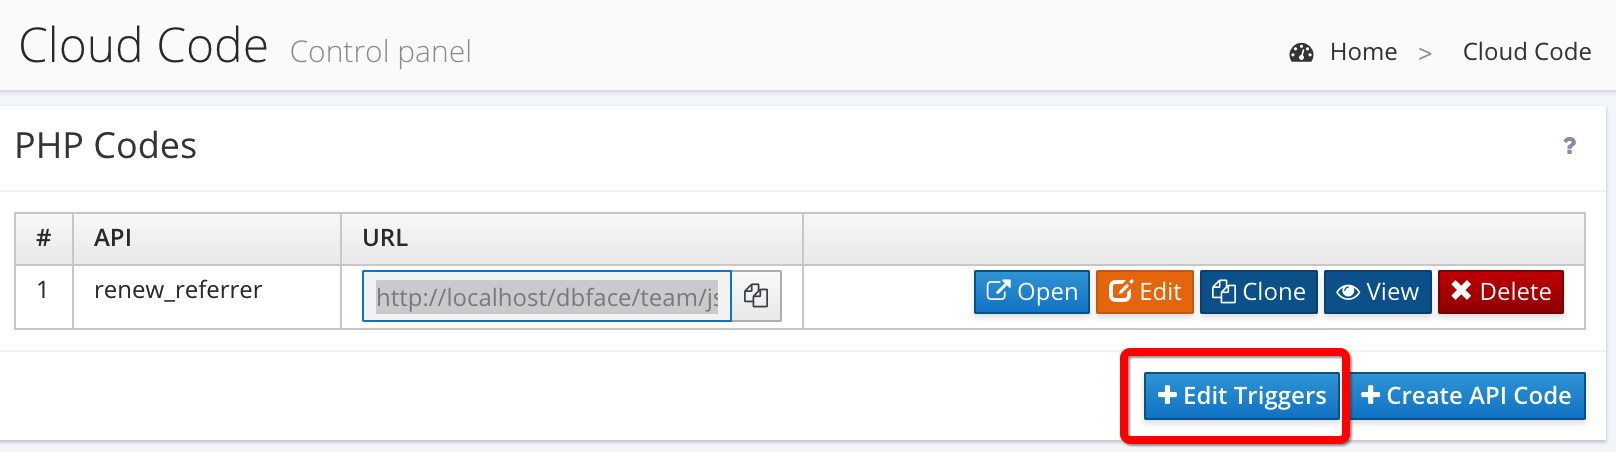
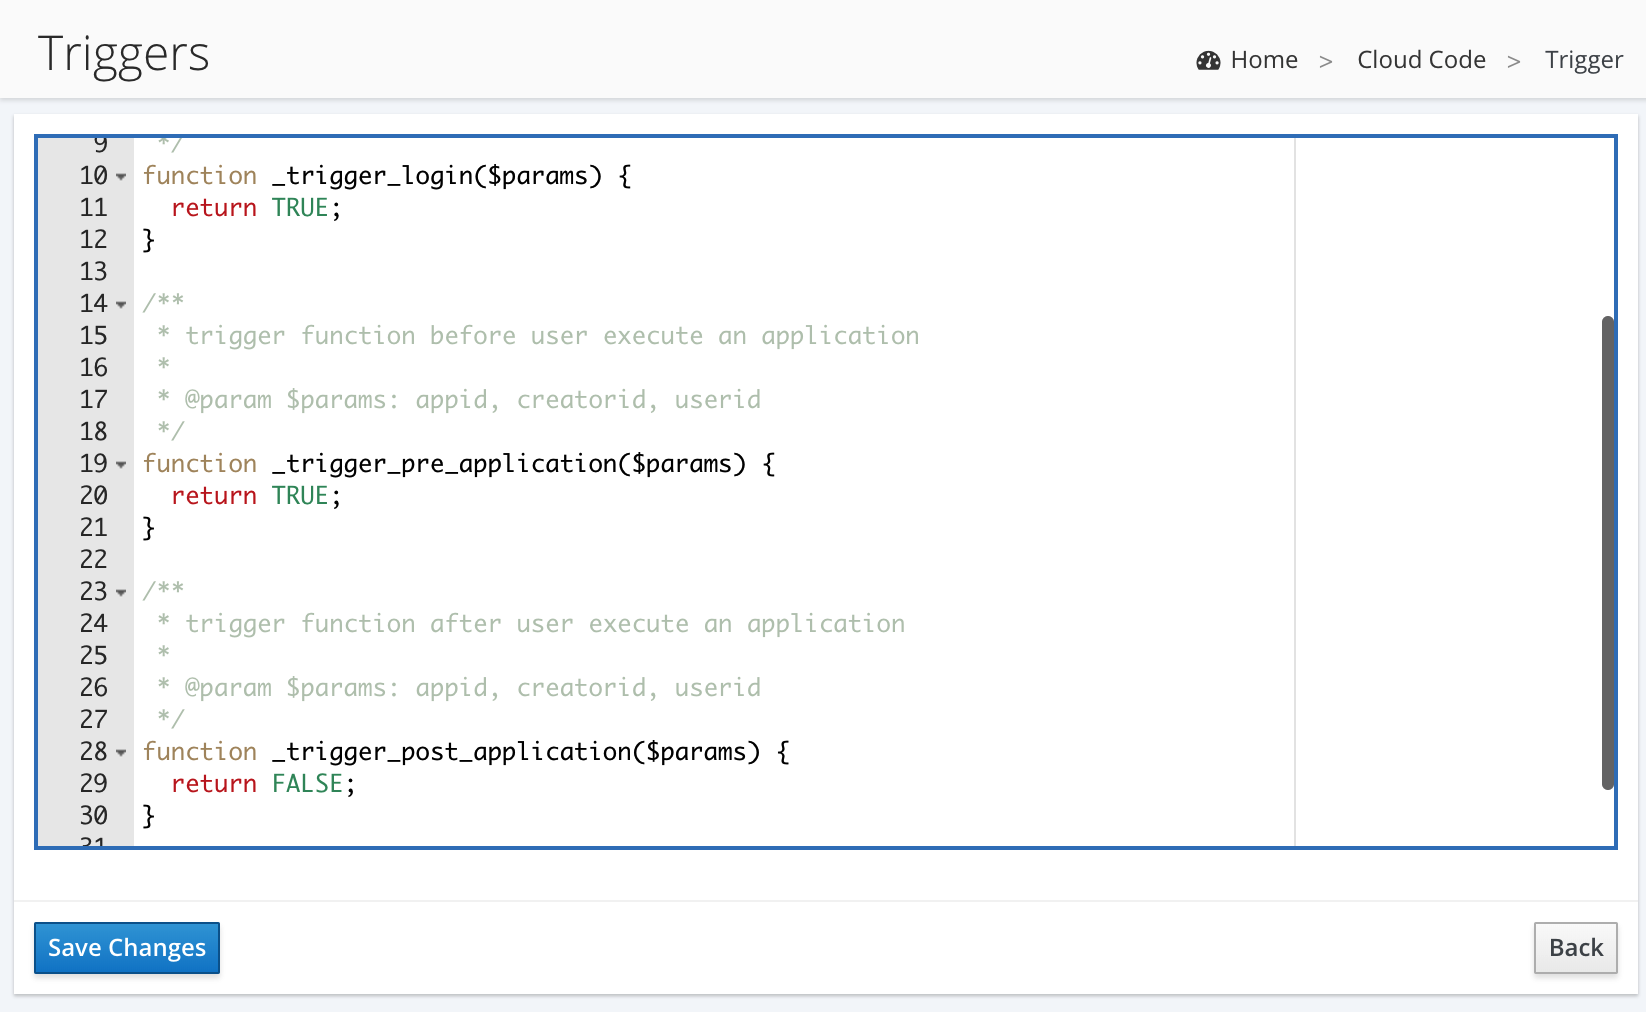
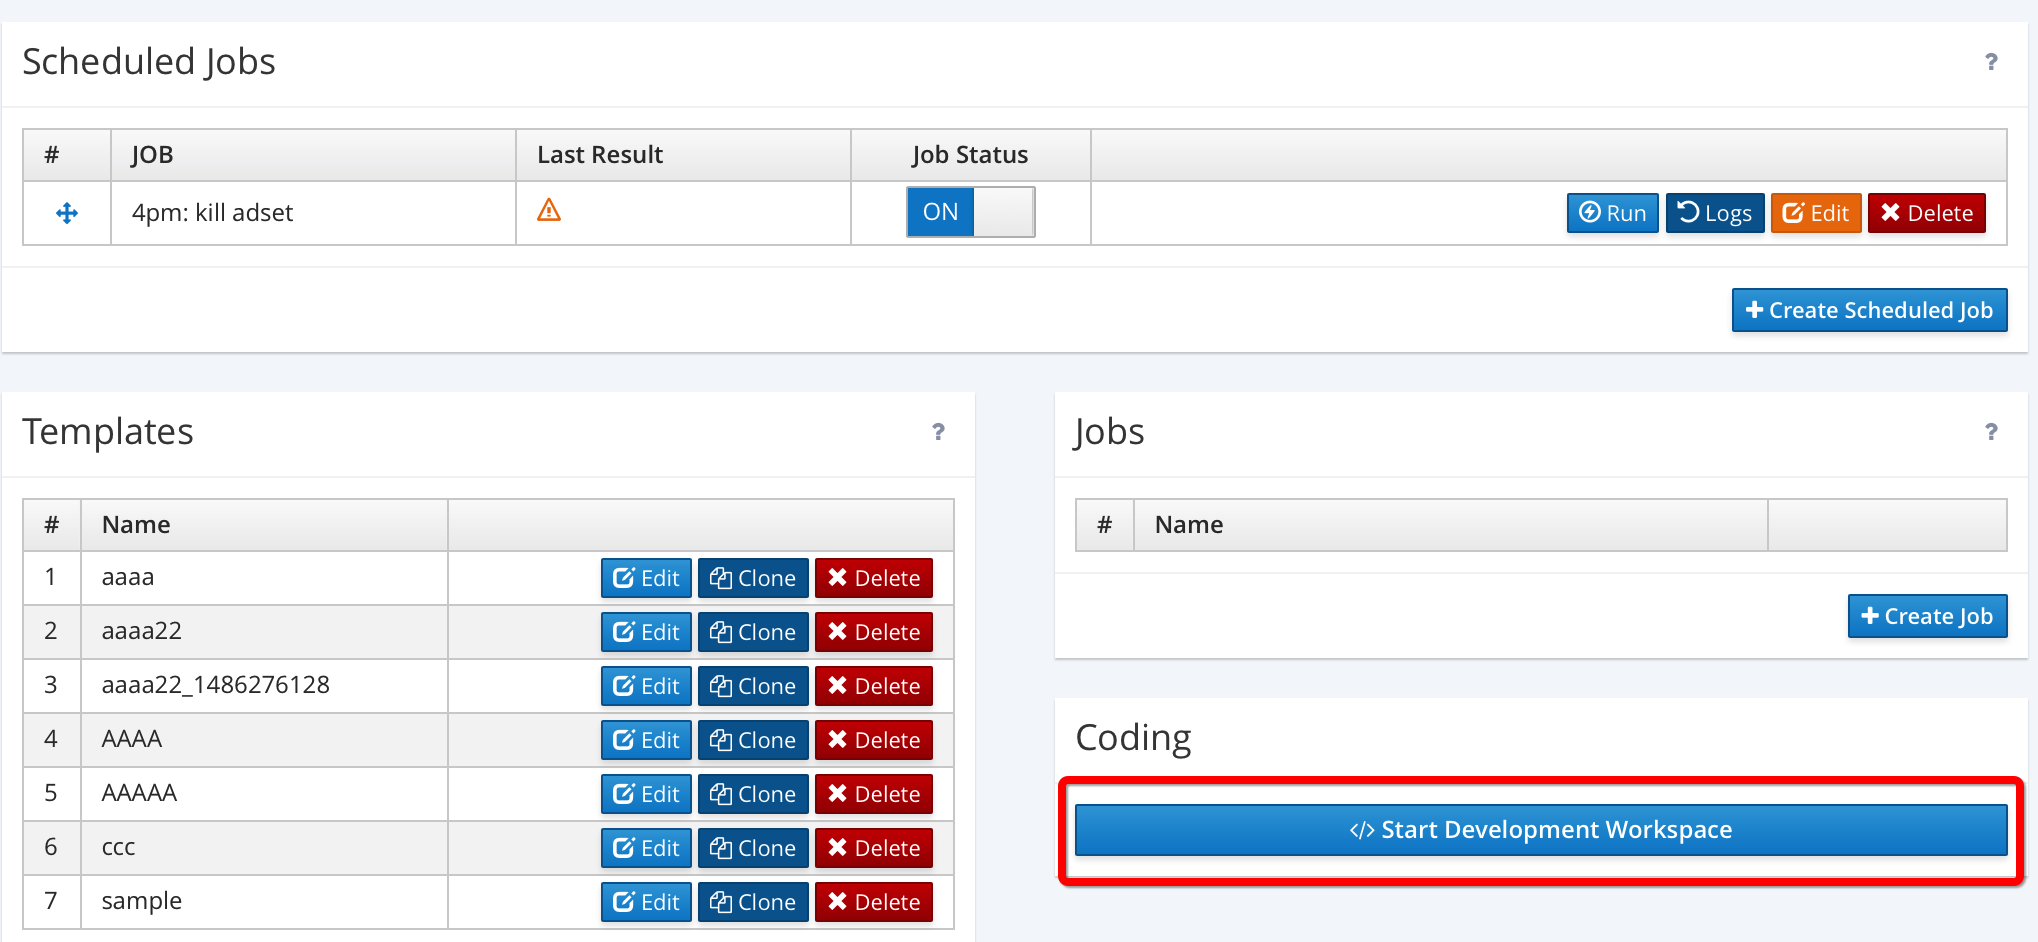
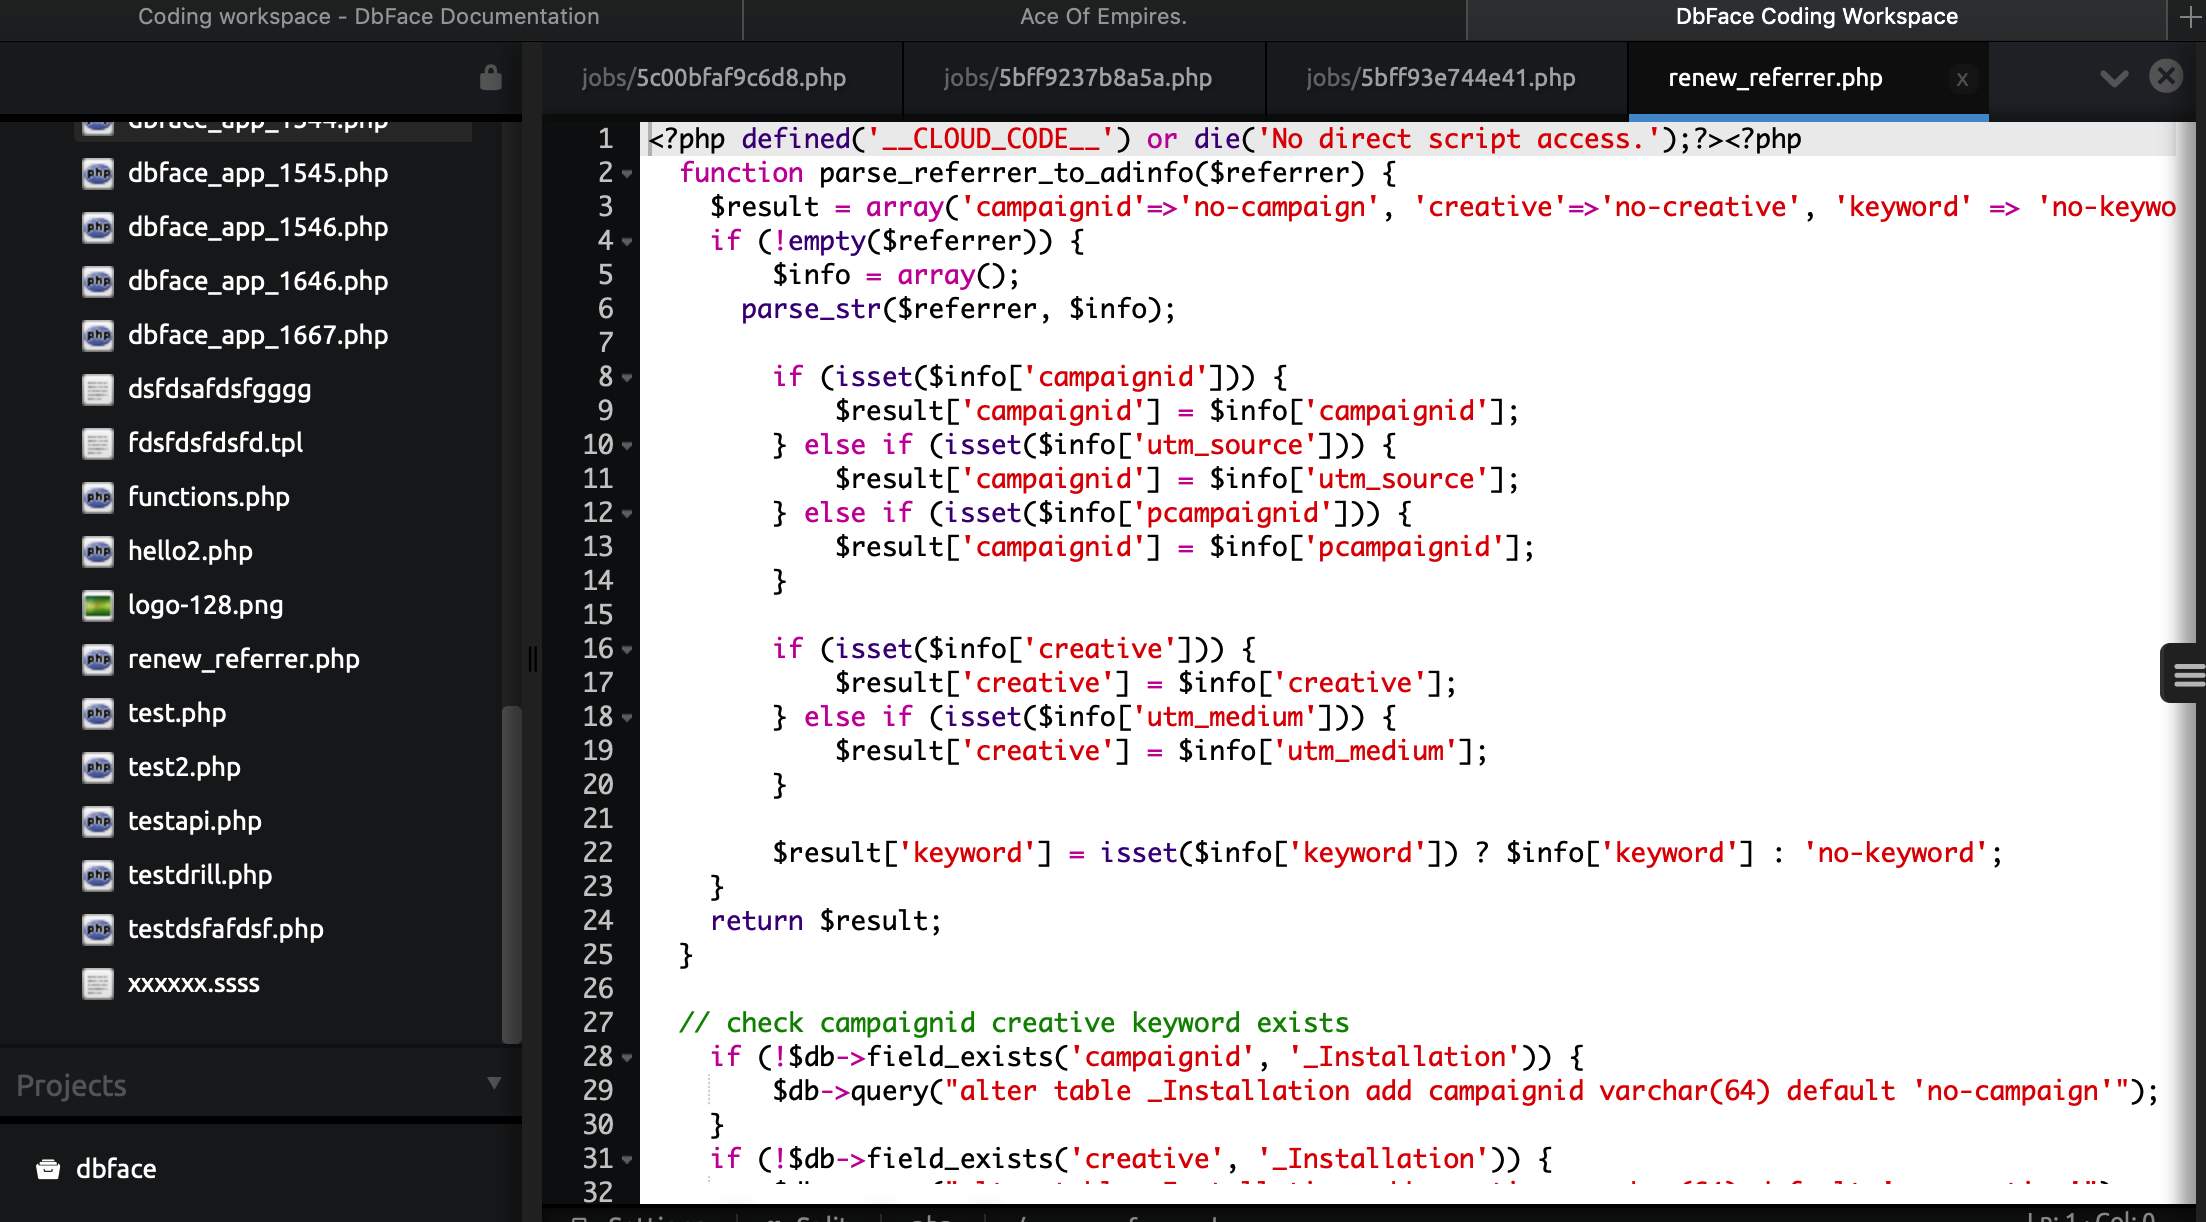


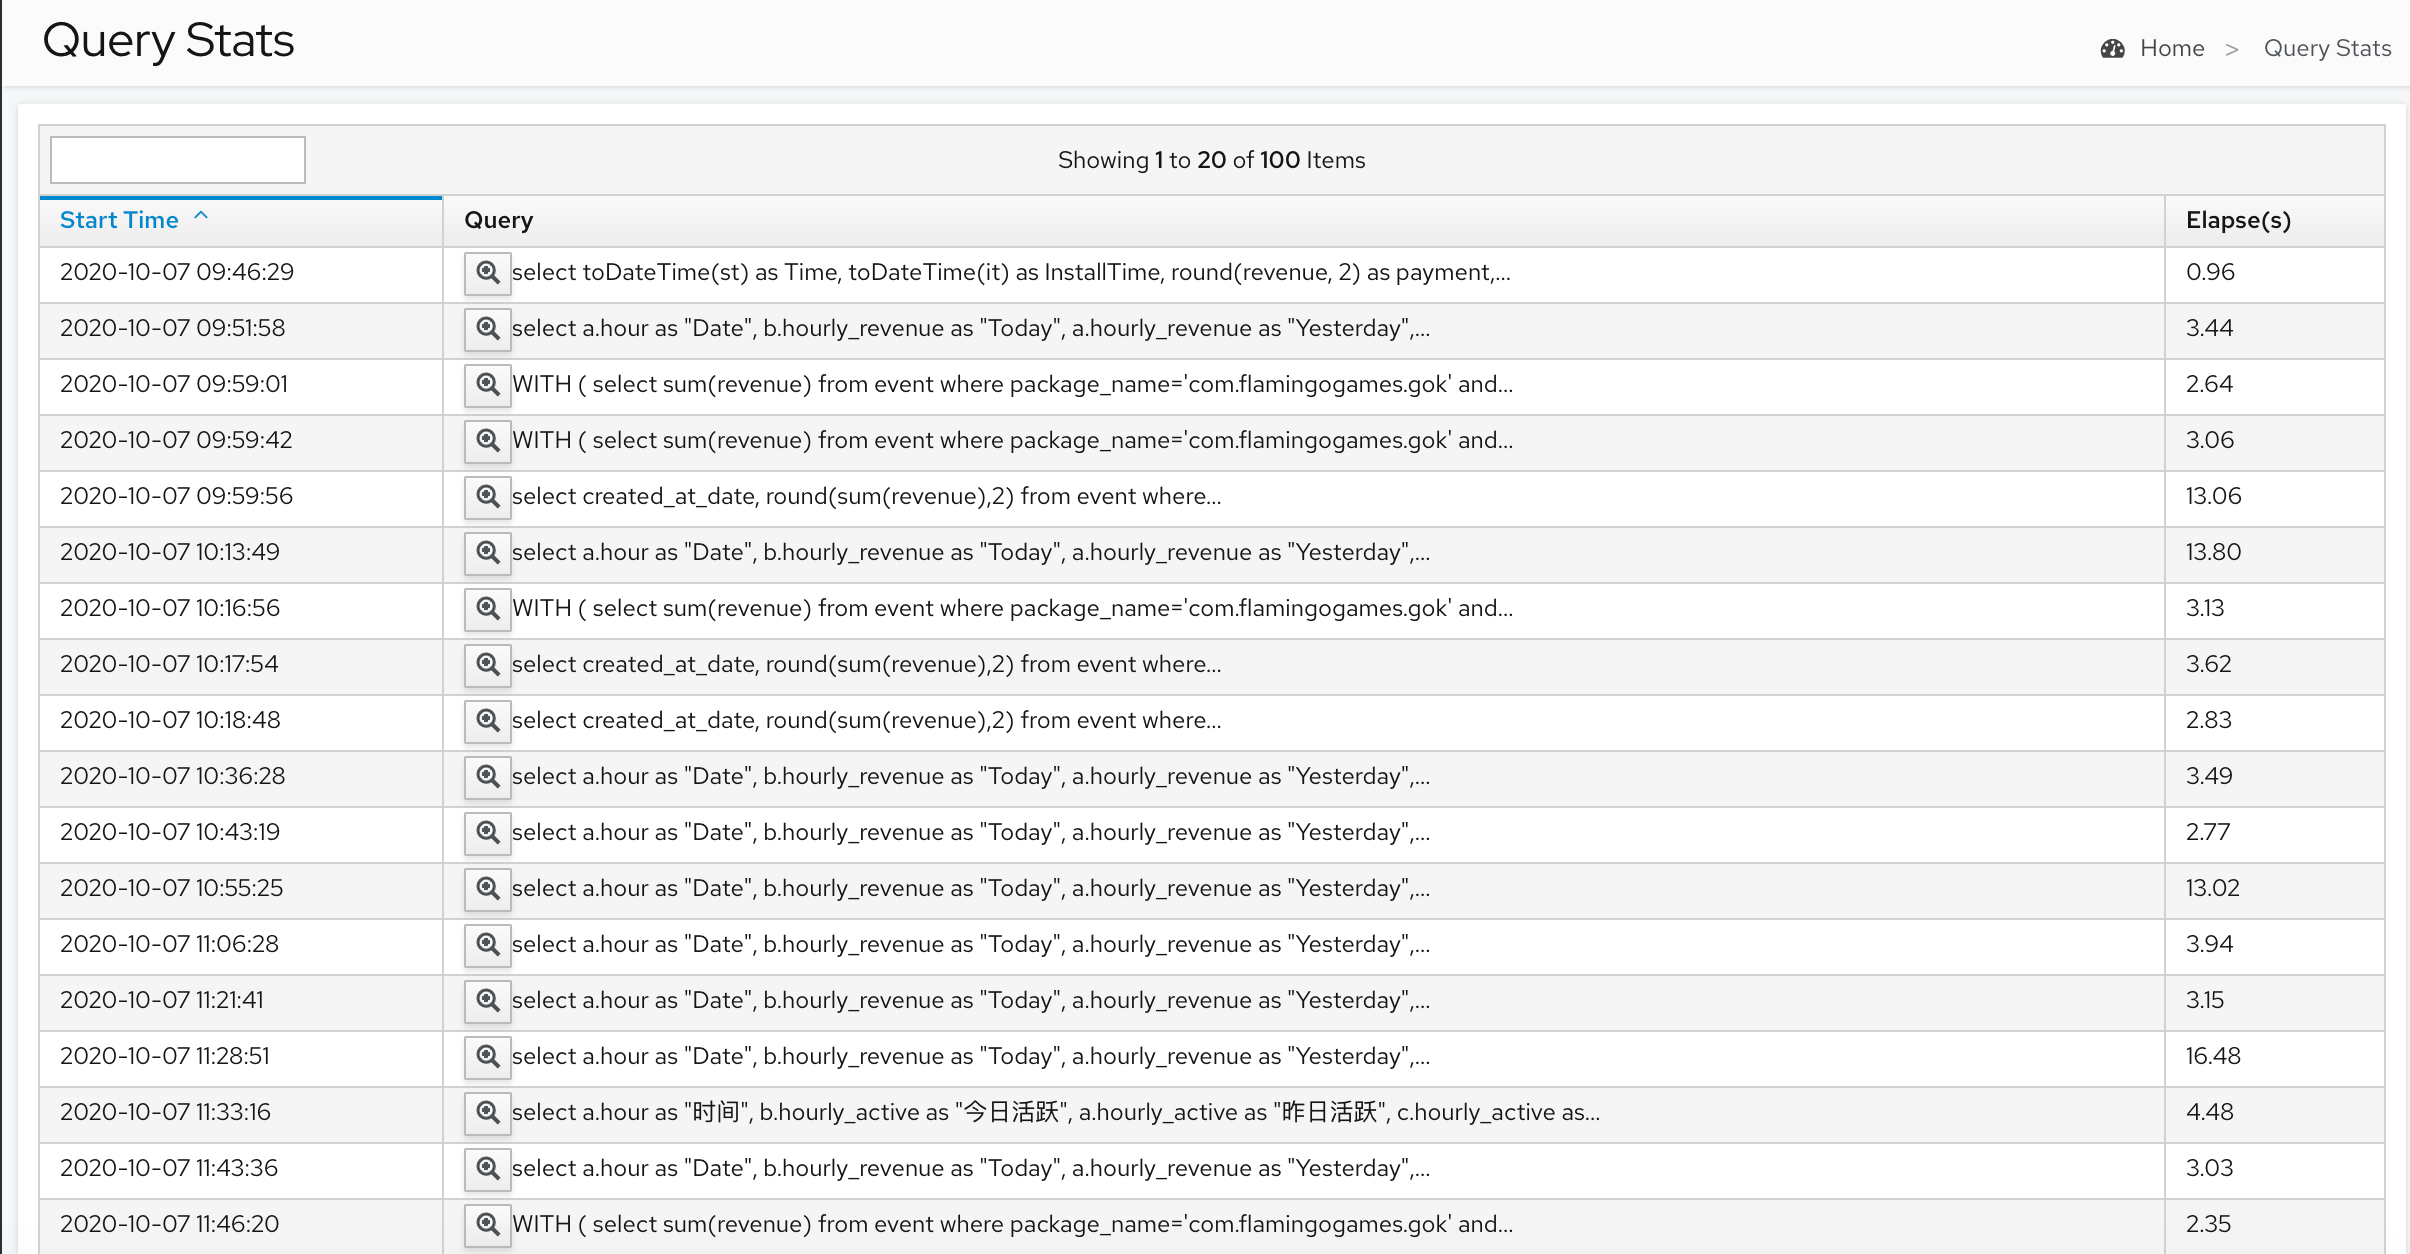

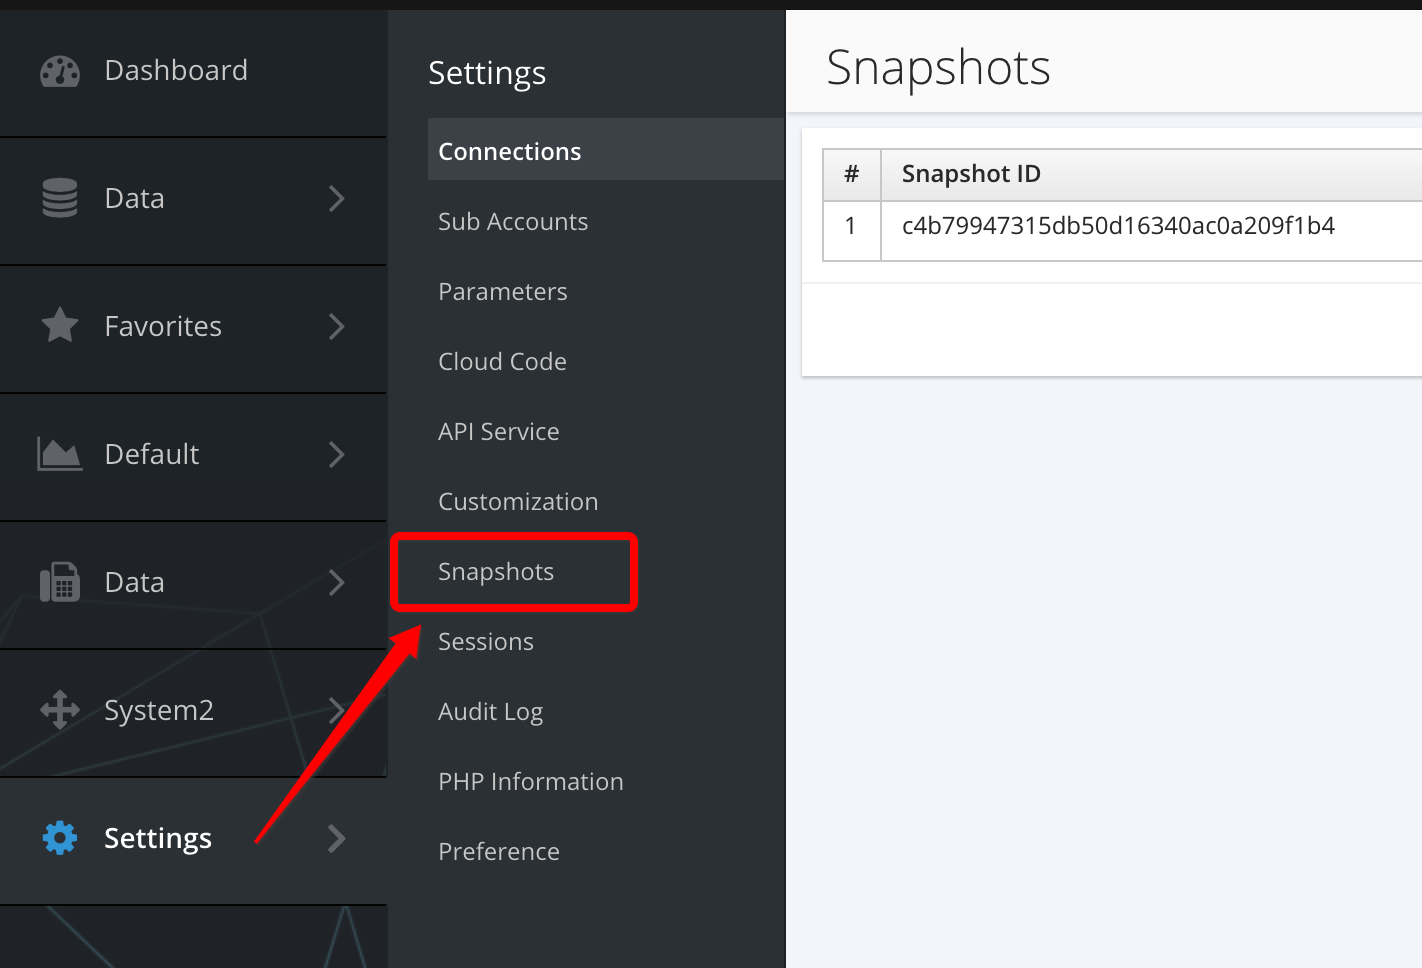
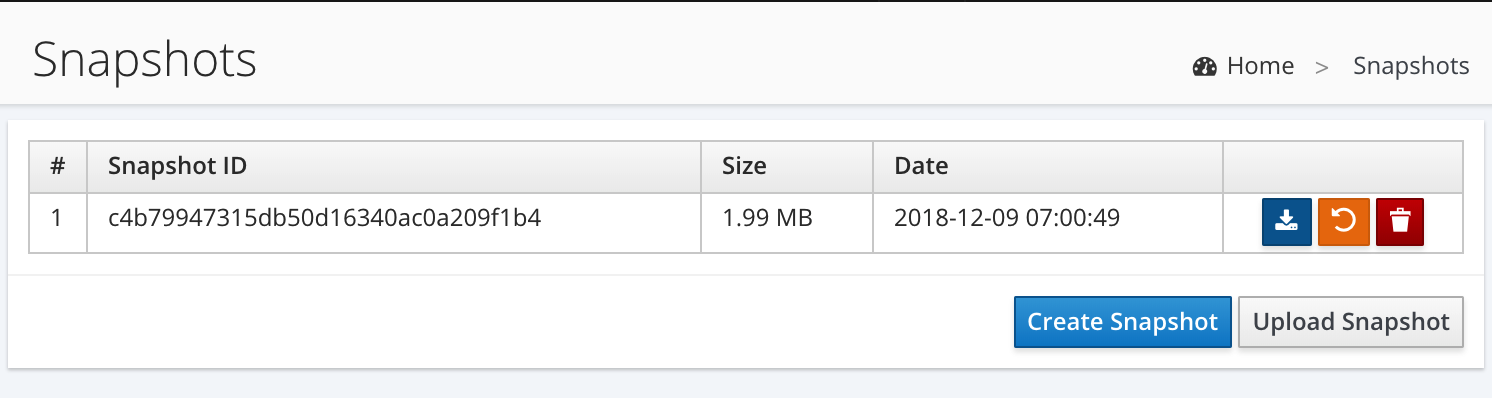

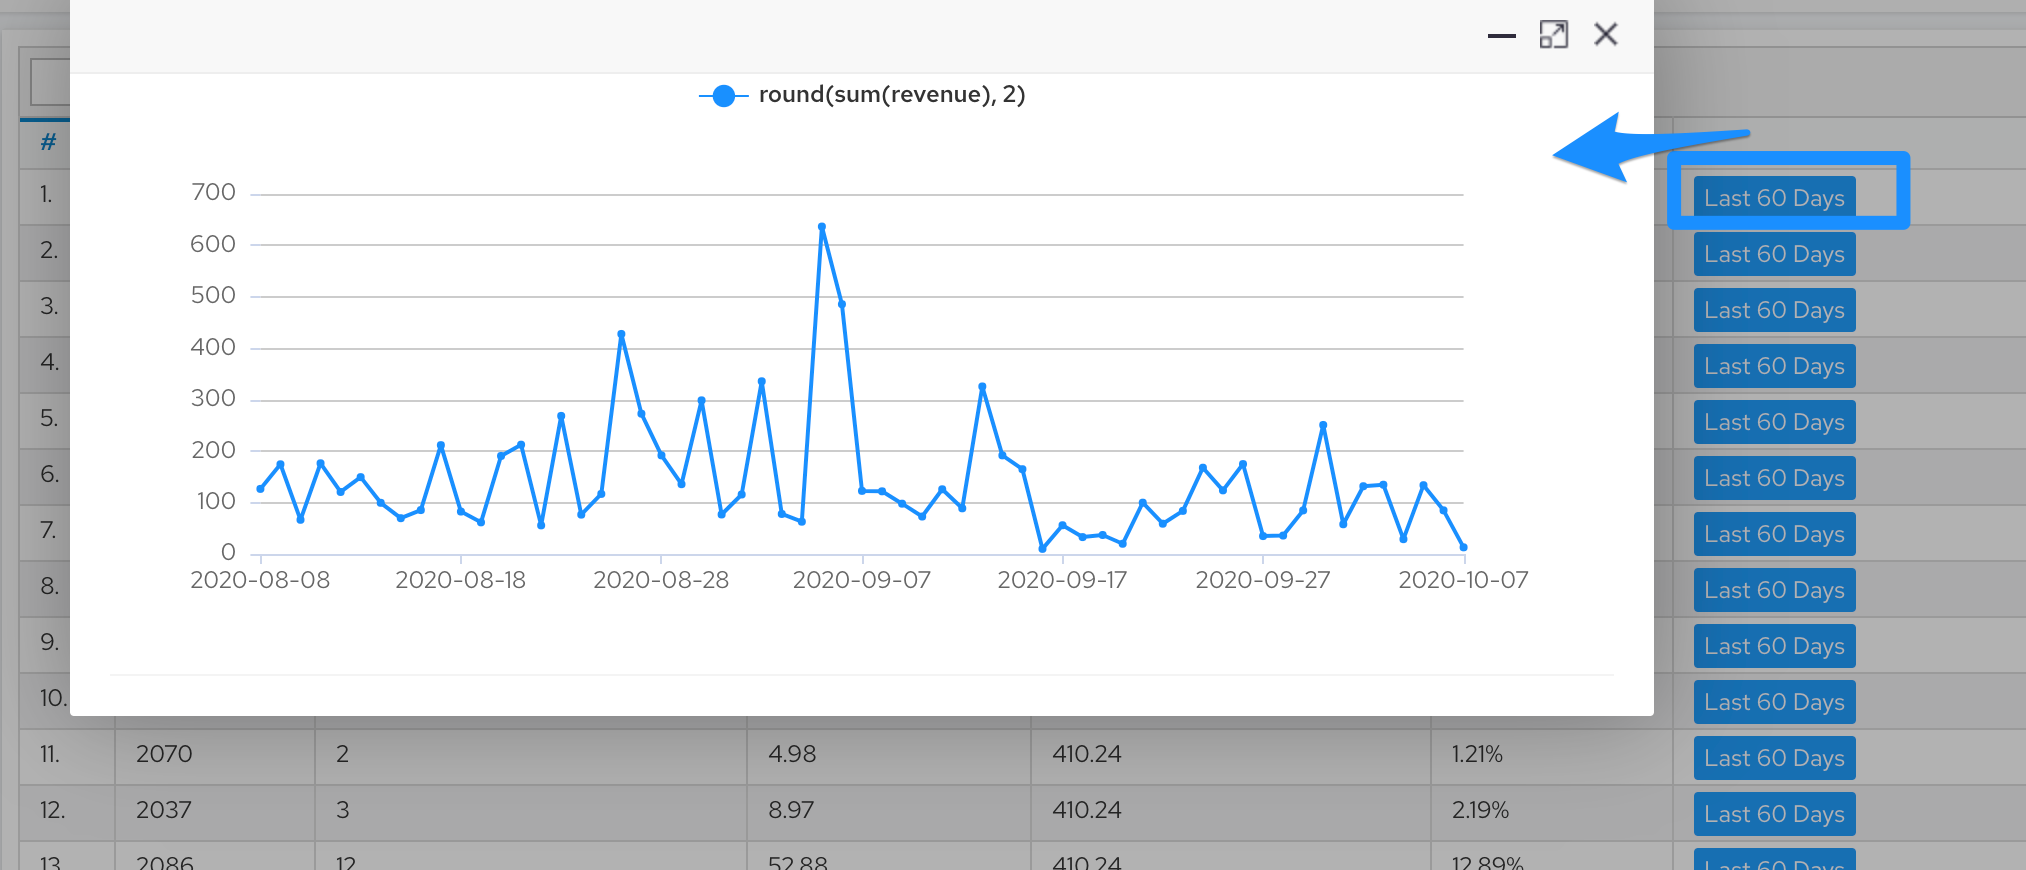
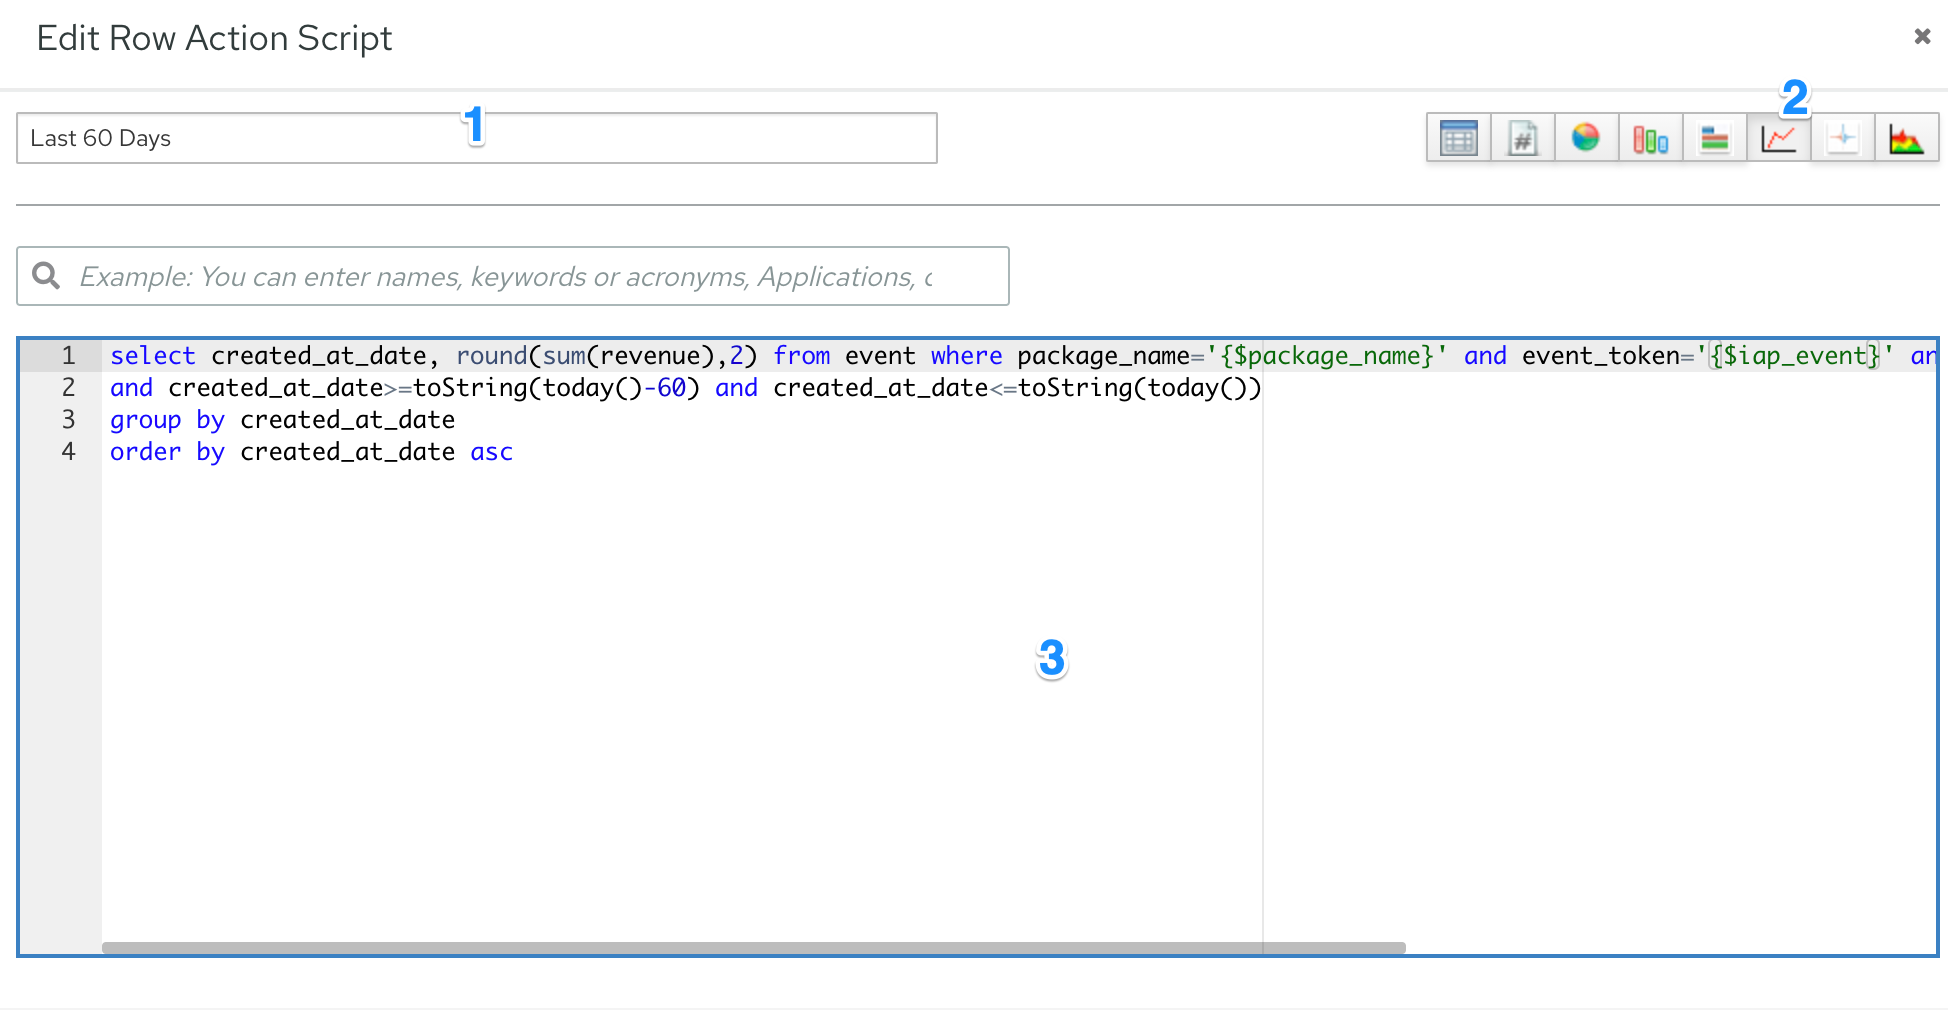
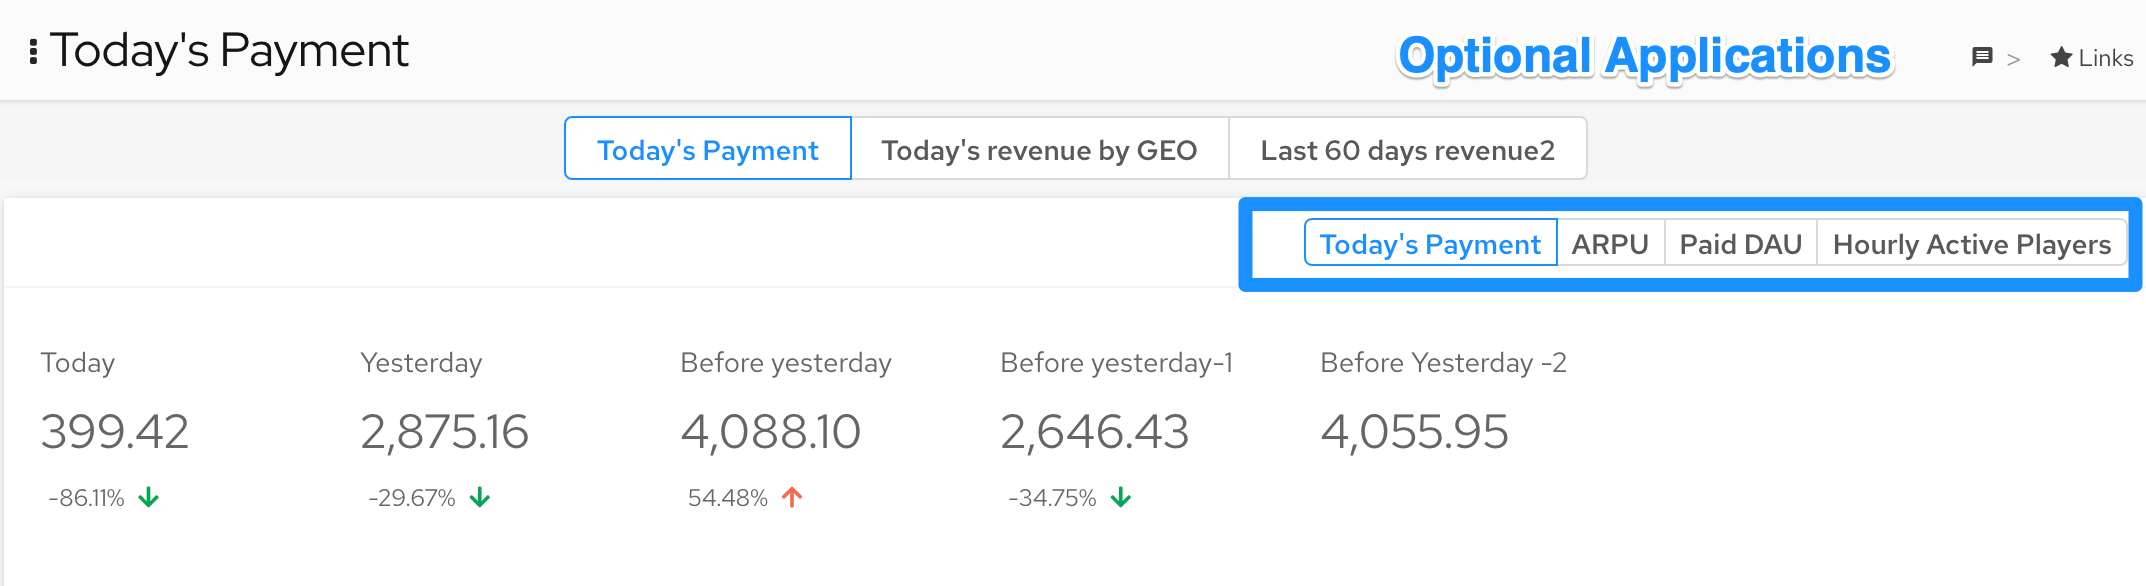


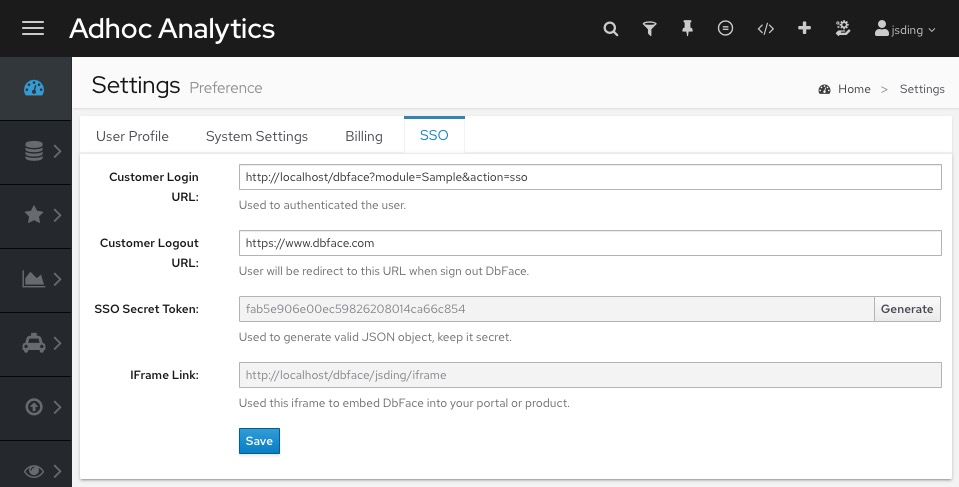
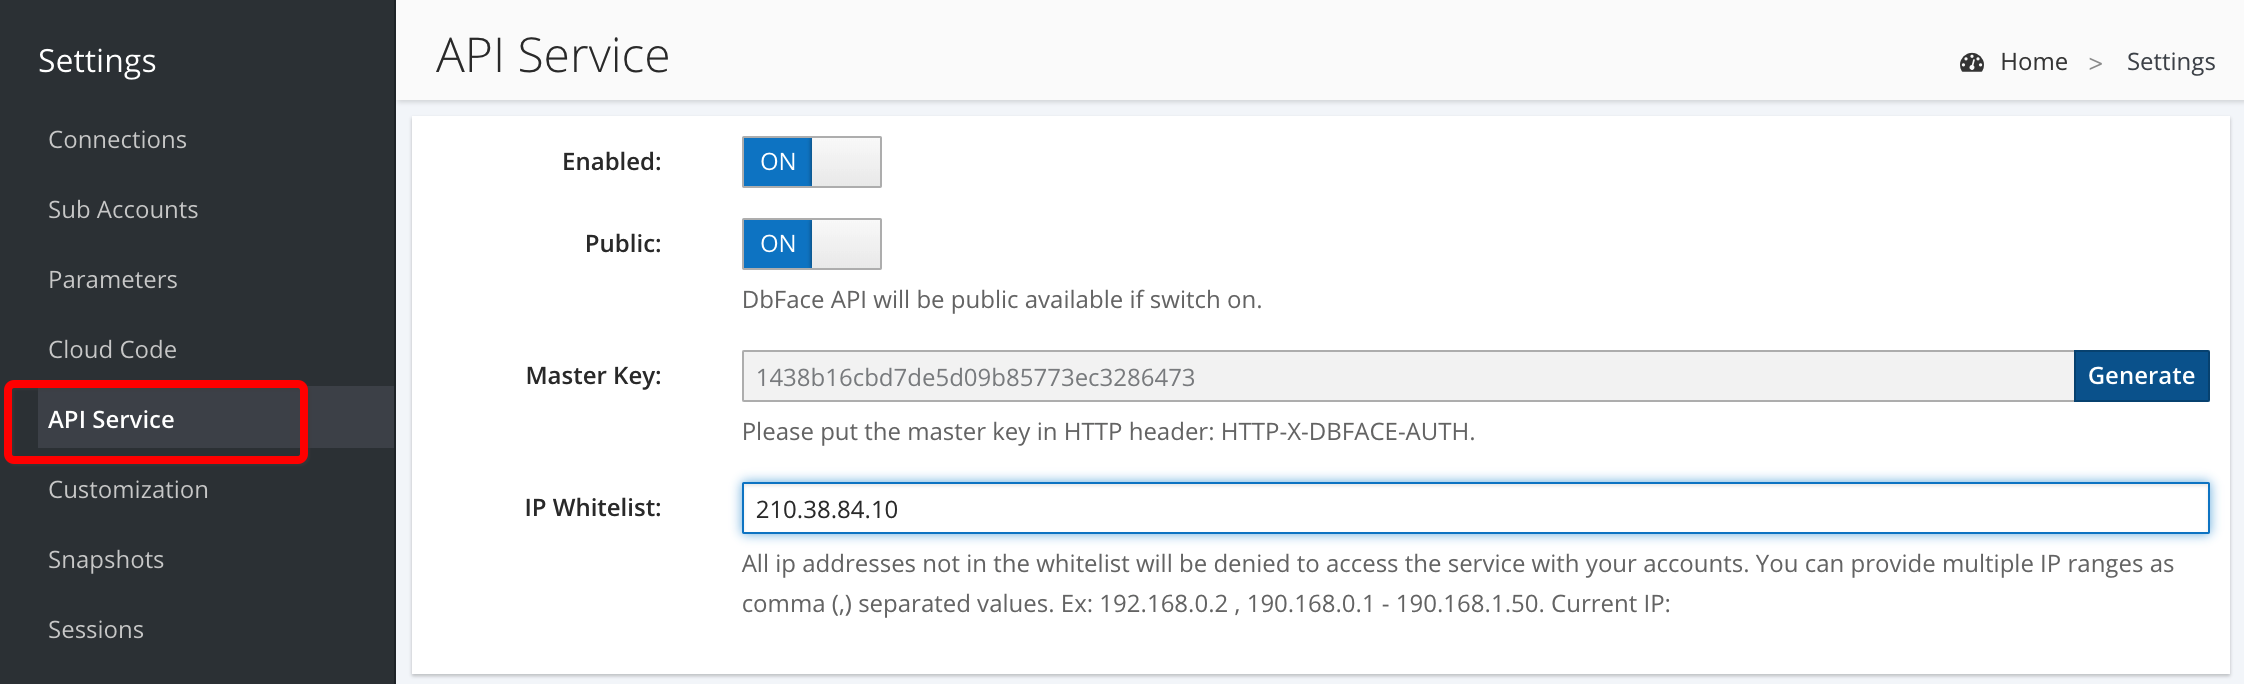


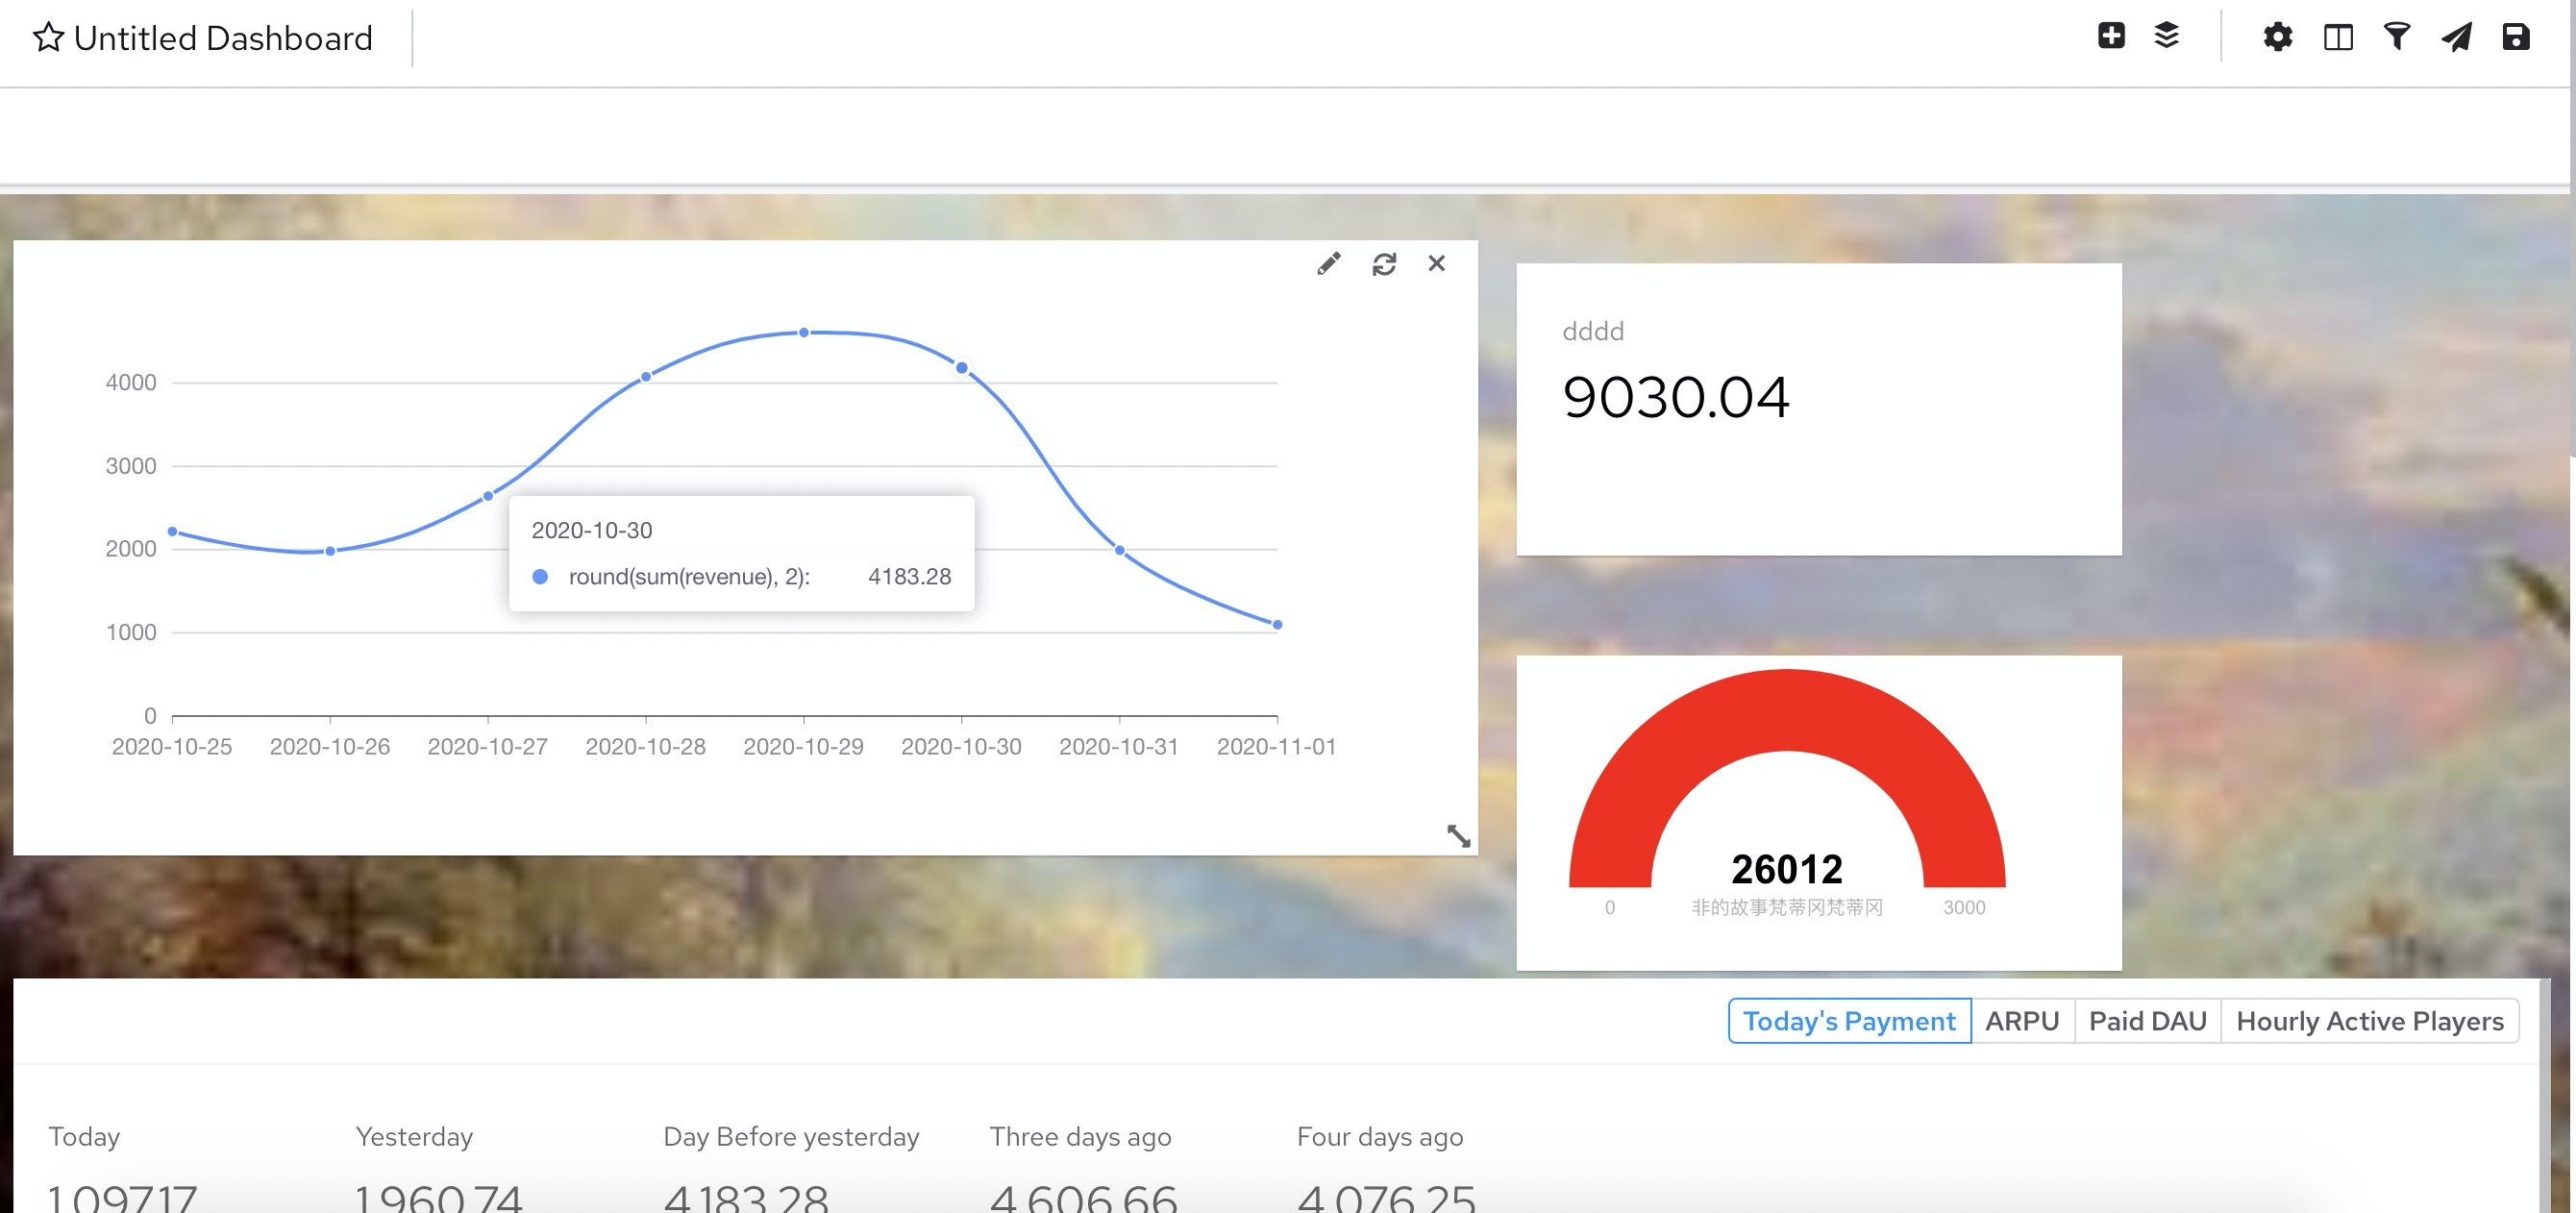 The DbFace application is an available execution unit, could be a database query / operation, a form report, a summary report, a line chart,or a pie chart,etc.


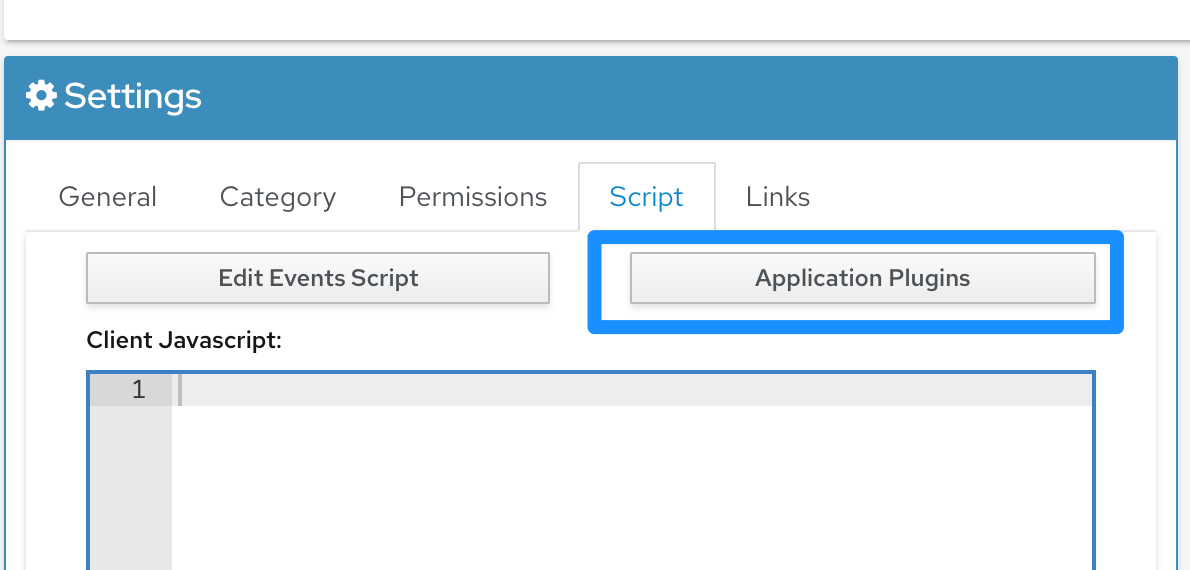


 Click “Download Backup” button, DbFace will generate a zip file that contains all your work in DbFace, save the zip file locally.