Data Sources
DbFace supports MySQL, PostgreSQL, Clickhouse, Google BigQuery and most of SQL or NoSQL databases.
DbFace needs to get data from your database to display and manipulate. So DbFace needs to know how to connect to your database servers.
DbFace supports MySQL, PostgreSQL, Clickhouse, SQL Server, Oracle, Firebird/Interbase, CUBRID, MongoDB and other SQL/NOSQL database servers. You can also upload CSV files as data sources. For other data sources ( in-house data), you can create your own API connector or Data Source Plugin to make it work with DbFace.
Need Help?
We are always working on DbFace to support more database types, please let us know your databases, if you any issues with connecting to your data source, please drop us a mail.
Steps to Take Before Connecting
-
Ensure that the database is publicly addressable and currently up & running.
-
Verify that the database is not hosted on a local machine. DbFace cannot connect to databases hosted on local machines (e.g. laptops, PCs, etc.).
-
Ensure that DbFace supports the database type attempting to be connected. A list of supported integrations is available here.
Connect to database
To create a connection to your database, please login DbFace with the Administrator account, find the “Connections” section in the dashboard, there will list all the database connections you have created.

Click “Add new connection” button to enter “create a database connection” page:
Connect to database via DSN
We are always working on to support more database types.
Some database drivers (such as IBM DB2, 4D) might require a full DSN string to be provided. If that is the case, you should use the ‘dsn’ configuration setting, as if you’re using the driver’s underlying native PHP extension, like this:
// PDO
$db['default']['dsn'] = 'pgsql:host=localhost;port=5432;dbname=database_name';

// Oracle
$db['default']['dsn'] = '//localhost/XE';
Edit database connection
Log in as Administrator, find the “Connections” section in the dashboard, click on “Edit” button, then enter the database connection editing page.
!!! warning
If your database schema changed, all applications will be affected.
Remove database connection
Log in as Administrator, find the “Connections” in dashboard page, click “Delete” button, After confirmation, the database connection will be removed.
!!! warning “Be careful”
Deleting a database connection will delete all applications using this database connection!
Sync data source
For API Connector, DbFace provides a quick way to sync the remote data to DbFace server on the fly.
After tapped the “Sync” button, DbFace will get the updated data from your server via the API Connector.

Default connection
Click the “Select” button to change the default database connection. DbFace will only show applications that using default connection in the left menu.
If you want to show all applications, you can change the option at System Settings page.
- Tap Settings, and tap “Preference” menu
- Select “System Settings” page
- Find “Only show applications in default database connection.” and uncheck it
- Click “Save Changes” to save your settings.
Manage database structure
For MySQL, CSV Files, API Connector data sources, DbFace provide database structure management tool.
Click here to learn more information about Structure Management Tool.
SQL workshop
You can test SQL queries in SQL workshop, and save them as favorite. You can pick a tested SQL query while building an application.
Click here to learn more information about SQL Workshop.
SQL Terminal
SQL Terminal provides you a console emulator to execute SQL query quickly.
Click here to learn more information about SQL Terminal.
1 - MySQL or MariaDB
Connect to MySQL or MariaDB in DbFace
MySQL is one of the most popular open-source databases in the world, used by some of the top companies everywhere.
To create a database connection to MySQL or MariaDB,
- Log in DbFace with the Administrator account.
- Find the “Connections” section, and tap “Add new connection” button
- Select “MySQL or MariaDb” in the Database Type dropdown list.

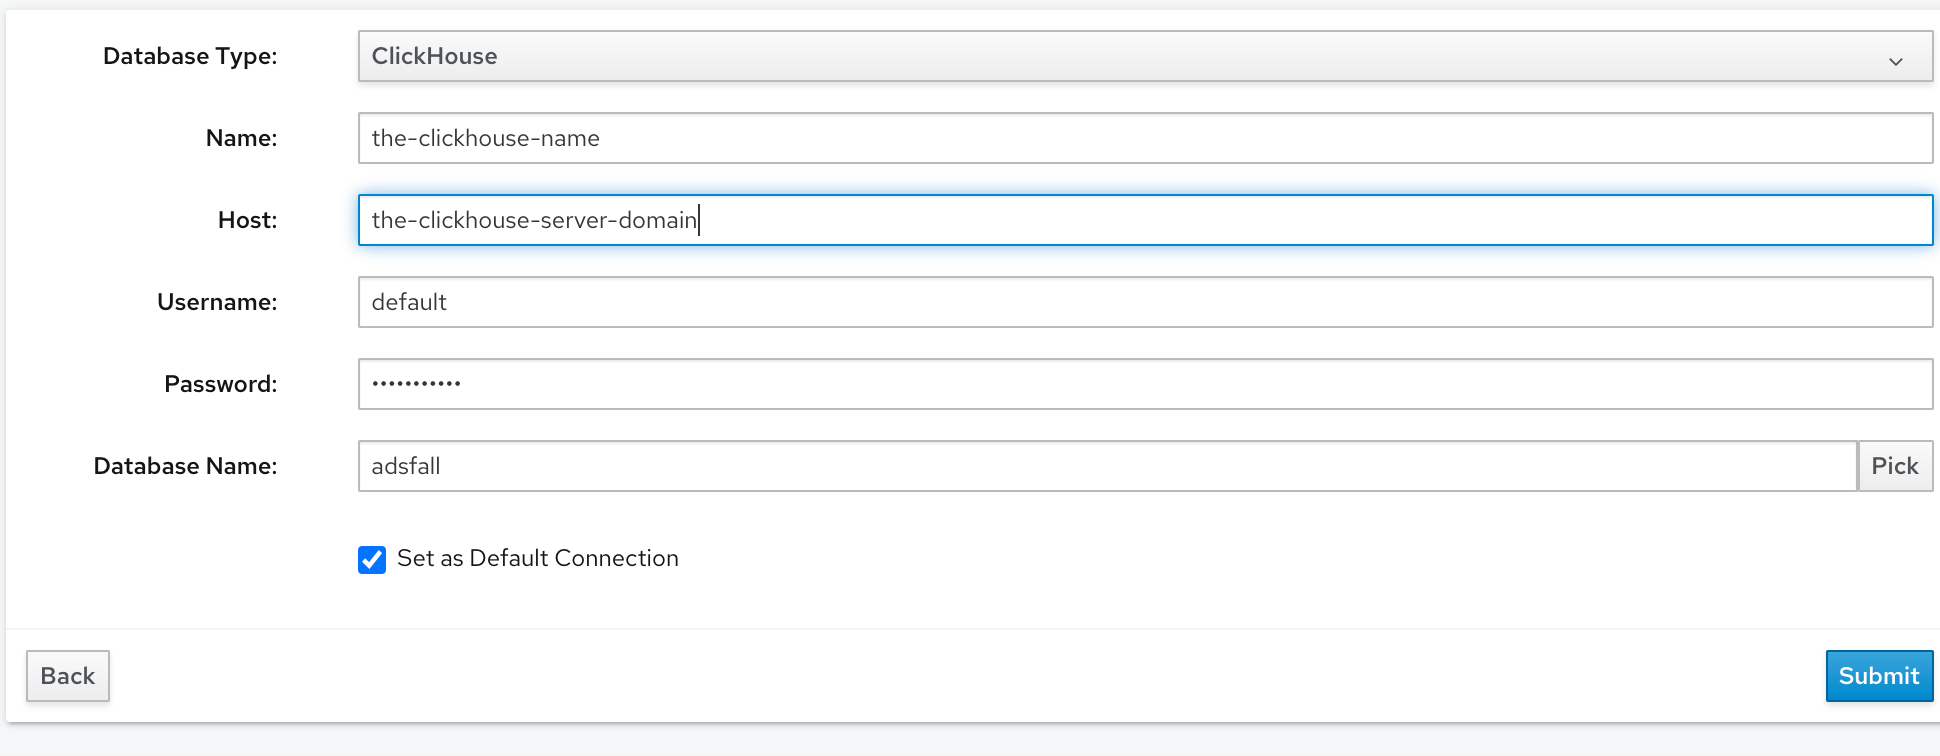
- Database Type:
The database driver that use to connect your database, here we choose “MySQL or MariaDB”. DbFace will use “mysqli” driver to connect to MySQL or MariaDB databases.
- Name:
The name to identify this connection, used only in DbFace.
- Host:
Your database host domain/IP. If you are not using the default port, should input host:port in the “Host” field.
- Username:
The database username.
- Password:
The database password.
- Database Name:
The database that you want to connect. Tap the “Pick” button to populate all database names that have permissions.
Ensure that all information is correct, click “Submit” button, DbFace will use the provided information to try to connect the database and create the connection if successfully.
Congratulations! You have successfully built your first database connection.
Tips
We recommend you create a sperated username/password for dbface to connect to your database, for MySQL:
create user 'thenewusername'@'52.221.20.99' identified by 'thenewuserpassword';
grant all privileges on thedatabase.* to 'thenewusername'@'52.221.20.99'
Recommend
If you just want to create query applications which only access the databases in DbFace, please create readonly database user for the databases.
Hosted Amazon EC2 or RDS
When the server is hosted on Amazon AWS, but not on a VPC, the first step is to log into the AWS console as an admin. Afterwards, the database instance needs to be set as publicly accessible. A Security Group on your EC2 or RDS client will need to be configured to accept connections from DbFace’s IPs. The IP requirement is a CIDR/IP, and thus the IPs that need to be added are 52.221.20.99/32. After configuring this Security Group, it must be applied to the instance of the database that you are connecting.
2 - PostgreSQL
Connect to PostgreSQL in DbFace
Choose the database type from the “Database Type” drop down.

- Database Type:
The database driver that use to connect your datatabase, choose PostgreSQL here.
- Name:
The name to identify this connection, used only in DbFace
- Host:
Your database host domain/IP. If you are not using the default port, should use host:port as your hostname
- Username:
The database username.
- Password:
The database password.
- Database Name:
The database that you want to connect. The “Pick” button is not available for PostgreSQL connection.
For on-premise installation, you need to enable pdo_pgsql extension to enable postgreSQL database connection, check php.ini
extension=php_pdo_pgsql.dll
Ensure that all information is correct, tap “Submit” button, DbFace will use the provided information to try to connect to the database, and create the connection if successfully.
We recommend you create a sperated username/password for dbface to connect to your database, for MySQL:
create user 'thenewusername'@'52.221.20.99' identified by 'thenewuserpassword';
grant all privileges on thedatabase.* to 'thenewusername'@'52.221.20.99'
!!! tip “Recommend”
If you just creating query applications which only access the databases, please create readonly database users for the databases.
!!! note “Be careful”
Please update your server’s firewall to allow DbFace to connect to your database server. If you’ve got any issues, please contact us to get free support.
3 - Clickhouse
Connect to Clickhouse in DbFace
ClickHouse is a fast open-source OLAP database management system. DbFace the Http port (default 8123) to connect to clickhouse.
4 - Microsoft SQL Server
Connect to Microsoft SQL Server in DbFace
Choose the database type from the “Database Type” drop down.
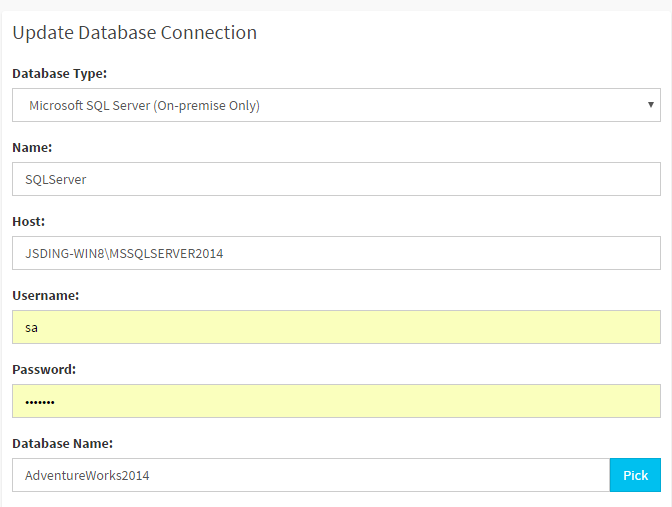
- Database Type: The database driver that use to connect your datatabase
- Name: The name to identify this connection, used only in DbFace
- Host: Your database host domain/IP. If you are not using the default port, should use host:port as your hostname
- Username: The database username.
- Password: The database password.
- Database Name: The database that you want to connect
For SQL Server, make sure the PHP PDO SQLSRV extension loaded, check php.ini
extension=php_pdo_sqlsrv_54_ts.dll
please enter the SQL Server address in the host field, it should be like:
JSDING-WIN8\MSSQLSERVER2014
Ensure that all information is correct, click “Submit” button, DbFace will use the provided information to try to connect the database, and create the connection if successfully.
Congratulations! You have successfully built your first database connection.
!!! Tip “Recommend”
If you just creating query applications which only access the databases, please create readonly database users for the databases.
!!! note “Be careful”
Please update your server’s firewall to allow DbFace to connect to your database server. If you’ve got any issues, please contact us to get free support.
5 - Oracle
Connect to Oracle in DbFace
Choose the database type from the “Database Type” drop down.
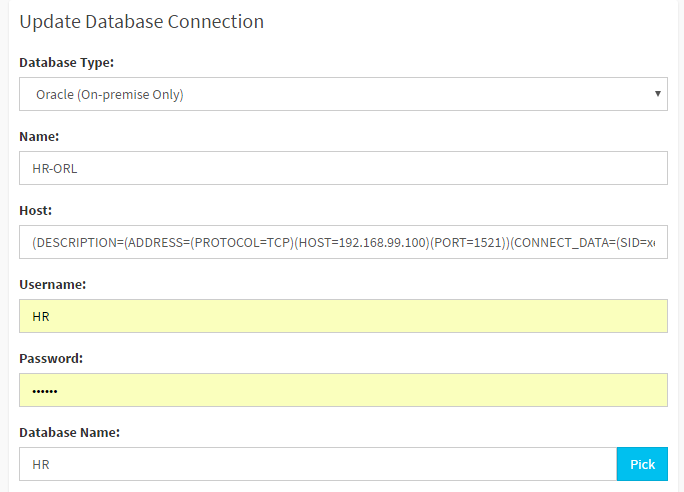
- Database Type:
The database driver that use to connect your datatabase
- Name:
The name to identify this connection, used only in DbFace
- Host:
Your database host domain/IP. If you are not using the default port, should use host:port as your hostname
- Username:
The database username.
- Password:
The database password.
- Database Name:
The database that you want to connect.
For oracle, make sure the PHP oci8 extension loaded, check php.ini
extension=php_oci8_11g.dll ; Use with Oracle 11gR2 Instant Client
please enter the oracle SID in the host field, it should be like:
(DESCRIPTION=(ADDRESS=(PROTOCOL=TCP)(HOST=localhost)(PORT=1521))(CONNECT_DATA=(SID=xe)))
Ensure that all information is correct, click “Submit” button, DbFace will use the provided information to try to connect the database, and create the connection if successfully.
Congratulations! You have successfully built your first database connection.
!!! Tip
If you just creating query applications which only access the databases, please create readonly database users for the databases.
!!! note “Be careful”
Please update your server’s firewall to allow DbFace to connect to your database server. If you’ve got any issues, please contact us to get free support.
6 - IBM DB2
Connect to IBM in DbFace
IBM DB2
We are working hard on this section. It is coming soon!
7 - MongoDB
Connect to MongoDB in DbFace
Connect to MongoDB
Sign in DbFace with Administrator account, and tap “Add New Connection” in the dashboard.
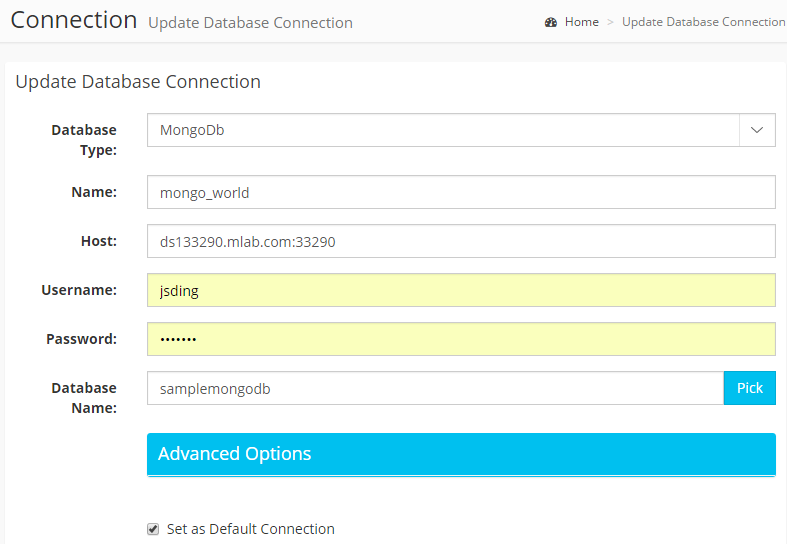
After fillout all the required fields, click “Submit” button, DbFace will try to connect to
MongoDb with your input information. You will be redirect to the “Database Structure” page.
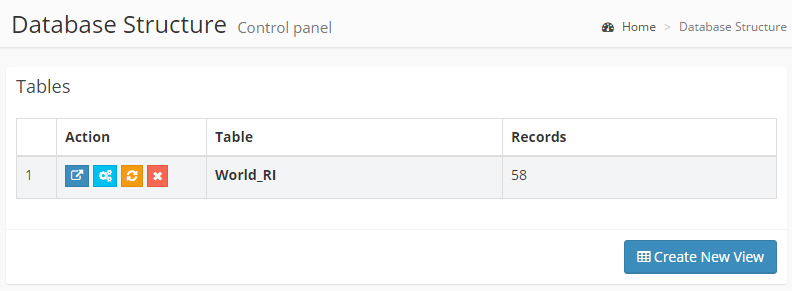
You can always click the “Views” button to enter this page.

Create Views
After connected to MongoDB, you need to create views using JSON query language.
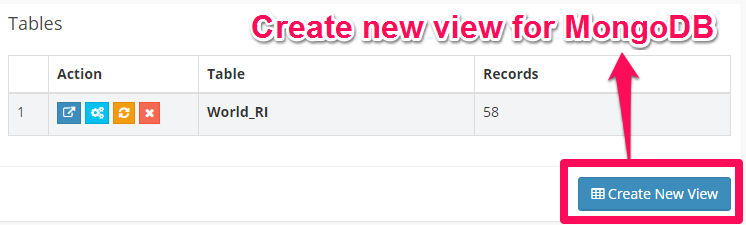 Click the “Create View” button in the “Database Structure” page.
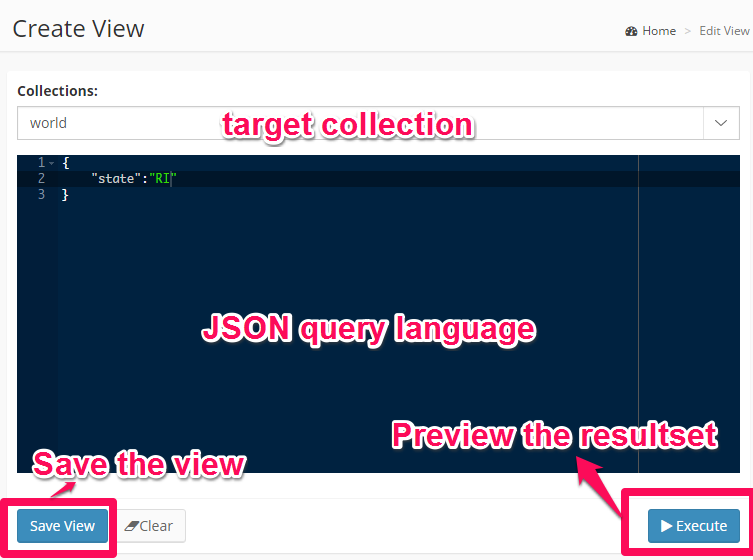
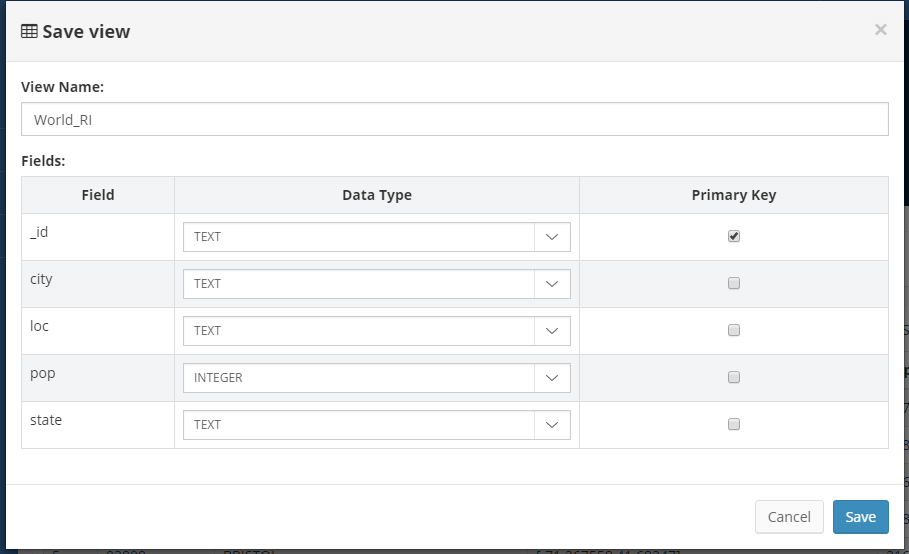
Click the “Save View” to open the “Save View” dialog.
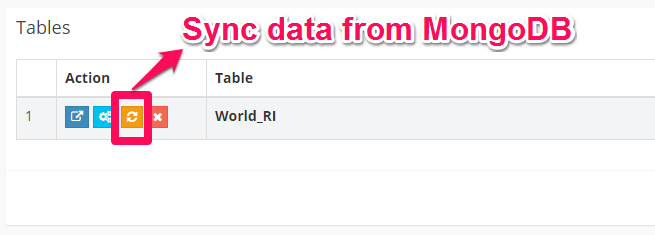
Sync data to DbFace from MongoDB
Click the “Sync” button to update the MongoDb data.
You can make as many views as you want.
Build Applications for MongoDB
Now you can create application reports in DbFace like MySQL or any other databases.
8 - SQLite3
Connect to SQLite3 in DbFace
Since SQLite3 is a file based database, we do not provide SQLite3 support on the cloud version, but you can still connect to SQLite3 on the premise installation.
To create SQLite3 connection
- STEP 1: Find the “Connections” section in the dashboard
- STEP 2: Tap “Add New Connection” button
- STEP 3: Select “SQLite3” in the Database Type drop down.
- STEP 4: Enter the SQLite3 absolute path in the “Database Name” field. If your SQLite3 is password protected, please enter the username and password in the corresponding form fields.
- STEP 5: Tap “Submit” button to save the connection

9 - Presto Db
Connect to Presto Db in DbFace
Presto Db
Presto is an open source distributed SQL query engine for running interactive analytic queries against data sources of all sizes ranging from gigabytes to petabytes.
With Presto, you can build visulization applications to Apache kafka and many other Presto supported connectors.
10 - Google BigQuery
Connect to Google BigQuery in DbFace
Google Big Query
We are working hard on this section. It is coming soon!
11 - Firebird
Connect to Firebird in DbFace
DbFace use PHP interbase driver to connect FireBird/Interbase database. You need to enable php-interbase extension. Open php.ini, and find
extension=php_interbase.dll
Click the Settings -> Connections and go to “Connections” section, click “Add New Connection” button, enter your firebird database information:

Your firebird database are powered by DbFace now.

12 - Cubrid
Connect to Cubrid in DbFace
DbFace use PHP CUBRID driver to connect CUBRID database. You need to enable php_cubrid extension. Open php.ini, and find
extension=php_cubrid.dll
Click the Settings -> Connections and go to “Connections” section, click “Add New Connection” button, enter your CUBRID database information:
Your firebird database are powered by DbFace now.
13 - Apache HBase
Connect to Apache HBase in DbFace
Apache HBase
We are working hard on this section. It is coming soon!
14 - Apache Cassandra
Connect to Apache Cassandra in DbFace
Apache Cassandra
Install DataStax PHP Driver
We use DataStax PHP Driver to connect to apache cassandra database. Please refer this linke to get how to install this driver:
https://github.com/datastax/php-driver
- Install DataStax PHP Driver
git clone https://github.com/datastax/cpp-driver.git
cd cpp-driver
mkdir build
cd build
cmake ..
make
make install
pecl install cassandra
15 - Amazon DynamoDB
Connect to Amazon DynamoDB in DbFace
Amazon DynamoDB
We are working hard on this section. It is coming soon!
16 - CSV Files
Connect to CSV Files in DbFace
DbFace also supports uploading CSV files as datasource.

After uploading the CSV files, DbFace will show you a preview of your CSV File: fields, data types. you can edit the fields names and data types and click the “Submit” button to create the database connection.
DbFace will make a copy of your CSV files at DbFace server.

17 - API Connector
Connect to API Connector in DbFace
DbFace only supports relational data sources, but you can also refine your No-SQL or any other data sources and make them work with DbFace.
DbFace provides a flexible user defined data source API that allows the extraction of data that is not stored in a database or when there is no standard connector available.
You can create your own API connector to make any data sources work with DbFace.

DbFace will curl your data via the API connector and make a copy of the response.
You can always click the “Sync” button to let DbFace get the fresh data from your data source.
The API connector must fit the JSON schema for working with DbFace:
{
   "table1": {
      "schema": [
         {
            "name": "field1",
            "type": "text"
         },
         {
            "name": "field2",
            "type": "text"
         }
      ],
      "data": [
         {
            "field1": "d11",
            "field2": "d12"
         },
         {
            "field1": "d21",
            "field2": "d22"
         }
      ]
   }
}
Supported data types:
Here is a sample response that works with DbFace.
https://dashboard.dbface.com/?module=Sample&action=rest
If you need help to make your own API connector, please contact us.
18 - Plugin Application Data
Plugin Application Data in DbFace
!!! Tip
Data Source Plugin only works on On-premises installation or Enterprise Plan.
If your data does not store in databases or even there is no data store. DbFace also works for your case with Data Source Plugin.
Write Data Source Plugin
Each data source plugin requires 2 entry files: plugin.setup.php and API.php
You can get the Sample Data Source plugin from:
https://github.com/jsding/dbface-plugins
plugin.setup.php
<?php
return array(
  'id'              => 'sample_plugin',
  'author'          => 'DbFace',
  'author_url'      => 'https://www.dbface.com/',
  'name'            => 'Sample Data Source Plugin',
  'description'     => 'Sample data source plugin that help you build DbFace plugin that make your application work with DbFace. <a href="https://github.com/jsding/dbface-plugins">https://github.com/jsding/dbface-plugins</a>',
  'version'         => '0.9.0',
  'namespace'       => 'Plugin\Datasource\Sample'
);
| Name | Required | Description |
| id | Yes | Plugin ID (unique) |
| author | No | Plugin author |
| author_url | No | Plugin author website |
| name | Yes | The plugin name |
| description | Yes | The plugin description |
| version | Yes | The plugin version |
| namespace | Yes | The plugin php calss namespace |
API.php
!!! warning “Please Note”
The API class namespace must be the namespace value in plugin.setup.php.
<?php
// Must match the namespace value in plugin.setup.php
namespace Plugin\Datasource\Sample;
/**
 * Apache Log Analytics Plugin for DbFace - by DbFace
 *
 * @package		plugins/datasources/apache-log
 * @author		DbFace
 * @copyright	Copyright (c) 2017 DbFace, Inc.
 * @link		https://www.dbface.com
 * @since		Version 1.0
 */
class API {
  private $database;

  /**
	 * accept data source configuration
	 *
   *
	 * @return array schemas array
	 */
  public function setup($config = array()) {
    $this->database = $config['database'];
  }

  /**
	 * get schemas of this data source
	 *
   *
	 * @return array schemas array
	 */
  public function get_schemas() {
    // TODO: do your business and get the schemas finally
    return array(
      'sample_view1' => array(
        'fields' => array(
          'id' => array('type'=> 'integer', 'pk'=>1),
          'comment' => array('type'=> 'string')
        )
      )
    );
  }

  /**
	 * get datas of this specific schema
	 *
	 * @return array datas of the schema
	 */
  public function get_datas($schema) {
    // TODO: do your business and finally get the resultset for $schema
    $result = array(
      array('id'=>0, 'comment'=>'this is string1'),
      array('id'=>1, 'comment'=>'this is string2'),
      array('id'=>2, 'comment'=>'this is string3'),
      array('id'=>3, 'comment'=>'this is string4')
    );
    return $result;
  }
}
| Method Name | Parameter | Description |
| setup | $config | Pass the database configuration |
| get_schemas | void | Return all the views |
| get_datas | $shema | Return all json data of the specific schema |
Use Data Source Plugin
Once you finished your data source plugin, place all the files in plugins/datasources folder, DbFace will scan all the subfolders and list all the available plugins in the Plugin category.
Now, we can make a new connection that use the plugin.
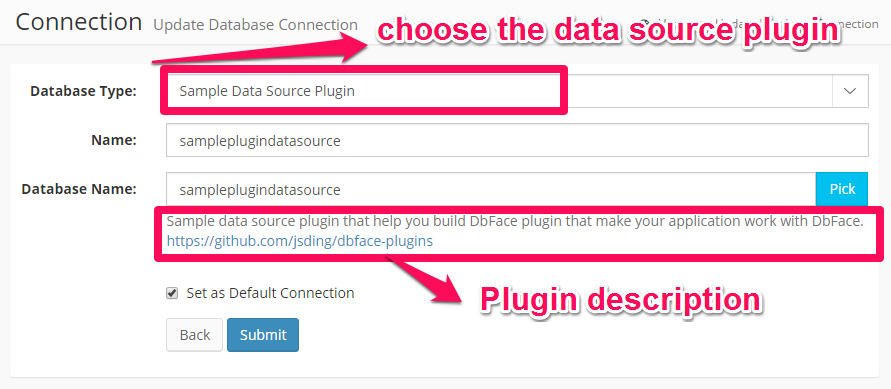
| Field | Description |
| Database Type | The data source plugin name |
| Name | The name that identify the connection |
| Database Name | Internal name that will pass to plugin |
Click “Submit” button, DbFace will create a new connection that use your data source plugin.

Click the “Sync” button to run the plugin.
!!! warning “Please Note”
Do not forget to click “Sync” button to let DbFace know the data source changes.
Now, you can use the data source to create report applications just like MySQL or any other database connections in DbFace.
19 - Microsoft Access
Connect to Microsoft Access in DbFace
Microsoft Access
Tip
Microsoft Access support was outdated and removed since V8.0. Please contact us for bringing it back.
Microsoft Access is only supported at on-premise installation on Windows. DbFace use PHP ODBC driver to connect to Access.
To connect to Access, you need to create ODBC data source first
- Open the ODBC Data Source Administrator (How to?)
- On the User DSN tab or the System DSN tab, click Add to add a user data source or a system data source.
Now, you can use the DSN in DbFace on the Access connection page:

20 - Warehouse
DbFace internal warehouse
Warehouse
DbFace warehouse feature provides a way to do cross database reporting applications, even your database located at different hosts.
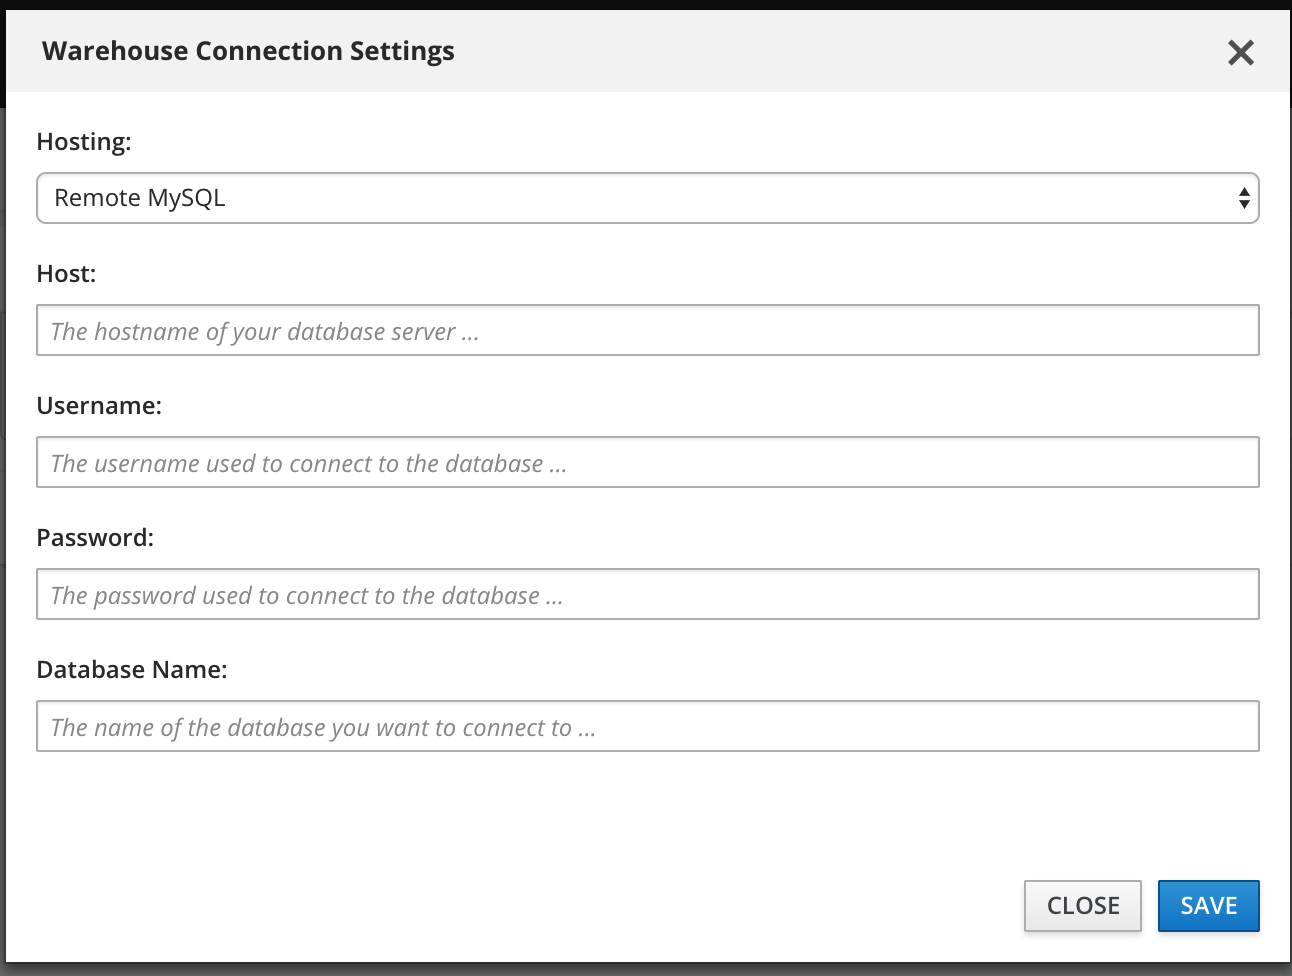
Warehouse Database Settings
DbFace stores all warehouse data in local SQLite3 database (the file will be created in dbface user directory). You can also configure it to existing remote MySQL database to gain better performance.
Click the gear icon button at the top right corner of Warehouse page,
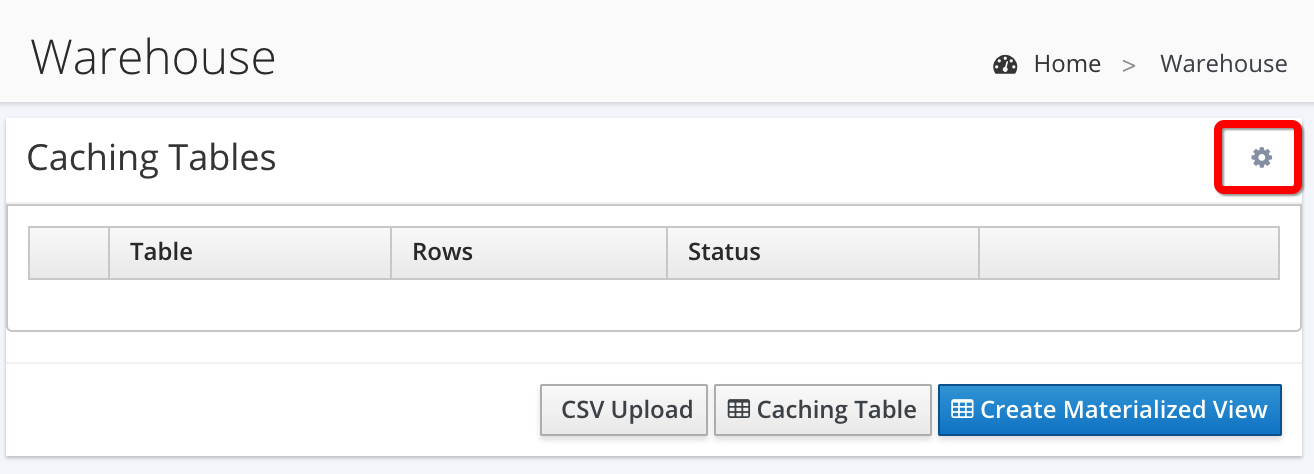
At the popup dialog, change the hosting to Remote MySQL
Warehouse API


